Your cart is currently empty!
Category: Food & Drink
Auto Added by WPeMatico
-
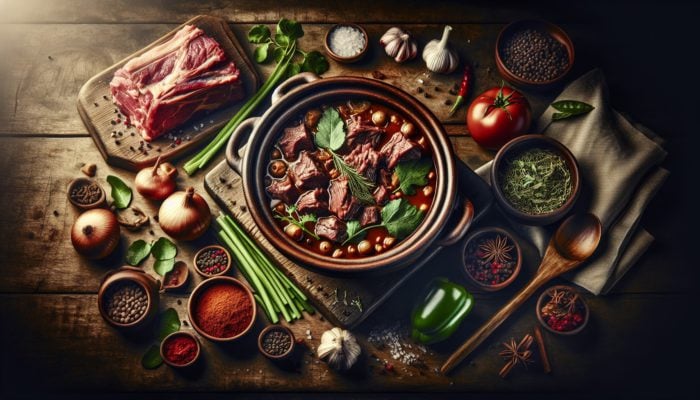
Winter Stew Recipes for Cozy Comfort and Warmth
Discover the Art of Creating Hearty and Flavorful Stews
Enhance Your Stews with the Perfect Protein Selections: Beef, Lamb, and More
Top Winter Stew Recipes for Warmth: Selecting the ideal protein is crucial for crafting a rich and satisfying stew. The choice of meat forms the core of your dish’s heartiness and flavor, with options like beef and lamb offering depth and tender textures when cooked slowly. It is imperative to choose cuts that excel during prolonged cooking periods; this method allows the meat to become delectably tender, while simultaneously enriching the stew with its savory juices, creating a comforting and flavorful experience.
When evaluating your protein selections, consider these key ingredients:
- Beef chuck: An exceptional choice for slow cooking, this cut becomes incredibly tender and flavorful.
- Lamb shanks: These impart a distinctive, earthy taste and transform into a soft delight when braised.
- Pork shoulder: Renowned for its subtly sweet flavor and impressive moisture retention.
- Chicken thighs: More succulent than breasts, they are ideal for hearty stews.
- Venison: A fantastic gamey alternative that pairs exquisitely with rich, earthy flavors.
- Tofu or tempeh: Outstanding vegetarian choices that soak up flavors beautifully.
- Seafood: Fish or shellfish can lend a lighter twist to traditional stews.
- Beans or lentils: These plant-based proteins bolster the stew’s substance and nutritional value.
Integrating a variety of proteins can elevate the excitement and taste of your stews. Consider marinating your meats with an array of spices or herbs prior to cooking; this practice deepens their flavor, resulting in a more complex and satisfying dish.
Integrate Essential Vegetables: The Importance of Root and Leafy Greens
Root vegetables serve as the vital backbone of any excellent stew, providing both heartiness and comfort. Ingredients like Potatoes, carrots, and parsnips contribute natural sweetness along with essential nutrients. Leafy greens, such as spinach or kale, add vibrant colors and additional health benefits, creating a dish that is both visually appealing and nutritionally balanced.
Striking a balance of flavors and textures among your vegetables is critical for achieving the perfect stew. For instance, combining the starchy goodness of potatoes with the earthy flavor of turnips or the sweetness of carrots can produce a harmonious blend. Beyond taste, it’s beneficial to consider the nutritional profile of your vegetables:
– Carrots provide vitamin A and introduce natural sweetness.
– Potatoes serve as an excellent source of carbohydrates that can help thicken the stew.
– Parsnips bring a unique flavor that complements root vegetables beautifully.
– Onions add depth and aroma, enhancing the overall experience.
– Garlic boosts flavor and imparts significant health benefits.
– Celery contributes a subtle crunch and heightens the stew’s fragrance.
– Spinach and kale are rich in iron and fiber, upping the stew’s nutritional profile.
– Tomatoes can introduce acidity and richness, brightening the dish considerably.When prepping your vegetables, aim for uniform cuts to ensure even cooking and a consistent texture throughout the stew.
Elevate Flavor with High-Quality Broths and Seasonings
A well-crafted broth is the essence of any stew, serving as the foundation that melds all its ingredients. Whether you opt for chicken, beef, or vegetable broth, the liquid you choose will greatly impact the overall flavor profile of the stew. Infusing seasonings such as thyme, bay leaves, and parsley can elevate your dish, enriching the depth of flavor with each bite.
Experimenting with various combinations of broths and seasonings can lead to delightful discoveries that enhance the overall taste experience. Here are some suggestions to consider:
– Beef broth: Imparts a rich and deep flavor, especially well-suited for beef stews.
– Chicken broth: A lighter yet flavorful option, ideal for poultry-based dishes.
– Vegetable broth: Perfect for vegetarian stews, providing a nutritious foundation.
– Red or white wine: A splash can brighten flavors and add acidity.
– Soy sauce: Enhances umami, particularly in Asian-inspired stews.
– Worcestershire sauce: Adds a savory depth to meat dishes.
– Fresh herbs: Incorporating herbs at the end of cooking brings a touch of brightness and freshness to your meal.Maintaining a balance of flavors is essential, so be sure to taste as you go to achieve your desired flavor profile.
Perfecting Cooking Techniques: Mastering Slow-Cooking and Braising

Mastering cooking techniques such as slow-cooking and braising is essential for achieving tender meat and harmonizing flavors in your stew. Slow cooking allows proteins to gradually break down, resulting in an amazing melt-in-your-mouth experience. Braising, which combines both wet and dry heat, is particularly effective for tougher cuts of meat, transforming them into succulent, flavor-packed morsels.
Implementing these cooking methods requires a few essential techniques:
– Searing: Begin by browning your proteins and vegetables to develop a rich crust and depth of flavor.
– Simmering: After adding liquids, bring your stew to a gentle simmer, allowing flavors to meld over an extended cooking period.
– Slow cooker options: For convenience, a slow cooker allows you to set it and forget it, achieving similar results without constant supervision.
– Pressure cooking: A modern approach, pressure cookers can drastically reduce cooking time while still yielding tender results.Understanding the nuances of these cooking techniques can significantly enhance the quality of your stew. Each method has its unique advantages, so don’t hesitate to experiment and discover what works best for your specific recipe.
Exploring Thickening Agents: Flour, Cornstarch, and Alternative Options
Achieving the perfect consistency in your stew often hinges on selecting the right thickening agents. Flour and cornstarch are popular choices, each offering distinctive contributions to the texture and flavor of the stew. Flour thickens by introducing a slight graininess, while cornstarch delivers a glossy finish without significantly impacting the dish’s overall taste.
Consider these thickening options:
- Flour: Create a roux by cooking flour with fat before incorporating it into the stew.
- Cornstarch: Mix with cold water to create a slurry before adding it to the stew.
- Pureed vegetables: Blending a portion of the cooked vegetables can naturally thicken the stew.
- Arrowroot powder: A gluten-free thickener that works quickly, ideal for clear broths.
- Mashed potatoes: Adding mashed potatoes enriches the stew while naturally thickening it.
- Beans or lentils: These can break down and thicken the stew while adding protein.
- Roux: A combination of flour and fat cooked together can serve as a versatile thickener.
- Reducing the broth: Simmering your stew uncovered can concentrate flavors and naturally thicken the liquid.
Experiment with these approaches to discover your preferred method for achieving the desired thickness without sacrificing flavor.
Expert Strategies for Mastering the Best Winter Stew Recipes
Inspiring Real-Life Examples of Flavorful Stew Recipes

Exploring real-life stew recipes can spark your culinary creativity and inspire your cooking adventures. Each recipe has unique characteristics that define its essence and elevate the entire dish. Here are some standout features of successful stew recipes:
- Layering flavors: Effective recipes often build depth through multiple cooking stages.
- Seasonal ingredients: Utilizing fresh, in-season produce enhances both taste and nutritional value.
- Slow cooking: Patience is key; allowing stews to simmer achieves depth and complexity.
- Balance: A good stew harmonizes bold and subtle flavors, ensuring that no single ingredient overshadows the others.
- Serving suggestions: Many recipes provide recommendations for accompaniments, enriching the overall meal experience.
- Adaptability: Successful recipes can be customized with various proteins or vegetables.
- Colorful presentations: Aesthetic appeal is vital; vibrant colors entice and excite the palate.
- Herbs and spices: Thoughtful seasoning can elevate a basic stew into something extraordinary.
Diving into these recipes can unveil techniques and flavor combinations you might not have considered, enriching your culinary repertoire and making your stews truly remarkable.
Practical Steps to Streamline Your Stew Preparation
Efficiently preparing a stew involves several actionable steps that can simplify your cooking process and ensure a successful outcome. Here are practical tips to streamline your stew preparation:
1. Mise en place: Gather and prepare all your ingredients before you start cooking. This includes chopping vegetables, measuring spices, and prepping proteins. Having everything ready will make your cooking process smoother and more efficient.
2. Sear proteins first: Always begin by searing your meat; this not only enhances flavor but also adds depth to the overall dish. Browning creates a caramelized surface that enriches your stew.
3. Layer flavors: After searing, add your aromatics like onions and garlic to the pot, allowing them to sweat out their flavors before introducing the liquids. This layering technique yields a more flavorful stew.
4. Add liquids gradually: When incorporating broth or wine, do so gradually. This assists in deglazing the pot, lifting the fond (the browned bits stuck to the base), ensuring maximum flavor incorporation.
5. Simmer gently: Once all ingredients are combined, bring the stew to a gentle simmer. This low-and-slow cooking method allows flavors to meld beautifully while ensuring the meat becomes tender.
6. Taste and adjust: Throughout the cooking process, continually taste your stew and adjust seasonings as needed. Adding salt, pepper, or herbs at various stages can significantly affect the final taste, enhancing enjoyment.
7. Rest before serving: Let your stew rest for a few minutes before serving. This allows the flavors to settle, enhancing the overall experience and making each bite more delicious.
By following these actionable steps, you can streamline your stew preparation process and ensure a consistently delicious outcome, delighting your family and friends with hearty meals.
Expert Insights on Effective Stew Cooking Techniques
Understanding cooking techniques can profoundly impact your stew’s outcome, making it essential to grasp the significance of methods such as slow cooking and braising. Slow cooking enables uniform heat distribution, critical for breaking down tough cuts of meat. This method particularly suits stews that thrive from prolonged cooking times, resulting in tender meat and well-blended flavors that comfort the palate.
Conversely, braising combines both dry and wet cooking techniques, where food is first browned in fat and then cooked slowly in a liquid. This approach is ideal for tougher cuts, allowing them to become tender while infusing the stew with rich flavors from the meat and other ingredients.
The choice of cooking method also influences the stew’s overall texture. Slow-cooked stews tend to have a more homogeneous consistency, as everything melds together beautifully. In contrast, braised stews may retain distinct pieces of meat and vegetables, offering a pleasing variety of textures that enhance the dining experience.
For those experimenting with different cooking techniques, consider the following:
1. Slow cooker: Perfect for busy schedules, simply throw in all your ingredients in the morning and return to a perfectly cooked stew by evening, ready to enjoy.
2. Dutch oven: This versatile pot is ideal for both stovetop and oven cooking, providing excellent heat retention and distribution for braising, ensuring even cooking.
3. Pressure cooker: For a quick fix, pressure cookers can significantly reduce cooking time while still yielding tender meat that retains its flavor and texture.Understanding the strengths of each cooking method allows you to select the most suitable one for your desired stew. Experimenting with these techniques can lead to discoveries and improved results, making your culinary adventures even more enjoyable.
Highlight Seasonal Ingredients for Heartwarming Winter Stews
Utilizing seasonal ingredients enhances your stew, ensuring the best flavors and nutritional benefits. Winter provides the perfect opportunity to embrace hearty root vegetables, robust greens, and warming spices, as certain ingredients peak during the colder months, making them ideal for stews.
Consider incorporating these key seasonal ingredients:
- Root vegetables, such as carrots, turnips, parsnips, and potatoes, are in season, adding heartiness and nutrition.
- Winter squash: Varieties like butternut or acorn squash can introduce natural sweetness and texture.
- Cabbage: A humble leafy green that adds volume and nutritional value to your stew.
- Kale: A nutrient powerhouse, kale thrives in winter and adds color and texture.
- Celery: Provides a subtle crunch and aromatic quality to your stew.
- Beef or lamb: These meats often become more flavorful during winter months, making them perfect for robust stews.
- Herbs, such as fresh rosemary, thyme, or sage, thrive in winter and can significantly enhance the dish’s aroma and taste.
- Beans: Dried beans, such as kidney or pinto, are ideal for winter cooking, providing protein and substance to your stew.
Incorporating these seasonal ingredients not only elevates your stew’s taste but also supports local agriculture and ensures fresher produce. By focusing on what’s available during winter, you can create delicious and nourishing meals that reflect the season’s bounty, bringing comfort and warmth to your table.
Strategies for Achieving the Perfect Thickness in Your Stew
Utilizing Flour and Cornstarch for Optimal Stew Consistency
Thickening your stew for the ideal consistency can be accomplished with various agents, primarily flour and cornstarch. Each thickener brings unique characteristics to the table, influencing both texture and flavor in distinct ways, allowing you to tailor your stew precisely to your liking.
Flour, typically used for a roux, thickens by incorporating starch into the fat, which then combines with the liquid in your stew. This method helps create a heartier, more opaque stew with a slight graininess. In contrast, cornstarch is a gluten-free option that dissolves easily, providing a glossy finish without significantly altering the taste of the stew.
To compare their effects:
1. Flour:
– Thickens gradually and requires longer cooking to eliminate any raw taste.
– Can create a creamier texture, especially when used in a roux.
– May alter the color, giving the stew a lighter appearance.2. Cornstarch:
– Thickens quickly, often requiring only a few minutes of simmering.
– Best added as a slurry, mixed with cold water before incorporation into the stew.
– Maintains a clear broth appearance, perfect for lighter stews that require a more delicate touch.Choosing the right thickener depends on your desired stew consistency. For a classic, hearty stew, flour is often the go-to choice, while cornstarch is ideal for a quick-thickening solution that won’t alter the stew’s clarity or taste.
Pureeing Vegetables for Natural Thickness and Flavor
Pureeing some of the vegetables in your stew is an excellent method for achieving natural thickness while enhancing the dish’s flavor profile. By blending a portion of the cooked vegetables, you create a creamy texture without the need for added thickeners, allowing the natural flavors of the vegetables to shine.
Certain vegetables work particularly well for pureeing, including:
- Potatoes: Their starch content makes them a natural thickener when pureed, contributing to a smooth texture.
- Carrots: These not only add sweetness but also provide a beautiful color to the stew.
- Squash: Varieties like butternut or pumpkin become creamy when blended, enhancing the overall mouthfeel.
- Cauliflower: This versatile vegetable lends a smooth texture without overwhelming flavors.
- Beans: Blending beans can add creaminess and protein to the stew, further enriching it.
- Peas: Offer a pop of color and sweetness when pureed, making them a delightful addition.
- Tomatoes: Pureeing tomatoes can provide depth and richness, enhancing the overall flavor profile.
- Celery: While subtle, it can enhance the overall texture and flavor when blended into the stew.
To incorporate this method, remove a portion of the cooked vegetables from the pot, blend them until smooth, and return them to the stew. This not only thickens the stew but also infuses it with vibrant flavors, making your dish even more comforting and hearty.
Reducing the Stew on the Stove for Concentrated Flavors
Reducing your stew by simmering it uncovered is an effective technique for concentrating flavors and achieving the desired thickness. This method involves cooking the stew over low heat, allowing steam to escape, which thickens the liquid and intensifies the flavors, resulting in a more robust and satisfying dish.
The key to successful reduction is timing. Typically, simmering for about 20 to 30 minutes on low heat after the initial cooking phase can yield excellent results. Stir occasionally to prevent sticking, and keep an eye on the consistency to avoid over-thickening.
To determine the right thickness, use a simple guideline:
1. Coat the back of a spoon: Dip a spoon into the stew; if the liquid coats it and leaves a line when you run your finger through it, it’s ready.
2. Taste as you go: Reducing flavors can become more pronounced, so adjust seasonings accordingly as you simmer for the best results.
3. Consider the final serving: Remember that the stew will thicken further as it cools, so aim for a slightly thinner consistency than you envision for the final dish.Reducing your stew not only enhances its flavor but also creates a satisfying texture, making each bite a warming experience that brings comfort on chilly days.
What Are the Benefits of Enjoying Stews During Winter?
Understanding the Nutritional Value of Hearty Stews
Stews provide a plethora of nutritional benefits, making them an excellent choice for winter meals. By incorporating a diverse range of ingredients, you can create a well-rounded dish that covers essential nutritional bases. The combination of proteins, vegetables, and seasonings contributes to a balanced and satisfying meal that nourishes both body and soul.
For example, lean meats such as chicken or beef offer valuable protein, essential for muscle health and repair, especially during the colder months. Vegetables contribute essential vitamins and minerals, with root vegetables providing carbohydrates for energy. Including legumes, such as beans or lentils, introduces fiber and plant-based protein, making stews more filling and nutritious, ideal for winter comfort.
Moreover, the cooking methods utilized in preparing stews, such as slow cooking or braising, can enhance nutritional absorption. By cooking vegetables gently, you can retain more of their vitamins compared to boiling, ensuring you receive the maximum benefit from your ingredients. The integration of spices and herbs not only enriches flavor but can also add health benefits, such as antioxidants and anti-inflammatory properties, making stews a wholesome choice.
Ultimately, stews serve as an efficient way to consume a variety of nutrients in one dish, supporting a balanced diet during the winter months while keeping you warm from the inside out.
Finding Comfort and Warmth in Hearty Meals
There’s an undeniable comfort that comes with enjoying a warm bowl of stew on a cold winter day. Consuming warm, hearty meals can significantly impact mood and emotional well-being. Nourishing dishes like stew evoke a sense of comfort, alleviating feelings of anxiety and stress while promoting overall well-being.
The warmth from hot meals triggers physiological responses within the body. Heat helps soothe, encouraging relaxation and creating a sense of contentment that is difficult to replicate with cold dishes. The rich aromas of stews wafting through the kitchen stimulate appetites and create a welcoming atmosphere, perfect for gatherings with family and friends.
Moreover, the communal aspect of sharing a stew can strengthen bonds and create lasting memories. The social interaction involved in sharing meals contributes to enhanced mental health and well-being, making stews not just a meal but a comforting ritual during winter, fostering connections and warmth among loved ones.
Time and Cost Efficiency of Preparing Hearty Stews
Stews excel in both time and cost efficiency. Often made with affordable ingredients, stews are an economical choice for feeding a crowd or batch cooking for the week. The ability to utilize less expensive cuts of meat and seasonal vegetables allows you to create hearty meals without overspending, making them a smart choice for family dinners.
Additionally, stews are incredibly time-efficient because they can be prepared in large quantities, enabling you to cook once and eat multiple times throughout the week. This not only saves time in the kitchen but also reduces the need for extensive meal prep, simplifying your life. Leftover stews can be easily reheated, retaining their delicious flavors and nutrients, ensuring that nothing goes to waste.
Furthermore, the slow cooking process allows for hands-off preparation. You can start your stew in the morning and let it simmer throughout the day, returning to a fully cooked, flavor-packed meal that’s ready to enjoy. This convenience makes stews a practical choice for busy lifestyles, allowing you to savor homemade comfort food without the need for daily cooking or extensive effort.
Creative Twists on Classic Stew Recipes
Incorporating Flavors from Diverse Culinary Traditions
Stews are remarkably versatile and can be adapted to include flavors from different cuisines, offering endless possibilities for culinary experimentation. By infusing your stew with spices and techniques from various culinary traditions, you can create unique flavor profiles that excite the palate and distinguish your dishes.
For instance, consider adding cumin and coriander for a Middle Eastern flair, or incorporating curry powder for an Indian-inspired twist. Here are some unique spice combinations to try:
- Mexican: Add chipotle, cumin, and oregano for a spicy kick that warms the soul.
- Italian: Incorporate basil, oregano, and garlic for a classic flavor combination that feels like home.
- Moroccan: Use cinnamon, turmeric, and saffron for an aromatic stew that delights the senses.
- Asian: Add ginger, sesame oil, and soy sauce for umami-rich flavors that elevate your stew.
- French: Herbs de Provence, garlic, and white wine can elevate your stew to gourmet levels.
- Caribbean: Add allspice, thyme, and scotch bonnet peppers for a tropical flair that excites the taste buds.
- Thai: Incorporate lemongrass, coconut milk, and lime for a refreshing twist that brightens the dish.
- Southern: Include Cajun spices for a hearty, soulful stew that embodies comfort food.
Experimenting with these flavor profiles allows you to explore the world through your cooking, making each stew a delightful journey that transports you to new culinary heights.
Adding Unexpected Ingredients for a Unique Touch
Incorporating surprising ingredients into your stew can transform a simple dish into something extraordinary. Unconventional additions can enhance the depth and complexity of flavors, offering a fresh take on traditional recipes that surprise and delight.
Consider these unexpected ingredients to elevate your stew:
- Chocolate: A small amount of dark chocolate can deepen the richness, especially in beef stews.
- Fruits: Dried apricots, raisins, or apples can add sweetness and balance to savory flavors, creating a delightful contrast.
- Beans: Adding kidney beans or chickpeas can contribute both texture and protein, making the stew more filling.
- Beer or stout: Incorporating a splash of beer can add a unique depth to beef or lamb stews, enhancing their overall flavor.
- Nut butters: A spoonful of peanut or almond butter can introduce creaminess and a nutty undertone that surprises the palate.
- Pickles or olives: These can add a surprising briny note, enhancing the overall flavor profile and adding complexity.
- Spicy peppers: Fresh or dried chili peppers can introduce welcomed heat, making your stew more exciting.
- Herb pesto: Stirring in pesto just before serving can add freshness and vibrancy that brightens the dish.
These unexpected ingredients can transform your stew, introducing new textures and flavors that tantalize and delight, making each meal an adventure in taste.
Experimenting with Textures for a Multi-Dimensional Dish
The texture of a stew plays a significant role in the overall eating experience. By experimenting with different textures, you can create a dish that is not only comforting but also intriguing to the palate. Consider incorporating elements that add crunch, creaminess, or heartiness to your stew to enhance its appeal.
To elevate the texture, consider these options:
- Croutons: Serving your stew with crunchy croutons on top adds a delightful textural contrast.
- Toasted nuts: Chopped almonds or walnuts provide a satisfying crunch and nutty flavor that complements the stew.
- Cheese: A sprinkle of grated cheese can add richness and creaminess, enhancing the overall experience.
- Fried shallots: These add a crispy layer of texture, enhancing the dish’s appeal with their savory crunch.
- Fresh herbs: Adding chopped parsley or cilantro just before serving introduces freshness and a pop of color to your stew.
- Pasta or rice: Incorporating cooked pasta or rice adds heartiness and a contrasting texture that can enhance the dish’s overall appeal.
- Vegetable garnish: Freshly sliced radishes or crunchy cucumbers provide a refreshing contrast to the warmth of the stew.
- Mashed potatoes: Adding swirls of mashed potatoes to your stew creates a creaminess and a contrasting texture that is simply delightful.
By incorporating different textures, your stew can become a multi-dimensional dish that delights the senses, ensuring a truly enjoyable meal for everyone at the table.
Exploring Regional Stew Traditions for Culinary Inspiration
Delving into regional stew traditions provides insight into the diverse ways cultures interpret this comforting dish. Each region contributes its unique spin, shaped by local ingredients, climate, and culinary customs. Whether it’s the hearty Irish stew or the fragrant Moroccan tagine, every variation tells a story that reflects its cultural origins.
For instance, traditional Irish stew is characterized by its simplicity, featuring lamb or beef, potatoes, and carrots, highlighting the natural flavors of the ingredients in a comforting manner. In contrast, Moroccan tagine incorporates warming spices like cinnamon and cumin, along with dried fruits and nuts, crafting a sweet and savory profile that tantalizes the taste buds.
Similarly, French coq au vin elevates chicken stew by braising it in red wine with mushrooms and lardons, showcasing the importance of quality ingredients and technique in French cuisine. In Brazil, the feijoada stew features black beans and assorted meats, emphasizing the country’s rich culinary heritage and the communal aspect of sharing meals.
Learning about these regional traditions can inspire new approaches to your stews, encouraging creativity and exploration in your cooking. Adapting techniques and flavor profiles from around the world can lead to delightful culinary creations that bring warmth and comfort to your dining table.
Modern Twists on Classic Stews for Exciting Flavor Experiences
Incorporating modern cooking techniques and contemporary ingredients can breathe new life into classic stew recipes, transforming traditional dishes into innovative creations. Fusion cuisine, which blends elements from different culinary traditions, can inspire exciting new stew recipes that reflect today’s culinary landscape.
Consider these modern twists:
- Slow cooker technology: Utilize a slow cooker to simplify the cooking process while still achieving rich flavors and tender meats.
- Instant pot: For a speedy meal, leverage an Instant Pot to pressure cook your stew, significantly reducing cooking time.
- Plant-based alternatives: Experiment with vegan proteins, such as jackfruit or textured vegetable protein, to create a satisfying plant-based stew.
- Sous vide: Cooking meat sous vide ensures precise temperature control, resulting in incredibly tender meat that melts in your mouth.
- Global ingredients: Incorporate flavors from various cuisines, such as miso for umami or harissa for heat, adding depth to your stew.
- Creative garnishes: Top your stew with unusual herbs or pickled vegetables for added freshness and intrigue that surprises the taste buds.
- Cauliflower rice: Serving your stew over cauliflower rice provides a lower-carb alternative that still feels hearty and satisfying.
- Spiralized vegetables: Use spiralized zucchini or sweet potato as a base for a modern touch that adds visual appeal and nutrition.
These modern approaches not only keep classic stews exciting but also allow for healthier adaptations, making them perfect for today’s culinary landscape, where innovation meets nourishment.
Proven Strategies for Crafting Top Winter Stew Recipes
Efficient Meal Planning for Hearty Stews
Meal planning is an effective strategy for maximizing your stew recipes, ensuring you have delicious, homemade meals ready to go throughout the week. Integrating stews into your meal planning can simplify grocery shopping and cooking while significantly reducing food waste.
Start by designating one or two days each week dedicated to creating stews. This allows you to prepare larger batches that can be stored for later use, making mealtime easier and more convenient. Consider these planning strategies:
1. Choose a base recipe: Start with a classic stew recipe that you can easily adapt by changing proteins or vegetables based on what’s in season or on sale, keeping meals fresh and exciting.
2. Make a shopping list: List all ingredients needed for your stews, ensuring you have everything on hand when it’s time to cook. This helps avoid last-minute trips to the grocery store, saving you time and effort.
3. Cook in bulk: Prepare double or triple batches of stew to freeze for later. Portion them into individual servings for convenient reheating throughout the week, making lunches and dinners hassle-free.
4. Mix and match: Create a rotation of different stews to keep meals exciting. This prevents monotony and allows you to explore various flavor combinations that cater to varying tastes.
5. Plan sides: Consider what accompaniments will pair well with your stews, such as crusty bread, rice, or salads, to create a balanced meal that satisfies all cravings.
6. Label and date: When freezing stews, clearly label and date containers to keep track of freshness, ensuring you enjoy them at their best.By planning your meals around stew recipes, you can enjoy nutritious, hearty dishes with minimal daily effort, making mealtime a breeze and allowing you to focus on enjoying time with loved ones.
Storing and Reheating Stews for Maximum Freshness and Flavor
Proper storage and reheating are crucial for maintaining the deliciousness and safety of your stews. Understanding the best practices for storing and reheating can help preserve flavor and texture, ensuring that your hard work in the kitchen doesn’t go to waste and your stews remain enjoyable.
For storing:
1. Cool before refrigerating: Allow your stew to cool to room temperature before placing it in the fridge to prevent condensation and sogginess that can detract from the dish’s quality.
2. Use airtight containers: Store your stew in airtight containers to maintain freshness and prevent flavor transfer with other foods, ensuring each serving is as delicious as the last.
3. Label with dates: Mark containers with the date prepared to keep track of freshness, as most stews can be refrigerated for up to 3-4 days without losing quality.
4. Freeze for longer storage: Stews freeze well, retaining flavors and textures. Portion them into freezer-safe containers or bags, removing as much air as possible to prevent freezer burn.For reheating:
1. Thaw properly: If frozen, thaw your stew in the fridge overnight or use the defrost function on your microwave for best results.
2. Reheat gently: Use a stovetop pot or microwave to reheat on low heat. Stir occasionally to ensure even heating and prevent sticking, allowing the stew to warm thoroughly.
3. Check temperature: Ensure the stew reaches an internal temperature of at least 75 degrees Celsius (165 degrees Fahrenheit) before serving to ensure it’s safe to eat.
4. Adjust consistency: If your stew thickens too much during storage, add a splash of broth or water when reheating to achieve your desired consistency, keeping the dish enjoyable and satisfying.By following these storing and reheating guidelines, you can enjoy your stews at their best, ensuring that hearty meals are always within reach and ready to warm you up.
Serving and Pairing Suggestions to Elevate Your Stew Experience
Serving your stew with the right accompaniments can elevate the entire meal experience, transforming a simple dish into a culinary delight. Thoughtful pairings can enhance the flavors of your stew while providing additional textures and aromas that entice the senses and make each meal special.
Consider these ideal pairings for different types of stews:
- Crusty bread: A hearty sourdough or baguette is perfect for scooping up stew, adding a satisfying crunch that complements the dish.
- Rice or grains: Serving stews over rice, quinoa, or barley adds substance and nutrition that rounds out the meal beautifully.
- Salads: A fresh green salad with a tangy vinaigrette can provide a refreshing contrast to the richness of the stew, balancing the meal.
- Mashed potatoes: Creamy mashed potatoes can complement the heartiness of a rich meat stew, creating a comforting combination.
- Cheese: Sprinkling grated cheese on top can add a rich layer of flavor, especially with tomato-based stews that benefit from added creaminess.
- Pickled vegetables: The acidity of pickles can cut through the richness and add brightness to your stew, enhancing the overall experience.
- Herb garnish: Fresh herbs like parsley or cilantro can brighten the dish and add a pop of color, making it visually appealing.
- Wine: Pair your stew with a glass of red wine for a classic, comforting meal that complements the dish beautifully.
These pairings not only enhance the overall dish but also create a more satisfying dining experience, making each meal memorable and enjoyable for everyone at the table.
Selecting High-Quality Ingredients for Delicious Winter Stews
Choosing quality ingredients is essential for creating a hearty and delicious winter stew. The right meats, vegetables, and spices can elevate your stew to new heights, ensuring a satisfying dining experience that warms you up on cold days.
When selecting ingredients, consider the following recommendations to create the best stew possible:
1. Meats: Opt for cuts that benefit from long cooking, such as beef chuck, lamb shanks, or pork shoulder. Choose well-marbled meats for added flavor and tenderness, ensuring they retain their texture during the cooking process.
2. Vegetables: Focus on seasonal root vegetables like potatoes, carrots, and parsnips. Adding leafy greens like kale or spinach can enhance nutritional value and provide more color to your dish.
3. Broths: Use high-quality homemade or store-bought broths. Organic or low-sodium options can provide a rich base without overwhelming saltiness that can mask the flavors of your other ingredients.
4. Herbs and spices: Fresh herbs like rosemary, thyme, and bay leaves can significantly improve flavor. Ensure that dried spices are fresh to guarantee maximum aroma and potency, enhancing the overall taste.
5. Thickening agents: Choose between flour or cornstarch based on your desired texture. Consider adding pureed vegetables for a natural thickener that enhances the flavor.
6. Acidic ingredients: A splash of vinegar or citrus can brighten up the stew, balancing richness and adding a layer of complexity that elevates the dish.
7. Quality oils: Use extra virgin olive oil or high-quality fats for sautéing ingredients, as they contribute significantly to the flavor and overall quality of your stew.By focusing on high-quality ingredients, you can create a winter stew that is both delicious and nourishing, warming you from the inside out and making every meal a special occasion.
Frequently Asked Questions (FAQs) About Hearty Stews
What type of meat works best for stew?
Cuts like beef chuck or lamb shanks are ideal for stew as they become tender when slow-cooked, providing rich flavor and texture that enhance the overall dish.
How long should I cook a stew?
Stews generally require 1.5 to 3 hours of slow cooking, allowing the flavors to meld beautifully and the meat to become tender and juicy, creating a comforting meal.
Can I freeze leftovers?
Yes, stews freeze well. Be sure to store them in airtight containers and label them with the date to track freshness, ensuring you can enjoy them later without compromising quality.
What are the best thickening agents for stews?
Flour and cornstarch are common thickeners, but pureed vegetables can also add thickness without compromising flavor, providing a natural and wholesome texture.
Should I add salt at the beginning or end of cooking?
It’s best to add salt gradually throughout the cooking process, adjusting to taste as flavors develop, ensuring your stew is seasoned perfectly without being overly salty.
Can I use frozen vegetables in stew?
Yes, frozen vegetables can be used. Just add them towards the end of cooking to avoid overcooking and ensure they retain their texture and flavor in the stew.
What’s the difference between braising and stewing?
Braising typically involves cooking larger pieces of meat in a small amount of liquid. In contrast, stewing generally uses smaller pieces cooked in more liquid, resulting in a different texture and flavor profile.
How do I make my stew more flavorful?
Incorporate herbs, spices, and umami-rich ingredients like soy sauce or Worcestershire sauce to enhance the flavor profile, elevating your stew to new, delicious heights.
Can I cook a stew in a slow cooker?
Absolutely! A slow cooker is perfect for making stews, allowing the flavors to develop gradually over several hours, resulting in a delicious and hearty meal with minimal effort.
What are some creative stew variations?
You can experiment with global flavors, try plant-based proteins, or add unique ingredients like chocolate or fruits for unexpected twists that keep your stews exciting and fresh.
Join Our Culinary Community on Facebook!
The post Top Winter Stew Recipes for Warmth: Cozy Comfort appeared first on https://cookinggods.com
The Article Winter Stew Recipes for Cozy Comfort and Warmth Was Found On https://limitsofstrategy.com
-

Herbal Butter Guide: Essential Tips for the UK
Comprehensive Guide to Selecting Ideal Herbs for Your Artisan Butter Creations
Explore the Best UK Herbs to Enhance Your Butter Flavors
Crafting outstanding herbal butter necessitates a thoughtful selection of the most appropriate herbs, which play a pivotal role in enhancing your culinary creations. Within the UK, various herbs are revered for their aromatic properties and adaptability, making them perfect for infusing into butter. Fresh herbs not only impart unique flavors but also add vibrant colors and enticing fragrances to your butter masterpieces. The top five herbs frequently utilized in the UK are:
- Parsley – A quintessential herb celebrated for its fresh, grassy taste.
- Chives – Recognized for their subtle onion-like flavor, chives enhance dishes without overpowering them.
- Thyme – This herb provides earthy notes, making it ideal for enriching savory recipes.
- Rosemary – Renowned for its robust flavor, rosemary pairs beautifully with various meats.
- <a href="https://mcrtherapies.co.uk/basil-boosts-immunity-discover-natures-hidden-benefits/">Basil</a> – A fragrant herb that contributes a sweet and slightly peppery taste, perfect for diverse culinary uses.
These herbs thrive in the temperate climate of the UK, making them readily available to both novice and seasoned gardeners, as well as shoppers at local markets. When selecting herbs for your butter, it’s essential to assess their distinct flavor profiles and how well they harmonize with the dishes you plan to create.
Where to Find Fresh Herbs in the UK?
Sourcing fresh herbs in the UK can be a delightful journey, whether you prefer visiting local farmers’ markets, browsing supermarket shelves, or cultivating a personal herb garden. The freshness of the herbs you choose is crucial when making herbal butter, as it greatly influences both the flavor and aroma. Local markets often feature freshly harvested herbs, enabling you to connect with growers and learn about their cultivation practices. While supermarkets typically provide a wide variety of herbs, opting for organic options is recommended whenever possible, as they usually deliver enhanced freshness and flavor.
If you’re interested in growing your own herbs, start with pots on a sunny windowsill or create a small herb garden patch. Many herbs require minimal upkeep and thrive with basic care. To ensure a plentiful harvest, it’s vital to supply them with adequate sunlight and water. By sourcing fresh herbs locally or growing them yourself, you can significantly improve the quality of your herbal butter, all while enjoying the satisfaction of using homegrown ingredients in your culinary endeavors.
How to Effectively Prepare Herbs for Butter Infusion?
Careful preparation of herbs is essential to ensure they release their full flavor into the butter during the infusion process. This meticulous handling transforms the herbs into aromatic components that enrich the taste of your butter considerably. Begin by rinsing the herbs thoroughly under cool, running water to remove any dirt or residue. After washing, gently pat them dry with a clean towel or allow them to air dry naturally.
The subsequent step involves finely chopping the herbs, which increases their surface area and encourages the release of essential oils during infusion. Using a sharp knife or herb scissors is recommended for this task. Here’s a simple checklist of preparation steps to guarantee your herbs are ready for infusion:
- Rinse the herbs in cool water to eliminate any soil.
- Pat dry or let the herbs air dry completely.
- Trim away any thick stems and discard them.
- Finely chop the herbs to maximize flavor release during infusion.
By adhering to these steps, you will effectively prepare your herbs, ensuring they impart their delightful flavors beautifully to your herbal butter.
Best Practices for Storing and Preserving Your Herb-Infused Butter

Properly storing herb-infused butter is essential for preserving its freshness and flavor over time. When prepared correctly, it can remain viable for several weeks in the refrigerator and even months in the freezer. For optimal storage, transfer your butter into an airtight container, which prevents exposure to air and light that can lead to quality degradation over time.
If you prefer to store your butter in logs or other shapes, consider wrapping it in parchment paper or foil. When freezing, it’s advantageous to portion the butter into smaller servings, which allows you to thaw only what you need at any given time. Here are some effective storage tips to prolong the life of your herbal butter:
- Utilize airtight containers to prevent oxidation and flavor loss.
- Label containers with the date of preparation and types of herbs used.
- Refrigerate for up to two weeks for short-term use.
- Store in the freezer for extended storage, thawing as needed.
These practices not only help maintain flavor integrity but also enable you to enjoy your homemade herbal butter long after its initial creation.
Professional Techniques for Crafting Exceptional Herbal Butter
Preferred Methods of Culinary Experts in the UK for Creating Herbal Butter
In the UK, culinary experts employ various techniques to produce herbal butter that accentuates the rich flavors of fresh herbs. A favored method is slow infusion, where softened butter is combined with finely chopped herbs and left to steep for several hours or overnight. This approach allows the flavors to meld, developing a deeper aromatic profile that enhances the overall taste of the butter. Many chefs endorse this technique, as it captures the natural essence of the herbs, transforming the butter into a flavor powerhouse.
Another commonly used technique by chefs is blending, which ensures a consistent mixture of butter and herbs. Utilizing a food processor enables chefs to seamlessly integrate the herbs into the butter, resulting in a smooth texture that is easy to spread. For example, renowned chef Yotam Ottolenghi often combines both slow infusion and blending methods to create vibrant herb-infused butters that significantly elevate his dishes.
By adopting these expert techniques, you can enhance the flavor of your herbal butter, ensuring it stands out as a gourmet addition to your dining experience.
How to Enhance the Flavor Profiles of Your Herbal Butter?

Enhancing the flavor profiles of your herbal butter requires creativity and a willingness to experiment. Combining various herbs can yield exciting results, allowing you to craft a unique butter that perfectly complements specific dishes. For instance, blending thyme with rosemary can create a robust butter ideal for meat dishes, while a mix of basil and chives can exquisitely elevate the flavors of delicate fish.
In addition to herb combinations, consider incorporating spices or citrus zest into your herbal butter. A sprinkle of smoked paprika can add a gentle warmth, while lemon or orange zest can infuse brightness into the overall flavor profile. Here are some actionable steps to experiment with flavor enhancement:
- Combine complementary herbs for a balanced flavor experience.
- Add spices like paprika or cayenne for an extra kick.
- Incorporate zest from citrus fruits to enliven flavors.
- Utilize garlic or shallots for added depth and complexity.
By following these strategies, you can create herbal butter that not only complements but also elevates your culinary creations, ensuring that every dish you serve is a memorable experience.
What are the Most Effective Methods for Storing Herbal Butter?
Properly storing your herbal butter is vital for preserving its flavor and freshness. In the UK, the most common and effective storage methods include refrigeration and freezing. For short-term storage, refrigerating the butter in an airtight container is ideal, allowing you to enjoy it within up to two weeks while retaining its aromatic qualities.
For longer storage, freezing is the preferred method, as it can extend the butter’s lifespan for several months. It’s advisable to portion the butter into small servings before freezing, allowing you to thaw only what you need at any given time. Consider using a silicone mould for shaping and freezing, as this facilitates easy removal once the butter is frozen.
Furthermore, ensure that you label your containers clearly with the date and types of herbs used, as this will help you track freshness. Adhering to these best practices will ensure that your herbal butter remains a delightful addition to your kitchen for weeks or even months ahead.
Detailed Process for Crafting Herbal Butter
How to Achieve the Perfect Consistency for Your Butter?
Softening butter is the initial and crucial step in creating herbal butter, as it simplifies the mixing process with herbs significantly. Achieving the right consistency is essential; the butter should be pliable yet not entirely melted. There are several effective methods to soften butter:
- Allow the butter to sit at room temperature for approximately 30–60 minutes.
- Cut the butter into small cubes to expedite the softening process.
- Microwave on a low power setting (10-15 seconds) for quick softening.
- Grate the butter using a box grater for immediate softening.
Selecting the method that suits your time constraints is critical. For example, letting butter sit at room temperature provides the best texture for mixing, while grating is effective for immediate use. Softened butter can be easily combined with herbs, ensuring a consistent flavor throughout the mixture.
What is the Best Technique for Mixing Herbs with Butter?
Mixing the herbs with the softened butter is a pivotal step in the process of making herbal butter. Achieving a uniform distribution of flavors is crucial for the final product. Begin by placing the softened butter in a mixing bowl and gradually incorporate the finely chopped herbs. Use a spatula or fork to thoroughly blend the ingredients, ensuring that every portion of butter is infused with the delightful herbaceous notes.
For an even smoother consistency, consider utilizing a food processor. This equipment can efficiently combine the butter and herbs, resulting in a creamy texture that is easy to apply. Remember to taste the mixture as you progress, adjusting the quantity of herbs to suit your individual palate.
The significance of this step cannot be overstated; thorough mixing is essential to ensure that your herbal butter provides a consistent flavor profile in every spoonful or swipe.
What are the Different Techniques for Shaping Butter?
Shaping your herbal butter not only enhances its visual appeal but also aids in portion control. There are several creative techniques to shape butter, each offering unique presentation advantages. One of the most traditional methods is rolling the butter into logs using parchment paper. This technique allows for easy slicing when serving.
Another popular approach is to use molds, which can create decorative shapes ideal for entertaining. Silicone molds are especially useful, as they provide flexibility for easy removal after the material has frozen. Alternatively, you can use ice cube trays to create small, individual servings that are ready to use. Here are a few shaping techniques to consider:
- Roll into logs using parchment paper for effortless slicing.
- Utilize silicone molds for aesthetically pleasing shapes.
- Employ ice cube trays for convenient single servings.
- Pipe into decorative shapes using a piping bag for an elegant presentation.
These techniques not only make your herbal butter visually appealing but also practical for various culinary applications.
What are the Best Practices for Storing and Preserving Herbal Butter?
Storing and preserving your herbal butter effectively is crucial for maintaining its flavor and freshness. After shaping your butter, selecting the appropriate storage method is important. If you plan to use the butter within a few weeks, storing it in a refrigerator in an airtight container is ideal. This will keep the butter fresh and flavorful while ensuring easy access.
For longer storage, freezing is the best option. Ensure that you wrap the butter tightly in plastic wrap or place it in an airtight container to prevent freezer burn. It’s beneficial to portion the butter before freezing for convenience, allowing you to thaw only what you need at any given time. Here’s a summary of effective storage practices:
- Refrigerate in an airtight container for up to two weeks.
- Store in the freezer for longer-term storage, wrapping tightly to prevent freezer burn.
- Portion the butter before freezing for convenience.
- Label containers with the date and types of herbs used.
By implementing these storage practices, you will ensure that your herbal butter remains a delightful addition to your culinary repertoire for an extended period.
How Does Herbal Butter Enrich UK Culinary Traditions?
Which Dishes Are Enhanced by the Addition of Herbal Butter?
The inclusion of herbal butter can significantly elevate a wide range of dishes within UK cuisine, providing depth and richness that enhance the overall dining experience. Classic meals, such as roast beef, gain immense flavor from rosemary- or thyme-infused butter, imparting aromas and tastes that beautifully complement the roasted meat.
Grilled fish, a favorite in coastal regions, becomes even more delectable when paired with lemon and chive butter, introducing a zesty freshness that harmonizes perfectly with delicate flavors. Additionally, traditional scones can be transformed from simple to sublime when served with herb-infused butter, offering a unique twist on this cherished British treat.
The versatility of herbal butter means it can be seamlessly incorporated into numerous dishes, making it an invaluable addition to your culinary toolkit. Whether enhancing a Sunday roast or elevating afternoon tea, herbal butter has the potential to transform everyday meals into extraordinary experiences.
How to Pair Herbal Butter with Local UK Ingredients?
Combining herbal butter with local ingredients is a fantastic way to celebrate the rich flavors of UK produce. For instance, pairing parsley-infused butter with freshly harvested Cornish crab enhances the seafood’s natural sweetness. In contrast, garlic and herb butter can elevate seasonal vegetables like asparagus or new potatoes, significantly enriching their flavor profiles.
Cheddar cheese, a staple in British cuisine, pairs wonderfully with thyme or chive-infused butter, creating a complementary spread that enhances the cheese’s rich, nutty flavors. Seasonal ingredients, such as spring greens and autumn root vegetables, especially shine when sautéed in herbal butter, showcasing the versatility of this culinary creation.
By thoughtfully pairing herbal butter with local ingredients, you create dishes that not only highlight the best of British produce but also offer a unique dining experience that reflects the region’s culinary heritage.
In What Ways Can Herbal Butter Elevate Traditional UK Recipes?
Herbal butter acts as a transformative ingredient that can elevate traditional UK recipes, adding layers of flavor and sophistication. For example, a classic shepherd’s pie can be enhanced with garlic and rosemary-infused butter, enriching the filling with aromatic notes that elevate this comforting dish to new heights.
Similarly, adding basil-infused butter to a simple pasta dish can elevate it into a gourmet meal. The infusion of fresh herbs enhances the pasta, allowing the flavors to meld beautifully. Even the iconic fish and chips can benefit from a drizzle of parsley and lemon butter, providing a refreshing twist to this beloved dish.
These enhancements not only improve the taste but also introduce an element of creativity, encouraging cooks to experiment with flavors and techniques. With herbal butter, even the simplest recipes can be transformed into extraordinary culinary experiences that delight the senses.
How Does Herbal Butter Complement British Tea Time Offerings?
Herbal butter can play a delightful role in enhancing the British tea time experience, particularly when served alongside scones and sandwiches. A spread of herb-infused butter on freshly baked scones adds a new dimension of flavor, beautifully complementing the sweetness of jam and clotted cream.
For sandwiches, a chive or dill-infused butter can elevate plain cucumber sandwiches from ordinary to extraordinary, delivering a refreshing burst of flavor with every bite. Furthermore, serving herbal butter on warm bread or toast during tea time can enhance the overall experience, transforming it into an indulgent afternoon treat.
Incorporating herbal butter into British tea time not only enriches these traditional offerings but also promotes creativity and exploration in this cherished ritual, making it more enjoyable for both guests and hosts alike.
Examining the Health Benefits of Herbal Butter in the UK
What is the Nutritional Value of Common UK Herbs?
The addition of herbs into herbal butter not only enhances flavor but also brings valuable nutritional benefits. Common UK herbs, such as parsley and thyme, are rich in vitamins, antioxidants, and essential oils that can support overall health. For instance, parsley is abundant in vitamin K, crucial for maintaining bone health, while thyme contains powerful antioxidants that may help protect against cellular damage.
Moreover, herbs like basil and rosemary offer anti-inflammatory properties, which can be beneficial for gut health and digestion. By incorporating these herbs into your butter, you not only amplify the taste but also enhance the nutritional profile of your culinary creations, making them a healthier choice for daily consumption.
The fusion of flavors and health benefits makes herbal butter a valuable addition to your diet, allowing you to enjoy delicious food while also supporting your well-being.
How Does Herbal Butter Contribute to a Balanced Diet?
Herbal butter can significantly support a balanced diet by providing essential nutrients in a delightful format. This type of butter enriches dishes that may otherwise lack flavor, encouraging individuals to include more vegetables, lean proteins, and whole grains in their meals.
When cooking with herbal butter, you can enhance the overall flavor of healthy ingredients, making them more appealing. For example, sautéing vegetables in garlic and rosemary-infused butter not only boosts their natural flavors but also promotes vegetable consumption, a key aspect of a balanced diet.
Furthermore, using herbal butter as a substitute for less healthy fats in cooking and baking provides a more nutritious alternative while still delivering richness and depth of flavor. By integrating herbal butter into your meals, you nurture a varied and balanced diet that is both enjoyable and health-conscious.
What Are the Health Benefits Associated with Fresh Herbs?
Incorporating fresh herbs into your cooking repertoire offers numerous health benefits, enhancing both the flavor of your dishes and supporting overall wellness. Fresh herbs are packed with essential vitamins and minerals; for instance, basil is noted for its antimicrobial properties, while oregano is rich in antioxidants that may help combat oxidative stress.
Utilizing fresh herbs in your butter can also improve digestion, as many herbs, such as fennel and mint, are recognized for their digestive benefits. Additionally, the anti-inflammatory properties found in herbs like turmeric and garlic can help reduce inflammation in the body, promoting overall better health.
By prioritizing fresh herbs in your cooking, you not only create delicious flavors but also enhance the nutritional value of your meals, contributing to a holistic approach to health and wellness.
How Can Herbal Butter Support Heart Health?
Herbal butter, particularly when infused with herbs known for their heart-healthy properties, can be a beneficial addition to a cardiovascular-conscious diet. Ingredients such as garlic and oregano have been linked to lower cholesterol levels and improved blood pressure, both crucial for maintaining heart health.
Infusing butter with these herbs can impart their advantageous properties into the fat, allowing you to enjoy their benefits with each use. By incorporating herbal butter into your cooking, you can elevate the flavor of your dishes while simultaneously promoting heart health.
Additionally, substituting herbal butter for less heart-unhealthy fats can help to reduce overall saturated fat intake. This combination of flavor and functionality makes herbal butter an excellent choice for those aiming to maintain heart health while enjoying delicious food.
Proven Strategies for Crafting Exquisite Herbal Butter
What Are the Best Practices for Infusing Butter with Herbs?
Infusing butter with herbs requires meticulous attention to detail to ensure a high-quality product. One of the best practices involves maintaining the correct herb-to-butter ratio. A general guideline is one tablespoon of finely chopped herbs per 100 grams of butter, but this can be adjusted based on personal taste and the intensity of the herbs used.
Allow the mixture to sit for an adequate length of time, which can range from several hours to overnight, depending on your desired flavor intensity. This slow infusion process enables the herbs to fully release their essential oils, resulting in a robust and aromatic butter.
Another effective practice is to apply gentle heat during the infusion, especially with more robust herbs like rosemary or sage. This can be achieved by gently warming the butter on the stove before adding the herbs, facilitating better flavor extraction. By adhering to these best practices, you’ll ensure a successful infusion that maximizes the flavor of your herbal butter.
How Can You Achieve Consistent Results in Herbal Butter Preparation?
Achieving consistent results when crafting herbal butter relies heavily on precision and meticulous attention to detail. Following a specific recipe is crucial for maintaining both flavor and texture. This includes accurately measuring ingredients and ensuring the herbs are fresh and of high quality.
Maintaining quality control is also essential for consistent results. Always opt for fresh herbs, as dried herbs may not provide the same vibrant flavors. Furthermore, keeping a consistent infusion time will ensure that your butter achieves the desired flavor profile without becoming overpowering.
Conducting taste tests throughout the process allows you to adjust the herb quantities to suit your palate, guaranteeing that each batch meets your expectations. By implementing these strategies, you can create herbal butter that consistently delivers on flavor and quality.
What Are the Key Factors for Success in Making Herbal Butter?
Several key factors contribute to the successful creation of herbal butter, starting with the quality of your ingredients. Using fresh, high-quality herbs and butter is paramount, as these elements form the foundation of your final product.
Technique also plays a crucial role; from proper herb preparation to ensuring thorough mixing, each step contributes to the outcome. Patience during the infusion process is equally important, as rushing this stage can lead to a lack of flavor development.
Lastly, maintaining an organized workspace can streamline the process, allowing you to focus on creating a high-quality product. By paying attention to these key factors, you can craft delicious herbal butter that delights the senses and enhances your culinary creations.
Innovative Applications of Herbal Butter in UK Cooking
How to Incorporate Herbal Butter into Baking Recipes?
Integrating herbal butter into baking introduces an exciting twist to traditional UK baked goods. By replacing standard butter with herb-infused butter, you can elevate the flavor profile of scones and shortbread, turning a simple treat into a gourmet delight.
For example, using rosemary-infused butter in shortbread adds a fragrant, savory note that beautifully contrasts with the sweetness of the biscuits. Similarly, incorporating basil butter into a scone recipe can create a refreshing herbal twist, making it perfect for pairing with cheese or savory spreads.
When baking with herbal butter, consider how the flavors will interact with other ingredients and the overall dish. Experimenting with different herb pairings can yield delightful surprises, allowing you to create unique baked goods that stand out at any gathering.
What are the Best Ways to Use Herbal Butter in Savory Dishes?
The versatility of herbal butter extends well beyond baking; it can be an excellent addition to a variety of savory dishes. For instance, using garlic and parsley-infused butter on grilled meats or fish can significantly enhance their natural flavors, providing a delicious finishing touch.
Herbal butter can also be employed to sauté vegetables, adding a burst of flavor that transforms simple sides into standout dishes. For example, sautéing seasonal greens like kale or spinach in herb-infused butter can enhance their flavor while making them more appealing to those who might otherwise be hesitant about vegetables.
Additionally, incorporating herbal butter into sauces adds complexity and depth, making it a valuable culinary tool. Whether drizzling over steaks or mixing into pasta, herbal butter provides endless opportunities for enhancing savory dishes.
What are Some Innovative Serving Suggestions for Herbal Butter?
Innovative serving methods for herbal butter can greatly enhance your dining experience and impress your guests. One creative approach is to serve it as a spread alongside artisanal bread, allowing diners to enjoy a burst of flavors with every bite. A butter dish featuring several varieties, such as basil, garlic, and chives, can create a visually appealing presentation.
Another method involves using herbal butter as a topping for soups; a dollop of infused butter can enrich the flavors of a simple vegetable soup or elevate a creamy bisque. Additionally, consider utilizing herbal butter as a base for homemade sauces, adding a rich foundation for dishes like pasta or grilled fish.
These innovative serving ideas not only showcase the versatility of herbal butter but also encourage exploration and creativity in the kitchen, making meals more enjoyable and memorable.
Frequently Asked Questions (FAQs)
What is herbal butter?
Herbal butter is a delightful mixture of softened butter infused with a variety of fresh herbs, creating a flavorful spread or cooking ingredient that enhances a wide range of dishes.
How long can herbal butter be stored?
When kept in an airtight container, herbal butter can last up to two weeks in the refrigerator and up to six months when frozen.
Can I use dried herbs instead of fresh?
While dried herbs can be utilized, fresh herbs are highly recommended for a superior flavor and aroma in herbal butter.
What are common uses for herbal butter?
Herbal butter can serve as a spread for bread and scones, a cooking fat for sautéing, or a finishing touch for meats and vegetables, enhancing their overall taste.
Can I customize my herbal butter recipes?
Absolutely! You can experiment with various herb combinations, spices, and flavorings to create a personalized herbal butter that suits your individual taste preferences.
How can I tell if my herbal butter has spoiled?
Signs that your herbal butter has gone bad include an off smell, mold growth, or an unusual texture. Always check for freshness before use.
Is herbal butter a suitable gift?
Herbal butter makes for a delightful homemade gift! Package it in decorative jars with a label for a personal touch that your recipients will appreciate.
What is the quickest method to soften butter?
Cutting butter into small cubes or grating it can help it soften quickly. Alternatively, you can microwave it on low power for short intervals for faster results.
Is herbal butter appropriate for high-temperature cooking?
It’s best to use herbal butter for low- to medium-heat cooking, as high temperatures may cause the butter to burn and lose its delicate flavor.
Can I combine herbal butter with other ingredients?
Yes, herbal butter can be combined with other ingredients, such as garlic, lemon zest, or spices, to create more complex and interesting flavors for your dishes.
Connect with us on Facebook!
The Article: How to Make Herbal Butter: A UK Guide appeared first on https://mcrtherapies.co.uk
The Article Herbal Butter: Your Essential Guide for the UK Was Found On https://limitsofstrategy.com
-

Electric Smokers: Top Choices for Effortless BBQ in the US
Discover the Best Electric Smokers for Effortless BBQ Mastery in the United States
Key Features That Differentiate the Top Electric Smokers in the US
Across the United States, electric smokers have gained immense popularity among BBQ enthusiasts, providing a straightforward and efficient way to savor delectable smoked meats. The best electric smokers on the market come equipped with an array of sophisticated features designed for seamless operation and dependable cooking outcomes. A standout feature is the digital control panel, which empowers users to precisely adjust cooking temperatures and times. This level of meticulous control ensures meats are cooked evenly, minimizing guesswork while enhancing flavor profiles for an unforgettable BBQ experience.
Another crucial feature is the integrated temperature probe. This handy tool continuously monitors the internal temperature of the meat, reducing the need for constant checking and guaranteeing consistently mouthwatering results. Additionally, many electric smokers offer smoke control settings, allowing users to tailor the smoke intensity to their personal flavor preferences. Furthermore, top-tier electric smokers frequently feature spacious designs that enable the simultaneous smoking of various meat cuts—ideal for gatherings where guests appreciate a variety of flavors.
Portability is another major advantage, as numerous electric smokers are designed to be lightweight and easy to transport. This feature is particularly beneficial for individuals wanting to take their BBQ to events such as tailgates or outdoor festivals. Finally, the simple cleanup process stands out, as most electric smokers include removable drip trays and ash catchers, simplifying post-cooking maintenance and allowing users to focus on savoring their BBQ.
Leading Brands Dominating the Electric Smoker Industry in the US
In the electric smoker market, several brands have distinguished themselves as favorites among American BBQ fans due to their dedication to quality, innovation, and reliability. Masterbuilt stands out as a premier brand in this arena, known for its user-friendly designs and powerful performance. Their digital electric smokers are packed with advanced features, appealing to both beginner cooks and seasoned BBQ experts who demand outstanding results.
Camp Chef is another prominent brand, offering a diverse range of smokers celebrated for their versatility and exceptional temperature control. BBQ aficionados appreciate their ability to smoke, grill, and bake using a single appliance, making it a multifunctional addition to any outdoor cooking setup. Char-Broil has also garnered attention by providing budget-friendly yet efficient electric smokers, often featuring intuitive controls and compact designs that fit seamlessly on smaller patios or decks.
Traeger, traditionally known for its pellet grills, has successfully ventured into the electric smoking realm with impressive results. Their electric smokers excel in maintaining precise temperature control, delivering their signature wood-fired flavor, which appeals to BBQ lovers. Lastly, Bradley Smoker is recognized for its unique smoke generator system, which utilizes flavored wood bisquettes for consistent smoke production, earning a dedicated following among BBQ purists.
Is Audio a More Convenient Option for BBQing?
Exploring the Price Range of Electric Smokers in the US
The pricing of electric smokers can fluctuate significantly based on various factors such as features, capacity, and brand reputation. On the entry-level spectrum, economical models can start as low as $100 to $200. These budget-friendly smokers are typically smaller and may lack some advanced functionalities, making them suitable for novice BBQ enthusiasts or individuals with limited cooking spaces.
Mid-tier electric smokers generally range from $200 to $500. These models offer improved temperature regulation, larger cooking capacities, and extra features such as built-in meat probes and digital controls. They are perfect for dedicated home cooks who want to elevate their BBQ skills without overspending.
For those interested in high-end electric smokers, prices can extend from $500 to $1,500 or more. Premium models often showcase advanced technology, spacious cooking areas, and high-quality construction materials, catering to competitive BBQ teams or serious enthusiasts who demand exceptional performance from their cooking tools.
Ultimately, the choice to invest in an electric smoker should align with an individual’s cooking habits and essential features. Regardless of the budget, there are impressive options available to suit a variety of preferences and requirements.
How Electric Smokers Simplify BBQing Across the US

Why Electric Smokers Are Exceptionally User-Friendly
Electric smokers are designed with user-friendliness as a priority, making them an excellent option for BBQ aficionados throughout the United States. One of the primary benefits of electric smokers is their straightforward operation. Unlike traditional smokers, which require constant adjustments of charcoal or wood, electric smokers maintain stable temperatures with minimal user involvement. Users can set their desired temperature and let the smoker handle the rest, allowing them to concentrate on other tasks or spend quality time with their guests.
Additionally, many electric smokers feature digital controls that simplify the cooking process significantly. With just a few button presses, users can select their preferred settings, making these devices accessible to both novices and experienced cooks alike. The presence of timers and temperature alerts further enhances convenience by notifying users when their meat is ready or if any adjustments are required.
Electric smokers also rank as safer options compared to gas or charcoal smokers. They eliminate the need for open flames and greatly reduce the risk of flare-ups, making them ideal for backyard BBQs, especially in family-oriented settings. Lastly, cleanup is generally effortless, as most models include removable drip trays and non-stick surfaces, allowing users to indulge in their BBQ without the worry of extensive post-cooking cleanup.
- Easy-to-use digital controls for seamless operation
- Consistent temperature management for reliable results
- Decreased risk of flare-ups for safer cooking
- Convenient timers and alerts for added ease
- Effortless cleanup with removable components
- No requirement for charcoal or wood management simplifies the process
- Versatile cooking options for a wide variety of meats
Can Electric Smokers Handle Various Types of Meat?
Absolutely! Electric smokers are incredibly versatile and can accommodate a wide range of meats that are staples in American BBQ culture. Whether it’s smoked brisket or pulled pork, electric smokers excel at producing tender, flavorful meats when the right smoking techniques are applied. The consistent heat provided by electric smokers ensures that larger cuts of meat, such as beef ribs or whole chickens, are cooked evenly and thoroughly, leading to delicious outcomes every time.
Poultry is another type of meat that significantly benefits from electric smoking. Chicken and turkey turn out juicy and infused with delightful smoky flavor when cooked in an electric smoker. A popular favorite for backyard BBQs, smoked chicken wings can be effortlessly prepared using these devices, making them a hit at any gathering.
Seafood enthusiasts also find great success with electric smokers. Salmon, trout, and shrimp can be smoked to perfection, with the ability to control temperature and smoke intensity ensuring a delicate balance of flavors. Smaller cuts of meat, such as sausages and ribs, are easily accommodated as well, allowing for a diverse array of BBQ options.
Electric smokers cater to a wide range of flavor preferences, whether one desires a rich, smoky taste or a more subtle infusion. By utilizing the appropriate wood chips and temperature settings, users can customize their smoking experience to suit various meats and tastes, making electric smokers an ideal choice for any BBQ enthusiast.
How Electric Smokers Save Time for BBQers in the US

Electric smokers have revolutionized the BBQ experience by significantly reducing the time commitment required from users. Traditional smoking techniques often demand meticulous attention to temperature and wood management, resulting in long hours spent overseeing the cooking process. In contrast, electric smokers provide a more hands-off approach, allowing busy Americans to enjoy the art of smoking without the constant vigilance associated with traditional methods.
One of the key time-saving features of electric smokers is their ability to maintain consistent temperatures. Once the desired temperature is set, the smoker autonomously manages its heat, enabling users to engage in other activities, such as preparing side dishes, entertaining guests, or simply relaxing. This convenience enables busy families to enjoy delicious smoked meals without sacrificing valuable time.
Moreover, the setup process for electric smokers is typically quicker than traditional methods. With no charcoal to ignite or wood to soak, users can begin smoking their favorite meats within minutes. This is particularly advantageous for spontaneous gatherings or weeknight dinners when time is of the essence.
Cleanup is another area where electric smokers excel. Many models incorporate removable components that simplify the post-cooking process, allowing users to spend less time scrubbing and more time savoring the fruits of their labor. By streamlining the overall BBQ experience, electric smokers have become essential for those looking to enjoy great flavors without a significant time investment.
Expert Recommendations for the Best Electric Smokers for Effortless BBQ
What Insights Do BBQ Experts Offer About Electric Smokers?
BBQ experts across the United States have provided invaluable insights regarding the advantages and limitations of electric smokers, helping consumers make informed decisions. Many experts laud electric smokers for their consistency and user-friendliness, highlighting that these models enable novice cooks to create high-quality BBQ without needing an extensive understanding of traditional smoking techniques. Renowned pitmasters have noted that electric smokers can produce exceptional results, making them a popular choice for cooking competitions and catering events.
However, some experts caution that while electric smokers are versatile, they may not replicate the intense smoke flavor achieved through traditional methods that utilize wood or charcoal. The flavor profile is often more controlled, leading some enthusiasts to prefer the robust tastes associated with wood-fired smokers. Nevertheless, many agree that the convenience offered by electric smokers frequently outweighs this limitation, especially for individuals with busy lifestyles.
Real-world examples from BBQ competitions illustrate the effectiveness of electric smokers. In several recent contests, competitors have successfully used electric smokers to prepare award-winning briskets and ribs, showcasing their ability to produce tender meats infused with flavor, even in competitive environments. This acknowledgment from industry professionals emphasizes the growing acceptance of electric smokers as reliable cooking tools within the BBQ community.
How to Select the Perfect Electric Smoker for Your BBQ Needs?
Choosing the right electric smoker is essential, depending on individual BBQ styles, cooking habits, and personal tastes. Start by considering the size of the smoker. For families and those who frequently host gatherings, larger models with ample cooking capacity can accommodate multiple racks of meat. Conversely, if space is limited or the user typically cooks for one or two people, compact models may be sufficient.
Next, evaluate the features that matter most to you. If precision cooking is a priority, seek models equipped with built-in meat probes and digital controls, allowing for greater oversight of cooking temperatures. For those who enjoy experimenting with flavors, electric smokers with adjustable smoke output can increase the versatility of smoking different meats and fish.
Another vital factor to consider is portability. If you plan to take your smoker to tailgates or camping trips, look for lightweight and easily transportable designs. Some electric smokers come with handles and wheels, making them easy to maneuver.
Additionally, consider the brand reputation and customer feedback. Established brands often deliver superior customer service and higher-quality products, enhancing the overall user experience. Finally, think about the price point—identify a model that strikes the best balance between features and budget, ensuring you receive the maximum value for your investment.
Pro Maintenance Recommendations for Electric Smokers in the US
Proper maintenance of an electric smoker is crucial for ensuring its longevity and optimal performance. Experts recommend several key practices to keep electric smokers in excellent condition. First and foremost, regular cleaning is vital; after each use, allow the smoker to cool before removing the drip tray and any other detachable components. Soak and scrub these parts with warm, soapy water to remove food residues and grease, ensuring the smoker remains in prime condition for future use.
Another critical maintenance step involves periodically inspecting the heating element and wiring. Ensuring these components are free of debris and functioning correctly can prevent complications during cooking. Additionally, it’s advisable to check the seals and gaskets on the smoker door to ensure they are intact. Proper seals play a crucial role in maintaining temperature and smoke levels throughout the cooking process.
For longer storage periods, covering the smoker and keeping it dry is wise. This practice protects it from moisture and dust, which could compromise performance over time. Some users also find it beneficial to season their electric smokers occasionally, similar to traditional smokers, to enhance flavors and maintain a non-stick surface.
Lastly, always refer to the manufacturer’s guidelines for specific maintenance recommendations tailored to your model. Implementing these expert tips can significantly extend the lifespan of your electric smoker and ensure it continues to produce mouthwatering BBQ for years to come.
The Optimal Electric Smokers for Different Regions in the US
Best Electric Smokers for Northeastern US BBQ Enthusiasts
In the Northeastern United States, where the climate often tends to be cool and humid, electric smokers must excel in heat retention. A remarkable option is the Masterbuilt Digital Electric Smoker, featuring an insulated body that effectively retains heat even in chilly conditions. This model is outfitted with a digital control panel and a built-in thermometer, making it easy to achieve precise smoking temperatures regardless of the weather.
Another excellent choice is the Bradley Smoker. Its innovative design includes a smoke generator that utilizes wood bisquettes, allowing for consistent smoke flavor while maintaining temperature control. This feature is particularly advantageous for smoking during the unpredictable seasons common in the Northeast, where temperature fluctuations are frequent.
For those prioritizing portability, the Camp Chef Smoke Vault offers a compact design perfect for Northeastern BBQ enthusiasts who may need to transport their smoker for events and family gatherings. Moreover, its capability to reach high temperatures makes it versatile for various cooking styles.
Lastly, the Char-Broil Deluxe Digital Electric Smoker stands out for its spacious cooking area and intuitive interface. Its ability to maintain even heat and humidity levels makes it ideal for smoking meats in Northeast climates, where moisture retention is crucial for optimal flavor.
Top Electric Smokers for Southern US BBQ Lovers
For BBQ enthusiasts in the Southern United States, characterized by heat and humidity, selecting an electric smoker that can withstand these conditions is essential. The Smokin-it Model #1 is a favored choice in southern regions. This durable stainless steel smoker offers consistent temperature regulation, crucial for cooking in warmer weather. Its generous cooking space makes it perfect for large cuts of meat, ideal for family gatherings.
Another worthy option is the Pit Boss Electric Smoker. Renowned for its affordability and performance, this model features a digital control panel and provides ample cooking space, aligning perfectly with the Southern tradition of serving large BBQ feasts. Its portability makes it ideal for tailgating or outdoor festivities.
For those who appreciate the quintessential Southern BBQ flavor, the Traeger Pro Series pellet smoker, while primarily a pellet cooker, integrates electric features and wood-fired flavors. Its temperature control and dual functionality allow users to smoke and grill, making it versatile for various Southern BBQ dishes.
Lastly, the Dyna-Glo Electric Smoker is a strong contender, featuring robust construction that withstands Southern weather while effectively retaining heat. Its adjustable air damper allows for precise smoke control, enhancing the flavors of traditional Southern BBQ favorites.
Recommended Electric Smokers for Western US BBQ Styles
The Western United States is characterized by diverse climates and BBQ styles, necessitating the selection of electric smokers that can adapt to various conditions. A top recommendation is the Camp Chef Woodwind Wi-Fi 20, which combines electric and wood pellet technology. This smoker offers the best of both worlds, enabling users to utilize electric settings while infusing deep, wood flavors, making it ideal for the varied tastes found in Western BBQ.
Another excellent option is the Masterbuilt Gravity Series, which incorporates both charcoal and electric elements. This unique design is well-suited for the outdoor lifestyle of many Western BBQ enthusiasts, allowing them to smoke and grill simultaneously. Its gravity-fed charcoal system ensures users enjoy authentic flavors while benefitting from the convenience of electricity.
For those seeking a compact option, the Cuisinart Electric Smoker provides a smaller footprint without sacrificing performance. This model is suitable for smaller outdoor spaces and delivers solid results when smoking meats across the diverse climates of the West.
Lastly, the Smoke Hollow Electric Smoker is favored for its affordability and ease of use. It can accommodate a variety of meats and features a spacious cooking area, making it suitable for larger gatherings that are commonplace in Western BBQ culture.
Best Electric Smokers for Midwestern US BBQ Lovers
Midwestern BBQ enthusiasts often face diverse weather conditions, from hot summers to cold winters, necessitating electric smokers that can perform effectively across this spectrum. The Masterbuilt Bluetooth Digital Electric Smoker is an excellent choice due to its capability to connect to smartphones, allowing users to control their cooking remotely. This feature is particularly useful during the often unpredictable weather conditions in the Midwest, enabling users to monitor their meats from indoors.
Another reliable option is the Char-Broil SmartChef, which boasts advanced digital controls and a generous cooking capacity. Its ability to maintain even temperatures makes it a dependable choice for Midwestern cooks focused on quality BBQ without requiring constant supervision.
For those prioritizing portability and compactness, the Dyna-Glo Electric Smoker offers versatility and performance in a lightweight design. This smoker is perfect for tailgating or family gatherings and can handle various meats with ease.
Lastly, the Bradley Smokers Original Smoker remains a favorite, particularly among those seeking to replicate traditional smoking techniques. Its unique wood bisquette system allows for continuous smoke production without the need for frequent refills, making it ideal for Midwestern BBQ enthusiasts who appreciate flavor without the hassle.
What Are the Advantages of Using Electric Smokers in the US?
How Electric Smokers Enhance Flavor Profiles
Electric smokers are expertly designed to elevate the overall flavor of BBQ dishes, delivering a unique taste that many American BBQ enthusiasts cherish. One of the primary methods by which they achieve this is through precise temperature control, which is crucial for developing deep, rich flavors in meats. By maintaining consistent heat, electric smokers allow for even cooking and the breakdown of connective tissues, resulting in tender, flavorful dishes that delight the palate.
The ability to infuse various types of wood chips further enhances the flavor profile. Whether using hickory, mesquite, or applewood, the controlled environment of an electric smoker ensures that meats absorb just the right amount of smoke. Users can experiment with different wood flavors to achieve their desired taste, creating a personalized BBQ experience that reflects individual preferences.
Electric smokers also facilitate the use of marinades and rubs, allowing for thorough seasoning before cooking. This additional layer of flavor, combined with the smoky essence imparted during the cooking process, creates a depth of flavor that enriches the overall BBQ experience.
Moreover, electric smokers can maintain humidity levels, preventing meats from drying out during the smoking process. This feature is especially beneficial for longer smoking times, ensuring that the meats remain juicy and packed with flavor, providing a satisfying culinary experience every time.
Do Electric Smokers Offer Cost Savings for US Consumers?
Electric smokers can indeed yield significant savings for American consumers interested in BBQing. One of the most apparent ways they save money is through reduced fuel expenses. Unlike traditional charcoal or wood smokers, which require frequent purchases of fuel, electric smokers operate using a standard electrical outlet, leading to lower ongoing costs. With energy-efficient models available, users can smoke for extended periods without worrying about high energy bills.
Moreover, electric smokers often come equipped with features that prevent overcooking or burning, thereby minimizing food waste. This efficiency means users are less likely to dispose of poorly cooked meats or resort to takeout BBQ when pressed for time.
Another financial advantage is the potential for bulk cooking. Electric smokers generally offer larger cooking capacities, enabling users to prepare multiple cuts of meat simultaneously. This aspect is particularly beneficial for families or gatherings, as it allows for economies of scale. Smoking larger batches at once means that consumers can feed more people without the need for additional cooking sessions, saving both time and effort.
Lastly, many electric smokers are built to last, making them a cost-effective investment over time. By selecting a reliable model, consumers can enjoy years of hassle-free BBQ without the need for frequent replacements, ensuring their initial investment pays off in the long run.
Are Electric Smokers Eco-Friendly Options in the US?
In terms of American energy sources and environmental considerations, electric smokers can be a more eco-friendly choice compared to traditional charcoal or gas smokers. To begin with, electric smokers significantly reduce air pollution and emissions associated with burning fossil fuels or charcoal. Many electric smokers operate on renewable energy sources, thereby lessening their carbon footprint and making them a more sustainable option for consumers.
The efficiency of electric smokers also contributes to their eco-friendliness. With precise temperature controls, these smokers consume less energy by avoiding excess cooking time and heat waste. By maintaining optimal cooking conditions, electric smokers ensure that ingredients are cooked efficiently, resulting in lower overall energy consumption.
Moreover, the waste generated by electric smokers is often minimal. Unlike charcoal, which produces ash and requires disposal, electric smokers typically generate less waste, simplifying cleanup and reducing their environmental impact.
However, consumers must consider the source of their electricity. Utilizing renewable energy sources—such as solar or wind power—can further enhance the eco-friendliness of electric cooking methods. For consumers committed to sustainability, pairing electric smokers with renewable energy options can significantly reduce their environmental footprint while still enjoying delicious BBQ.
Essential Accessories for Electric Smokers in the US
Must-Have Accessories to Elevate Your Electric Smoking Experience
To enhance the electric smoking experience, BBQ enthusiasts should consider several essential accessories. A top necessity is a quality meat thermometer. A digital instant-read thermometer ensures that meats are cooked to the ideal internal temperature, preventing the risk of undercooking or overcooking, which can ruin a fantastic BBQ meal.
Another important accessory is wood chips or wood pellets. Choosing high-quality wood is crucial for achieving the desired smoky flavor in various meats. Whether it’s hickory, mesquite, or fruitwoods, having a selection of options allows users to experiment and customize their flavor profiles according to their tastes.
A smoker cover is also a wise investment, especially for outdoor smokers exposed to the elements. A durable cover protects the smoker from rain, snow, and UV rays, extending its lifespan and ensuring it remains in excellent condition for years to come.
Rub and marinade sets can significantly enhance the flavor of BBQ dishes. Having a variety of rubs tailored for different meats allows for seasoning versatility, making it easier to experiment with flavors. Furthermore, a smoke box or smoke tube can be advantageous for electric smokers, enabling users to add more wood chips for an intensified smoke flavor.
Finally, having replacement parts, such as heating elements and drip trays, readily available ensures that your smoker remains functional and efficient over time. Being equipped with these accessories can elevate the overall cooking experience and guarantee consistently delicious results.
- Quality digital meat thermometer for accurate readings
- Variety of wood chips or pellets for flavor customization
- Durable smoker cover for protection against the elements
- Rub and marinade sets for enhanced flavor options
- Smoke box or smoke tube for added smoking possibilities
- Replacement heating elements to maintain efficiency
- Cleaning supplies for regular maintenance
What Should You Consider When Choosing Wood Chips for Electric Smokers in the US?
Selecting the right wood chips for electric smokers is essential for achieving the perfect smoky flavor that complements your BBQ dishes. The first step is to consider the type of meat being cooked, as different woods contribute distinct flavor profiles. For instance, hickory is an excellent choice for smoking brisket and pork, offering a strong, robust flavor that pairs well with hearty, meaty dishes.
In contrast, applewood and cherry provide a milder, sweeter smoke, making them ideal for poultry and fish. If you’re looking to add complexity to your flavors, consider mixing different types of wood chips to create a unique taste that enhances your BBQ experience.
Another factor to consider is the moisture content of the wood. Using pre-soaked chips can extend the smoking process and generate a cooler smoke, while dry chips ignite quickly, producing a stronger smoke flavor. It’s essential to find the right balance, taking into account personal preferences and the type of meat being smoked.
When selecting wood chips, opting for high-quality options from reputable suppliers is critical. Many brands provide bags labeled for specific types of meat, simplifying the selection process. Lastly, storing wood chips in a cool, dry place will ensure they maintain their flavor and quality for the best smoking experience.
Innovative Tools for Electric Smokers in the US
Advancements in smoking technology have introduced several innovative tools that enhance the electric smoking experience for users in the United States. One such tool is the Wi-Fi-enabled smoker control. This technology allows users to monitor and control their smoker from their smartphones, providing real-time updates on temperature and cooking progress, thereby increasing flexibility during the smoking process.
Another innovative accessory is the smoke generator, which enables users to add cold smoke to their food. This device is particularly useful for cheese or fish, providing a cold smoking experience that traditional electric smokers may not accommodate effectively.
Automatic wood feeders have also gained popularity, facilitating the maintenance of a consistent smoke level throughout the cooking process. These feeders automatically dispense wood chips at timed intervals, reducing the need for manual refilling and allowing users to focus on other aspects of their BBQ.
Additionally, smoker mats have emerged as valuable accessories for preventing small items, such as vegetables or fish, from falling through the grates. These mats enable versatile cooking options and allow for smoking a wider variety of foods.
Lastly, digital smoke alarms have become essential for safety, ensuring that users receive alerts in the event of smoke or temperature fluctuations that may indicate issues with the smoking process. Embracing these innovative tools can significantly improve the overall smoking experience and results.
Top Thermometers for Electric Smokers in the US
Accurate temperature monitoring is critical for achieving excellent BBQ results, and investing in a quality thermometer is essential for electric smoker users. One of the top recommendations is the ThermoPro TP20, a wireless meat thermometer that allows users to monitor the temperature of their meat from a distance. With a range of up to 300 feet, this thermometer is perfect for social gatherings, enabling users to keep an eye on their BBQ without being tethered to the smoker.
Another excellent choice is the Maverick ET-733, known for its reliable dual-probe system that allows simultaneous monitoring of both meat and smoker temperatures. This dual functionality is crucial for ensuring that meats are cooked safely and perfectly every time.
For those who prefer instant-read thermometers, the Lavatools Javelin PRO Duo is highly regarded for its speed and accuracy. Its quick-read capabilities allow users to check the temperature of their meats accurately within seconds, providing peace of mind while smoking.
Lastly, the Weber iGrill 2 is another innovative option, featuring Bluetooth connectivity that enables users to monitor their smoker’s temperature through a mobile app. This feature enhances convenience, especially during long smoking sessions. Choosing the right thermometer can greatly influence the success of your BBQ results, making it a vital accessory for electric smoker users.
Maintenance Recommendations for Electric Smokers in the US
Proper maintenance is essential for ensuring that electric smokers remain in optimal condition and consistently deliver delicious results over time. One of the first maintenance tips is to clean the smoker after each use. This includes emptying the drip tray, cleaning the interior, and removing any ash or debris that may have accumulated. Regular cleaning helps prevent flavor contamination and ensures that heat circulates efficiently during cooking.
Another crucial aspect of maintenance is regularly checking electrical components. Inspect the power cord for any signs of wear and tear, ensuring it’s safe for use. It’s also advisable to clean the heating element periodically, as grease and residue can build up, affecting performance and safety.
For models with a removable water pan, it’s essential to replace the water regularly and to clean the pan thoroughly. Keeping the water pan clean prevents buildup that can affect moisture levels during smoking, which is vital for juicy, flavorful meats.
Storage is another factor to consider. If the smoker is not being used for an extended period, it should be covered and stored in a dry, sheltered location to protect it from the elements. Finally, consulting the manufacturer’s maintenance guidelines and adhering to them can ensure that your electric smoker remains in excellent working condition for many BBQ seasons to come.
How to Use Electric Smokers for the Best BBQ Experience in the US
What Are the Most Popular Recipes for Electric Smokers in the US?
Diving into the world of electric smoking unveils a treasure trove of delicious BBQ recipes that can be tailored to suit personal preferences. One of the top recipes for electric smokers is smoked brisket, which showcases the capability of electric smokers to maintain low temperatures for extended periods. Seasoned with a rich rub and smoked over hickory or mesquite wood, smoked brisket can become the centerpiece of any BBQ gathering.
Another favorite is pulled pork. Pork shoulder is an ideal cut for electric smokers, as it requires long, slow cooking to break down tough fibers. Rubbed with a blend of spices and smoked until tender, pulled pork can be served on sandwiches or alongside classic sides like coleslaw and baked beans, making it a crowd-pleaser at any event.
Smoked salmon is yet another popular dish that highlights the versatility of electric smokers. With a simple brining process and light smoking over applewood, electric smokers produce a flavorful and flaky dish perfect for appetizers or main courses.
For those seeking easier options, smoked chicken wings are a must-try. They can be seasoned with a variety of spices or marinades, then smoked until crispy and infused with smoky goodness, making them a guaranteed hit at any party.
Lastly, vegetables can also be smoked to create unique sides. Grilled corn on the cob, smoked bell peppers, and even smoked potatoes offer a flavorful twist that can complement any BBQ spread. Experimenting with these recipes allows users to discover their personal favorites while enjoying the enriched flavors that electric smoking provides.
How to Set Up Your Electric Smoker for Optimal Results?
Proper setup of an electric smoker is crucial for achieving optimal results. Start by selecting an appropriate location for your smoker, ideally in an open area with ample ventilation and a safe distance from flammable materials. This ensures safety and allows for proper smoke circulation, which is essential for effective cooking.
Before loading the smoker with food, preheat the unit to your desired cooking temperature. Most electric smokers will require 20 to 30 minutes to reach the appropriate heat level. During this time, prepare your meat by seasoning it thoroughly with your preferred rubs and marinades to maximize flavor.
Once the smoker reaches the desired temperature, add your selected wood chips to the tray or box. If you’re using chips, soaking them in water for about 30 minutes can help prolong the smoking process and maintain moisture levels in the smoke, enhancing flavor. Place the meat in the smoker, ensuring it is spaced evenly to allow for even cooking and smoke penetration.
Lastly, monitor the temperature periodically using a meat thermometer to ensure your meat reaches the recommended internal temperature. Many electric smokers come equipped with built-in thermometers, but having an additional one can enhance accuracy. Following these setup tips will ensure a successful and flavorful BBQ experience every time.
- Choose an open and safe location for the smoker
- Preheat the smoker to the desired temperature
- Prepare and season the meat thoroughly
- Soak wood chips for extended smoking
- Ensure proper spacing of meat in the smoker
- Monitor temperatures with an accurate meat thermometer
- Keep an eye on wood chip levels during cooking
Tips for Monitoring and Adjusting Electric Smokers in the US
Monitoring and adjusting your electric smoker is crucial for achieving optimal BBQ results. Start by regularly checking the internal temperature of your meat. Using a reliable meat thermometer helps ensure that meats reach the appropriate doneness without overcooking or drying out. It’s wise to check the temperature periodically, especially during longer smoking sessions.
Another important tip is to adjust the airflow if your smoker has adjustable vents. Opening or closing vents can influence the intensity of the smoke and cooking temperature, allowing you to fine-tune the smoking process according to the specific needs of your dish.
If you notice that the smoker isn’t maintaining the desired temperature, check the power supply to ensure that the appliance is functioning correctly. If the electric smoker has a temperature control feature, consider recalibrating it according to the manufacturer’s guidelines to ensure accurate temperature control.
Monitor the wood chip levels as well, ensuring you have enough chips for the duration of your cooking session. Adding chips at regular intervals can help maintain consistent smoke levels throughout the process. For those with a smoke box, consider investing in a smoke tube for added versatility, allowing for a more prolonged smoking process without frequent interruptions.
Lastly, always follow the manufacturer’s instructions for monitoring and adjusting your specific electric smoker model. By being attentive and making timely adjustments, BBQ enthusiasts can achieve delightful results every time they smoke their favorite meats.
Customer Insights on Popular Electric Smokers in the US
What Are US Customers Saying About Electric Smokers?
Customer reviews of electric smokers across the United States reflect a wide range of experiences, often emphasizing the convenience and ease of use these appliances provide. Many users express appreciation for the consistent results they achieve, noting that electric smokers make it simpler to produce tender, flavorful meats without the steep learning curve associated with traditional smoking methods.
Common praise is directed toward models featuring digital controls, which simplify the cooking process. Customers frequently mention that the ability to set a precise temperature and step away without worry is a game-changer for busy lifestyles. Reviews often highlight satisfaction with the cooking capacity, particularly for larger gatherings, where an electric smoker can accommodate multiple meats simultaneously.
However, some reviews also mention limitations, particularly regarding the intense smoke flavor that some traditionalists desire. While many find the flavor satisfactory, others prefer the bolder profiles achieved through charcoal or wood smokers. Yet, the convenience of electric smoking often outweighs this concern, especially for casual cooks or those new to BBQ.
Overall, customer feedback generally supports electric smokers as a valuable investment for anyone looking to enjoy BBQ with less hassle and greater reliability.
How Do Electric Smokers Perform in US BBQ Competitions?
Electric smokers have made a notable impact on the BBQ competition scene in the United States. In recent years, many competitors have adopted electric smoking technology, discovering that it yields consistent results that can lead to winning dishes. Judges have noted the quality of entries prepared in electric smokers, often commenting on the tenderness and flavor profile achieved.
Competitors appreciate the ability to set precise temperatures and smoking times without the constant monitoring required by traditional methods. This has led to an increase in the use of electric smokers in both amateur and professional competitions, allowing pitmasters to focus on flavor and presentation without the stress of managing charcoal or wood.
Notably, some BBQ competitions have specific categories for electric smokers, recognizing the unique skill and technique involved in using these appliances. This categorization further validates their acceptance in the BBQ community and encourages a broader audience to explore electric smoking.
Overall, electric smokers are increasingly viewed as serious contenders in BBQ competitions, with many competitors achieving high accolades for their dishes. This trend indicates a growing acceptance of electric smoking methods among traditionalists and newcomers alike.
What Common Issues Do Users Experience with Electric Smokers in the US?
While electric smokers are lauded for their convenience and ease of use, several common issues have been reported by users in the United States. One frequent concern involves temperature fluctuations. Some electric smokers may struggle to maintain a consistent temperature, particularly during prolonged cooking sessions. This can be mitigated by ensuring proper ventilation and utilizing a high-quality thermometer to accurately monitor internal temperatures.
Another common issue is related to the production of smoke. Some users have indicated that their electric smokers do not generate enough smoke, resulting in milder flavors than anticipated. To address this, experimenting with different types of wood chips and ensuring that they are sufficiently soaked can enhance smoke output and flavor.
Power supply issues can also arise, especially if an electric smoker is used outdoors with extension cords. Ensuring the smoker is plugged directly into a suitable outlet can minimize potential power loss and improve performance.
Lastly, concerns related to cleanup can be common. While many electric smokers are designed for easy cleanup, neglecting to clean the smoker after each use can lead to buildup that affects flavor and performance. Regular maintenance and adherence to cleaning guidelines are crucial for preventing these problems.
By proactively addressing these common issues, users can enhance their electric smoking experience and enjoy consistently delicious BBQ results.
Which Electric Smoker Brands Are Most Popular Among US Consumers?
In the realm of electric smokers, certain brands have risen to prominence among US customers, recognized for their reliability and performance. Masterbuilt consistently garners high ratings for its range of electric smokers, celebrated for their user-friendly designs and innovative features. The brand’s digital models are particularly favored for their precision and consistent cooking results.
Camp Chef is another popular choice among electric smoker enthusiasts, known for its versatile cooking capabilities. Many users appreciate the brand’s ability to integrate smoking and grilling features, allowing for diverse cooking styles in a single appliance.
Char-Broil has also developed a solid following, particularly among budget-conscious consumers. Their electric smokers are often highlighted for their affordability without compromising quality, making them an attractive choice for newcomers to the BBQ scene.The Bradley Smoker is favored by those seeking a unique smoking experience due to its bisquette system, which provides continuous smoke without the need for frequent refills. Customers appreciate how this feature enhances the flavor profile of their dishes, adding complexity and depth to their smoked meats.
Lastly, Traeger, primarily recognized for its pellet grills, has made a significant entry into the electric smoker market, offering products that combine the best of both worlds, ensuring excellent flavor while providing the ease of electric cooking.
These brands have cultivated a loyal customer base, making them among the top choices for electric smokers in the United States.
Frequently Asked Questions About Electric Smokers
What is the best electric smoker for beginners?
The Masterbuilt Digital Electric Smoker is frequently recommended for beginners due to its user-friendly controls and reliable performance. It allows for easy temperature management and has ample cooking capacity, making it perfect for those just starting their BBQ journey.
How long does it take to smoke a brisket in an electric smoker?
Smoking a brisket generally takes between 12 and 14 hours in an electric smoker, depending on the size and desired doneness. Monitoring the internal temperature is crucial for optimal results, ensuring the meat reaches the perfect tenderness.
Can you use wood chips in electric smokers?
Yes, you can use wood chips in electric smokers. They enhance flavor in your meats, and using the appropriate type of wood can significantly elevate your BBQ experience, enhancing the taste of your dishes to new heights.
Do electric smokers require a lot of maintenance?
Electric smokers necessitate regular cleaning and maintenance, but they are generally easy to care for. Cleaning the drip tray and interior after each use can prolong the smoker’s life and ensure optimal performance.
What types of meat can I smoke in an electric smoker?
You can smoke a variety of meats in an electric smoker, including brisket, pork, chicken, and fish. Each type of meat benefits from the consistent temperatures provided by electric smoking, resulting in flavorful and tender dishes.
Are electric smokers suitable for use during winter?
Yes, electric smokers can be used in winter, but it’s essential to ensure they are adequately insulated and, if necessary, use a windbreak to maintain consistent temperatures while cooking. This allows you to enjoy delicious BBQ even in colder weather.
How do I prevent my electric smoker from overheating?
To prevent overheating, regularly monitor the temperature and avoid overloading it with food. Proper ventilation and utilizing the smoker’s settings as recommended also help maintain safe cooking temperatures.
What is the difference between electric smokers and traditional smokers?
Electric smokers provide consistent temperatures and are easier to operate. In contrast, traditional smokers require more attention to manage heat and smoke levels, often resulting in a more robust flavor profile in the final product.
Can I use my electric smoker indoors?
No, electric smokers should not be used indoors due to the risk of smoke buildup and the release of carbon monoxide. Always use them in a well-ventilated outdoor area to ensure safety.
What are the best wood chips for electric smokers?
The best wood chips for electric smokers vary based on the type of meat being cooked. Hickory and mesquite are excellent for red meats, while apple and cherry complement poultry and fish beautifully, providing a balanced and flavorful BBQ experience.
Connect with us on Facebook!
The Article Top Electric Smokers for Hassle-Free BBQ: Best Picks in the US appeared first on https://pitmastersarsenal.com
The Article Electric Smokers for Easy BBQ: Best US Picks Was Found On https://limitsofstrategy.com
-

BBQ Content Creation: The Ultimate Guide for Success
Discover the Dynamic BBQ Culture that Defines America
Unveiling the Fascinating Historical Evolution of BBQ in America
The historical evolution of BBQ in America is not just rich; it is also incredibly intricate, intertwining the culinary traditions of indigenous tribes and European settlers. The practice of roasting meat over open flames or in earthen pits was embraced, adapted, and passed down through generations, leading to an impressive variety of regional styles that we savor today. Initially, BBQ served as a practical solution for cooking large amounts of meat during community celebrations and festive gatherings. Over the years, as BBQ evolved, it became influenced by local agricultural practices, the availability of diverse ingredients, and the myriad cultures that shape the American culinary landscape. Understanding this historical context is essential for crafting authentic and engaging content that resonates with passionate BBQ enthusiasts.
As BBQ became integrated into local customs, unique regional variations emerged, with each style reflecting the specific ingredients and flavor profiles innate to various regions. For instance, the bold, smoky notes typical of Southwest BBQ sharply contrast with the tangy, vinegar-driven sauces cherished in the Carolinas. Recognizing this rich historical context not only enhances the narrative surrounding BBQ but also boosts the credibility of your content. Authenticity is crucial; readers are more inclined to connect with material that showcases a profound understanding of BBQ’s origins and its cultural implications, ensuring a deeper engagement.
Experience the Unique Regional BBQ Styles Found Throughout the United States
Across the United States, BBQ epitomizes a vibrant and diverse collection of regional styles, each possessing unique characteristics that captivate food lovers nationwide. Understanding these differences is vital for effectively reaching your target audience. For example, Texas BBQ is renowned for its mouth-watering brisket, which is often smoked for hours to achieve that coveted tenderness and rich flavor. Conversely, the Carolinas are famous for their pulled pork, typically cooked low and slow, paired with a tangy vinegar-based sauce. However, the variations extend far beyond these two; every region offers its own interpretation of BBQ, creating a rich tapestry of culinary experiences.
- Memphis BBQ: Celebrated for its dry ribs and pulled pork sandwiches, usually served with a crisp side of slaw, offering a delightful contrast in textures.
- Kansas City BBQ: Known for its thick, sweet tomato-based sauces that pair beautifully with a variety of meats, creating a satisfying flavor explosion.
- Alabama BBQ: Distinctive for its creamy white sauce, typically served with grilled chicken, providing a unique twist that surprises the palate.
- Hawaiian BBQ: Incorporating Asian culinary influences, featuring marinated meats grilled to perfection over hot coals, resulting in a delightful fusion of flavors.
- San Antonio BBQ: Merging Tex-Mex flavors, often showcasing smoked brisket tacos that tantalize the taste buds and highlight cultural diversity.
- North Carolina BBQ: Divided into Eastern and Western styles, each prioritizing different variations of vinegar-based sauces, showcasing regional pride.
The rich diversity of BBQ styles allows content creators to craft their narratives to appeal to specific audiences. By offering insights, recipes, and tips that resonate with local traditions and preferences, you can deepen your content’s relevance. Highlighting these regional styles enriches your narrative, engaging readers who take pride in their local BBQ heritage, ultimately making your material more relatable and appealing to a wider audience.
Understanding the Importance of BBQ Competitions and Festivals in BBQ Culture
BBQ competitions and festivals are essential to the US BBQ culture, serving as both celebrations and showcases of culinary expertise. Noteworthy events like the Memphis in May World Championship Barbecue Cooking Contest and the American Royal World Series of Barbecue draw thousands of enthusiasts and competitors from diverse backgrounds. These gatherings provide an exceptional platform for content creation, presenting a wealth of insights into emerging trends, innovative techniques, and flavors that are capturing the attention of skilled pitmasters from all over.
Participating in or attending these vibrant events can significantly enhance your credibility as a content creator. Witnessing the competition firsthand allows you to gather authentic stories, strategies, and techniques from top pitmasters. Additionally, festivals often highlight local vendors and showcase unique BBQ styles, creating countless content opportunities, from engaging interviews to immersive experiences. By leveraging these events in your content, you can attract a broader audience eager to explore the latest developments in the BBQ scene, enhancing your reach and engagement.
Exploring How BBQ Shapes American Social Gatherings

BBQ transcends being merely a cooking method; it has evolved into a cultural phenomenon that significantly shapes American social life. From family reunions to community cookouts, BBQ often serves as the heart of these gatherings, promoting a sense of community and shared tradition. Major summer holidays, such as Independence Day and Labor Day, see grills fired up across the nation as families and friends unite to enjoy mouth-watering meals that evoke nostalgia and warmth.
These gatherings present rich storytelling opportunities that can enhance your content. Capturing the essence of these social events allows for deeper connections with your audience. Discussing how BBQ facilitates bonding, sharing cherished recipes, and creating lasting memories can elevate the quality of your content. Including personal anecdotes or community stories surrounding BBQ enhances relatability, making your material feel warmer, more inviting, and profoundly engaging for your readers, ensuring that they feel a part of the BBQ culture.
Effective Strategies for Crafting Captivating BBQ Content
Leveraging Real-World Examples from Renowned BBQ Pitmasters for Your Content
To create captivating BBQ content, incorporating real-world examples from celebrated pitmasters can add authenticity and depth. Esteemed figures in the BBQ community possess unique stories, techniques, and experiences that can inspire and educate your audience. Here’s a bullet list featuring some of the most influential pitmasters and their contributions to the BBQ culture:
- Franklin Barbecue: Aaron Franklin transformed brisket cooking with meticulous attention to detail and unwavering commitment to quality, influencing aspiring chefs everywhere.
- Myron Mixon: Known as the “winningest man in BBQ,” his innovative techniques have shaped countless aspiring pitmasters, setting new standards in the industry.
- Pat Martin: His dedication to traditional Southern BBQ underscores the importance of preserving regional flavors, emphasizing authenticity in cooking.
- Melissa Cookston: An advocate for women in BBQ, her unique approach blends modern twists with classic techniques, inspiring future generations.
- Rodney Scott: Famed for his whole-hog BBQ, he emphasizes the cultural significance of BBQ within Southern traditions, showcasing the art of cooking.
Utilizing these examples allows you to draw from their expertise, illustrating their methods and philosophies, which contributes to a richer narrative. Sharing their journeys, triumphs, and challenges not only serves as inspiration but also creates an emotional connection with your audience, cultivating a deeper appreciation for the art of BBQ and the community that surrounds it.
Expert Techniques to Elevate Flavor in BBQ

Experts in the BBQ realm employ a wide range of techniques to amplify flavor and ensure mouthwatering results. Understanding these methods can significantly elevate your content. Here are some essential flavor enhancement techniques utilized by BBQ professionals:
- Smoking: Using wood chips or chunks imparts a profound, smoky flavor that enhances the overall taste experience, transforming simple dishes into extraordinary ones.
- Marinating: Soaking meats in flavorful liquids tenderizes the meat while adding layers of taste that elevate the final dish to new heights.
- Dry Rubs: Applying a blend of spices before cooking creates a flavorful crust, known as a bark, that adds both texture and flavor, enhancing the overall enjoyment of the meal.
- Brining: Soaking meats in a saltwater solution ensures moisture retention and boosts flavor absorption for a juicier result that tantalizes the taste buds.
- Low and Slow Cooking: Cooking at lower temperatures for extended periods allows flavors to develop in a rich and complex manner, resulting in unforgettable BBQ.
Each technique contributes a unique element to the BBQ experience, and discussing these in your content can provide valuable insights for your readers. Delving into specifics, such as which types of wood work best for different meats or how varying marination times affect flavor profiles, can lead to engaging articles that satisfy your audience’s curiosity and foster deeper connections.
Concrete Steps to Create Engaging BBQ Content
Creating captivating BBQ content requires a strategic approach to planning, execution, and promotion. Here are clear, actionable steps to consider to ensure your content resonates with your audience:
- Identify Your Audience: Understand who your content is tailored for—whether they are novices or seasoned BBQ enthusiasts seeking advanced techniques and insights.
- Plan Your Content: Organize your topics around seasonal themes, events, or specific BBQ styles to maintain relevance and engagement throughout the year.
- Incorporate Visuals: Utilize high-quality images and videos to complement your written content, making it more appealing and shareable across various platforms.
- Engage with Your Audience: Encourage feedback and discussions to foster an interactive environment that builds community and keeps readers returning for more.
- Promote on Multiple Platforms: Share your content across various social media channels to expand your reach and attract diverse audiences interested in BBQ.
These actionable steps provide a roadmap for producing high-quality content that resonates with BBQ lovers. Regularly assessing and adjusting your strategy can help maintain audience engagement, ensuring they eagerly anticipate your next release and continue to grow as a community.
Identifying the Most Effective Platforms for Sharing BBQ Content
Strategic Use of Social Media to Promote BBQ Content
Social media platforms are powerful tools for sharing BBQ content, offering unique opportunities for engagement and community building. To make the most of these platforms, consider these strategic approaches:
- Instagram: Ideal for sharing mouth-watering visuals and behind-the-scenes glimpses from BBQ gatherings, enticing viewers with captivating imagery that showcases the art of grilling.
- Facebook: Excellent for creating groups and communities centered around BBQ interests, fostering discussion and engagement among fans and foodies alike.
- YouTube: Provides a platform for video tutorials and demonstrations, allowing for in-depth exploration of BBQ techniques that captivate viewers and enhance their culinary skills.
- Pinterest: Useful for sharing recipes and visual content that can drive traffic back to your website, showcasing your expertise in the field and attracting new visitors.
By tailoring your content for each platform, you can maximize engagement and reach diverse audiences. Additionally, leveraging hashtags and participating in trending BBQ discussions can help your content gain visibility in a crowded digital landscape, enhancing its reach and impact while building a loyal following.
Benefits of Utilizing Video Content for BBQ Demonstrations
Video content is an exceptional medium for showcasing BBQ techniques and recipes, making it highly engaging for audiences seeking dynamic experiences. The visual and auditory elements of videos can vividly capture the sizzle of meat and the artistry of a well-prepared dish. This format allows viewers to see the entire process—from preparation to cooking—making it easier for them to replicate the techniques at home and feel confident in their BBQ skills.
Moreover, videos can forge a stronger connection with your audience. They provide an opportunity for your personality to shine through, allowing viewers to relate more closely to you as a content creator and BBQ enthusiast. Including step-by-step guides or tips within your videos can also enhance the learning experience. Engaging storytelling, combined with visually appealing content, can create a memorable viewing experience that keeps audiences returning for more, eager to learn and explore.
Blogs and Websites: The Best Platforms for In-Depth BBQ Articles
Blogs and websites serve as powerful platforms for comprehensive exploration of BBQ topics, allowing for detailed articles that cover everything from recipes and cooking techniques to equipment reviews and trend analyses. This format provides the flexibility to include extensive discussions that significantly benefit your audience by informing them about various aspects of BBQ culture.
Moreover, optimizing these articles for search engines ensures that your content reaches a wider audience. By employing SEO strategies, such as keyword optimization and link building, your content can achieve higher search rankings, attracting BBQ enthusiasts looking for specific information. Regularly updating your blog with fresh content can also help establish your site as a go-to source for BBQ knowledge, enhancing your credibility and reach within the community.
The Role of BBQ Forums and Communities in Content Sharing
Forums and online communities are pivotal in the BBQ landscape, offering platforms for enthusiasts to share their experiences and insights. Engaging in these communities can yield valuable content ideas and inspiration. These forums allow members to exchange tips, recipes, and personal stories, creating a vibrant exchange of knowledge that enriches everyone involved in the BBQ culture.
By actively participating in BBQ forums, you can establish yourself as a trusted voice within the community. Sharing your content in these spaces can drive engagement and foster loyalty among your audience. Furthermore, observing discussions in these forums can help you identify trending topics and questions, enabling you to tailor your content to meet the needs and interests of the community, ensuring your relevance and impact.
Utilizing Email Newsletters for Effective BBQ Content Distribution
Email newsletters represent a direct line of communication to your subscribers, facilitating the consistent delivery of BBQ content. They ensure that your audience stays informed about new recipes, cooking techniques, and upcoming events, creating a sense of anticipation and connection with your brand. Crafting engaging newsletters not only keeps your audience updated but also fosters a sense of community around your content and BBQ culture.
To effectively leverage email newsletters, consider segmenting your audience based on their interests or engagement levels. This approach allows for targeted content that can boost open rates and engagement significantly. Including visually appealing images, links to your latest blog posts, and exclusive tips or discounts can also enhance the value of your newsletters, encouraging subscribers to eagerly anticipate each edition and feel invested in your community.
Capturing the Essence of BBQ Through Visuals: Proven Strategies
Implementing Effective Techniques for BBQ Photography
Capturing the sizzling essence of BBQ through photography requires specific techniques to make visuals stand out and engage your audience effectively. The right approach can significantly enhance the appeal of your content. Start by utilizing natural lighting; it enriches colors and textures, making the food look more appetizing and inviting. Early morning or late afternoon light can create a warm and inviting atmosphere that draws viewers in, making them crave the dishes you showcase.
Additionally, pay careful attention to composition; utilizing the rule of thirds can guide you in framing your shots more attractively. Including props such as utensils or fresh ingredients can add depth and context to your images. Experimenting with various angles—like overhead shots for table spreads or close-ups to highlight textures—can also enhance visual interest, making your BBQ content more dynamic and appealing. Using a shallow depth of field can isolate the subject, resulting in a professional look that captures the viewer’s attention and invites them into the BBQ experience.
Using Video to Effectively Showcase BBQ Techniques and Recipes
Video serves as an excellent medium for demonstrating BBQ techniques and recipes, allowing viewers to follow along with the entire process from start to finish. This format can effectively capture the cooking action, making it far more engaging than static images. High-quality video production can enhance the overall experience, incorporating close-ups of the food and the intricate cooking process, immersing the audience in the sights and sounds of BBQ.
Additionally, consider adding voiceovers or on-screen text to guide viewers through the steps. This not only informs but also entertains, keeping the audience engaged and interested. Including personal anecdotes or tips can make the content more relatable, showcasing your personality as a content creator. Tutorials, behind-the-scenes glimpses, and coverage of BBQ events are all possibilities for video content that can resonate strongly with BBQ lovers, creating a lasting impact.
The Importance of High-Quality Visuals in BBQ Content
High-quality visuals are crucial for captivating audiences and conveying the irresistible appeal of BBQ. In a visually driven world, striking images and videos can make your content stand out amidst a crowded feed. Quality visuals not only attract attention but also convey professionalism, helping to establish trust with your audience. When it comes to BBQ, presentation is key; mouth-watering images can evoke emotions and cravings, encouraging readers to explore your content further and try out the recipes and techniques you present.
Investing in good photography equipment or editing software can significantly elevate your visuals. Additionally, learning about color theory and composition can further enhance your images. Showcasing the vibrant colors of grilled meats, fresh vegetables, and rich sauces can create a sensory experience that draws viewers in. Engaging visuals not only capture attention but also foster sharing, amplifying your reach and influence within the BBQ community.
Optimal Angles and Lighting for Captivating BBQ Visuals
Optimal camera angles and lighting setups can greatly enhance the visual appeal of your BBQ dishes and cooking processes. Experimenting with different angles can reveal unique perspectives that make your content more dynamic and engaging. For instance, shooting from a low angle can add drama to your images, particularly with towering burgers or stacked ribs, while overhead shots are ideal for flat-lay presentations of BBQ platters, showcasing the delicious spread in all its glory.
Lighting plays a critical role in photography; natural light is often the most flattering for food photography. If shooting indoors, consider using softbox lights to create an even distribution of light without harsh shadows. Additionally, reflectors can help bounce light onto the food, enhancing colors and textures, making them pop in your images. By mastering angles and lighting, you can create visually captivating content that highlights the artistry and appeal of BBQ, enticing your audience to engage with your material.
Incorporating Cultural Elements into BBQ Visual Storytelling
Integrating cultural symbols and traditions into your BBQ visuals can create a more authentic and engaging narrative. BBQ is steeped in cultural significance across various regions—a reflection of local ingredients, cooking methods, and communal traditions. For instance, showcasing how BBQ is central to Southern family gatherings can evoke nostalgia and a sense of connection among viewers, enriching your content with cultural depth.
When capturing BBQ events or dishes, consider including elements that represent local culture, such as traditional serving styles or regional ingredients. This approach not only enriches your visuals but also educates your audience about the deeper meanings behind the food. Incorporating personal stories or historical references can also enhance your narrative, making it relatable and compelling for your audience, ultimately creating a profound connection to the BBQ culture.
Research-Backed Advantages of Effective BBQ Content Creation
Expert Insights to Enhance Audience Engagement with BBQ Content
Understanding the factors that drive audience engagement with BBQ content is crucial for tailoring your strategy effectively. Engaging content is more likely to resonate with your audience, fostering interaction and nurturing loyalty. Expert insights can provide valuable analysis into the dynamics of audience engagement. Key engagement metrics to consider include:
- Likes and Shares: Indicate how well your content resonates with readers, serving as a measure of its appeal and effectiveness.
- Comments: Reflect audience interaction and interest, showcasing how engaged your readers are with your material and prompting further discussion.
- Click-Through Rates: Indicate how effectively your content drives traffic to your site, revealing its effectiveness in attracting viewers.
- Time Spent on Page: Reflects how engaging and relevant your content is to readers, providing insights into their preferences and interests.
- Subscriber Growth: Shows your ability to attract and retain an audience, highlighting the success of your content strategy and its appeal.
By focusing on these metrics, you can refine your content strategy, ensuring it meets the needs and preferences of your audience. Understanding the nuances of engagement can guide you in crafting content that not only informs but also captivates, leading to a more loyal following and a thriving BBQ community.
The Impact of BBQ Content on Consumer Behavior
BBQ content can significantly influence consumer behavior by showcasing products and techniques that ignite interest and drive sales. Engaging and informative content can lead viewers to explore new products, whether it’s specialty meats, sauces, or grilling equipment. Blogs, videos, and social media posts that highlight unique BBQ experiences can resonate with consumers looking to enhance their cooking skills or elevate their gatherings, creating a desire to try new things.
Moreover, the storytelling aspect of BBQ content can evoke emotions, creating a sense of desire and connection to the food. Highlighting personal experiences or sharing testimonials can further enhance credibility, making consumers more likely to trust recommendations. By showcasing the joy and community that BBQ fosters, your content can inspire consumers to seek out products and experiences that align with the BBQ lifestyle, driving them to make purchases and engage with your brand.
The Role of BBQ Content in Fostering Brand Loyalty
Creating compelling BBQ content fosters a sense of community and loyalty among your audience. When readers feel a personal connection to your content—whether through relatable stories, shared experiences, or valuable tips—they are more likely to become loyal followers and advocates for your brand. Establishing a consistent brand voice and visual identity can also reinforce this connection, ensuring that your audience recognizes and trusts your content.
Content that engages and informs can turn casual readers into dedicated advocates for your brand. Regularly interacting with your audience through comments, social media, and newsletters can further strengthen these relationships. By cultivating a community built around shared passions and experiences, BBQ content can solidify brand loyalty and encourage word-of-mouth referrals, amplifying your reach and establishing a strong presence in the BBQ scene.
Key Elements of a Successful BBQ Content Strategy
The Importance of Consistency in BBQ Content Creation
Consistency is paramount in keeping your audience engaged and fostering loyalty. Regular posts and updates help build a following that knows when to expect fresh content. Establishing a posting schedule not only keeps you organized but also signals to your audience that you are committed to providing valuable, relevant information that enhances their BBQ experience. Consistency in style, tone, and visual identity is equally important; a cohesive brand presence reinforces recognition and trust among your readers.
Consider implementing a content calendar to plan and distribute your posts effectively. This approach allows you to cover a diverse range of topics while ensuring that your audience receives varied and engaging content. By maintaining consistency, you create an environment where readers feel valued and connected, encouraging them to return for more insights and stories that resonate with their BBQ passions.
Incorporating Storytelling into Your BBQ Content
Storytelling is a powerful tool that can make your BBQ content more relatable and memorable. By weaving narratives into your posts, you can evoke emotions and create a deeper connection with your audience. Start by sharing personal experiences related to BBQ—whether it’s a cherished family recipe, a memorable gathering, or a cooking mishap that led to a great lesson. These anecdotes can enrich your content and invite readers into your world, making them feel a part of your BBQ journey.
Additionally, consider highlighting stories from the BBQ community, such as interviews with pitmasters or profiles of beloved local BBQ joints. These narratives not only provide valuable insights but also connect readers with the broader BBQ culture. The art of storytelling transforms your content from mere information into a dynamic, engaging experience that resonates deeply with readers and fosters a sense of belonging.
Leveraging User-Generated Content for Authenticity
User-generated content adds authenticity and can significantly boost engagement and trust in your brand. Encouraging your audience to share their BBQ experiences, recipes, and photos creates a sense of community around your content. It shows that you value their contributions and perspectives, fostering loyalty and deeper engagement among your followers.
Incorporate user-generated content into your strategy by creating challenges, contests, or themed posts that invite followers to showcase their BBQ skills. Highlighting these contributions on your platforms not only enriches your content but also builds a vibrant community around shared interests. This collaborative approach can lead to increased visibility and engagement, while making your brand feel more approachable and relatable to your audience, enhancing the overall BBQ experience.
Optimizing BBQ Content for SEO and Enhanced Visibility
Essential Keywords for Effective BBQ Content
Selecting the right keywords is critical for SEO and ensuring your BBQ content reaches the appropriate audience. Concentrate on terms that BBQ enthusiasts are likely to search for, such as “best BBQ recipes,” “smoking techniques,” or “BBQ sauce reviews.” Long-tail keywords—more specific phrases—can also help attract a targeted audience looking for detailed and relevant information within the BBQ niche.
Utilizing keyword research tools can assist in identifying popular search terms and evaluating competition levels. By strategically incorporating these keywords into your content—including headings, meta descriptions, and throughout the text—you can enhance your chances of ranking higher in search results. This optimization is key to driving organic traffic to your content, ensuring it reaches those most likely to engage with it and appreciate the art of BBQ.
The Importance of Meta Tags and Descriptions for BBQ Posts
Meta tags and descriptions play a vital role in improving the visibility of your BBQ content on search engines. A well-crafted meta tag can provide search engines with essential information about your content, aiding in determining its relevance to user queries. Similarly, a compelling meta description can entice users to click on your link when it appears in search results, increasing your overall traffic and engagement with your content.
When creating meta tags and descriptions, include relevant keywords while ensuring they are engaging and informative. Aim for clarity and brevity, as search engines typically display only a limited number of characters in search results. By optimizing these elements, you can enhance your content’s visibility, ultimately driving more traffic to your site and increasing engagement with your audience, fostering a thriving BBQ community.
Utilizing Analytics to Refine Your BBQ Content Strategy
Analytics provide invaluable insights into what works and what doesn’t in your BBQ content strategy. By examining metrics such as page views, bounce rates, and demographic data, you can gain a deeper understanding of your audience’s preferences and behavior, enabling you to tailor your content accordingly. This information can guide you in refining your strategy, ensuring that your content aligns with your audience’s interests and needs.
Regularly reviewing analytics allows you to identify trends, such as which topics generate the most engagement or which formats resonate best with your audience. By adapting your strategy based on these insights, you can continuously improve your content, ensuring it remains relevant, engaging, and valuable for your readers. This data-driven approach fosters a more effective content strategy that keeps your audience captivated and coming back for more BBQ inspiration.
Engaging Your Audience with Interactive BBQ Content
Boosting Engagement with Contests and Giveaways
Contests and giveaways can significantly elevate engagement and attract new followers to your BBQ content. These interactive elements encourage participation and excitement, drawing attention to your brand and offerings. Organizing contests that invite users to submit their best BBQ recipes or photos can create a sense of community and friendly competition among your audience, fostering connections and enhancing their experience.
Moreover, giveaways can incentivize audience interaction, encouraging followers to share your content or tag friends for a chance to win BBQ-related prizes. These activities not only boost your visibility but also foster a sense of belonging among participants. By creating engaging contests and giveaways, you can enhance your brand’s presence in the BBQ community while building loyalty and excitement around your content, ensuring it resonates deeply with your audience.
The Value of Live Streaming for Real-Time Interaction
Live streaming facilitates real-time interaction with your audience, creating a more dynamic and engaging BBQ content experience. Platforms like Instagram, Facebook, and YouTube offer features that enable you to connect with viewers instantly, answering questions and showcasing live cooking demonstrations that highlight your skills and expertise. This immediacy fosters a sense of community and enhances viewer engagement, making them feel like an integral part of the BBQ experience.
Live streaming BBQ events—whether they are cooking demonstrations or interactive Q&A sessions—provides audiences with a unique glimpse into your expertise and passion. Engaging with viewers in real-time not only humanizes your brand but also allows for spontaneous interactions that can enhance the overall experience. By leveraging live streaming, you can create memorable moments that resonate with your audience and encourage ongoing participation in the vibrant BBQ community.
Using Polls and Surveys for Audience Feedback
Polls and surveys are effective tools for understanding your audience’s preferences and tailoring your BBQ content accordingly. By soliciting feedback, you can gain insights into what topics resonate most, which recipes or techniques your audience is interested in, and how you can improve your offerings to better suit their needs and desires.
These interactive elements can easily be integrated into your social media channels or email newsletters, making it simple for your audience to participate. Using the feedback gathered from polls and surveys can guide your content strategy, ensuring that you create material that aligns with your audience’s interests and desires. This approach not only enhances engagement but also reinforces your commitment to delivering valuable content that meets their needs and fosters community.
FAQs
What are the various BBQ styles found in the US?
BBQ styles in the US include Texas brisket, Carolina pulled pork, Memphis ribs, Kansas City sauce, and many more. Each region boasts its unique flavors and cooking techniques that reflect local traditions and ingredients, creating a diverse BBQ landscape.
How can I enhance the flavor profile of my BBQ?
You can enhance BBQ flavor by employing techniques such as marinating, applying dry rubs, smoking with various woods, and cooking meats low and slow for optimal tenderness and flavor that will impress your guests.
What is the best way to share BBQ content on social media platforms?
Share BBQ content on social media by posting high-quality images, engaging videos, and interactive content like polls or contests. Utilize relevant hashtags and connect with BBQ communities to increase visibility and engagement, fostering a broader audience.
How often should I post BBQ content to maintain engagement?
Aim to post BBQ content regularly, whether weekly or bi-weekly, to sustain engagement. Consistent posting helps in building a loyal audience that looks forward to your updates and new content, ensuring they remain connected.
What types of visuals work best for BBQ content?
High-quality images and videos showcasing the cooking process, finished dishes, and behind-the-scenes moments are most effective. Using natural light and appealing compositions enhances the overall visual appeal, captivating your audience.
How can I foster a community around my BBQ content?
Build a community by actively engaging with your audience through comments, sharing user-generated content, and creating interactive elements like contests and Q&A sessions that encourage participation and connection among BBQ enthusiasts.
What role does storytelling play in BBQ content creation?
Storytelling adds emotional depth to BBQ content, making it relatable and memorable for your audience. Sharing personal experiences and community narratives fosters connections and enhances engagement, inviting readers into your BBQ journey.
What are some essential SEO tips for BBQ content?
Focus on keyword optimization, create engaging meta tags and descriptions, and regularly update your content. Utilize analytics to refine your strategy and boost visibility in search results, ensuring your content reaches a wider audience.
How can contests enhance engagement with my BBQ content?
Contests encourage participation and excitement, allowing followers to showcase their skills and share your content. They also promote sharing and increase visibility, attracting new followers to your content and fostering a sense of community.
Why is live streaming an effective tool for BBQ content?
Live streaming facilitates real-time interaction, creating a dynamic experience. It allows you to engage with your audience instantly, showcasing your expertise and enhancing community connection through spontaneous interactions that resonate deeply.
Connect with us on Facebook!
The Article How to Create BBQ Content for X: A Guide appeared first on https://pitmastersarsenal.com
The Article BBQ Content Creation: Your Essential Guide for X Was Found On https://limitsofstrategy.com
-

Low-Fodmap Dinners: Simple Recipes for All to Savor
Master the Fundamentals of a Low-FODMAP Diet for Enhanced Digestive Health
Discover FODMAPs and Their Effects on Your Digestive Well-Being
Understanding FODMAPs is crucial for anyone aiming to enhance their digestive health. These short-chain carbohydrates encompass fermentable oligosaccharides, disaccharides, monosaccharides, and polyols, which can cause significant digestive discomfort in certain individuals. For those suffering from conditions such as Irritable Bowel Syndrome (IBS), these substances can ferment within the gut, leading to symptoms like bloating, gas, and other gastrointestinal disturbances. Gaining a comprehensive understanding of what FODMAPs are and their impact on your body is fundamental for effectively implementing a low-FODMAP diet and making well-informed food choices.
To cultivate healthier eating habits, it’s vital to identify high-FODMAP foods that may trigger unpleasant symptoms. Common high-FODMAP foods include:
- Wheat products (such as bread and pasta)
- Onions and garlic
- Specific legumes (like chickpeas and lentils)
- Apples, pears, and other stone fruits
- Dairy products high in lactose (like milk and soft cheese)
- Sweeteners (including honey and high-fructose corn syrup)
- Some vegetables (such as cauliflower and mushrooms)
- Processed foods that may have added FODMAPs
By recognizing and steering clear of high-FODMAP foods, individuals can make more informed dietary choices that positively impact their overall digestive health.
Unlock the Benefits of a Low-FODMAP Diet for Improved Wellness
Adopting a low-FODMAP diet can significantly improve your quality of life, especially for those experiencing IBS or other digestive disorders. Many people who embrace this dietary approach report a noticeable decrease in symptoms such as bloating, abdominal pain, and irregular bowel movements. The primary objective of a low-FODMAP diet is to alleviate discomfort while promoting overall digestive well-being.
By committing to this dietary approach, you may also observe enhancements in your energy levels, improved nutrient absorption, and a more stable mood. This connection between gut health and mental well-being is increasingly recognized. A low-FODMAP diet encourages the intake of whole foods, fresh produce, and lean proteins, all of which contribute to a balanced nutritional profile. Understanding these advantages can motivate you to embark on your low-FODMAP journey, helping you establish and maintain healthy eating habits over time.
Successfully Transitioning to a Low-FODMAP Diet: Your Step-by-Step Guide
Transitioning to a low-FODMAP diet represents a significant change and requires a structured approach to achieve lasting success. Begin by eliminating high-FODMAP foods for a designated period, typically ranging from 4 to 6 weeks. This elimination phase is crucial in identifying specific food triggers that may contribute to your digestive distress. During this time, concentrate on incorporating low-FODMAP alternatives to maintain variety and flavor in your meals.
Following the elimination phase, you will proceed to the reintroduction phase. This stage involves gradually reintroducing high-FODMAP foods one at a time while closely monitoring any symptoms that may emerge. The goal here is to ascertain which specific FODMAPs your body can tolerate and which ones should be avoided. This systematic method allows you to tailor your diet according to your individual needs. Collaborating with a healthcare professional or a dietitian experienced with low-FODMAP diets during this transition is highly recommended to ensure its implementation is safe and effective.
Crafting Flavorful Low-FODMAP Dinner Plans That Delight

Mastering the Art of Strategic Low-FODMAP Meal Planning
Effective meal planning is essential for adhering to a low-FODMAP diet, as it streamlines the selection of appropriate foods that cater to your dietary requirements. By planning meals in advance, you can avoid the stress and impulsive decisions that often arise from last-minute cooking, which can lead to high-FODMAP choices. Regularly utilizing a meal planner or a dedicated app can help you efficiently organize your weekly dinners.
Here are some actionable meal planning tips to consider:
- Develop a weekly menu featuring low-FODMAP recipes.
- Shop for groceries with a well-prepared list to curb impulse purchases.
- Prepare ingredients ahead of time for quick meal assembly.
- Incorporate a diverse array of low-FODMAP foods to keep meals exciting.
- Batch cook meals that can be frozen for convenient access later.
- Experiment with new recipes to keep your menu dynamic and enjoyable.
- Stay informed about seasonal produce to optimize your selections.
- Utilize leftovers creatively to minimize waste and save time.
By prioritizing effective meal planning, you can ensure a variety of nutritious and satisfying options are readily available, making it easier to adhere to your low-FODMAP diet.
Choosing the Finest Ingredients for Delicious Low-FODMAP Dinners
Selecting the right ingredients is fundamental to crafting delicious low-FODMAP dinners. By prioritizing fresh, whole foods, you not only enhance the flavor of your meals but also ensure that you’re adequately nourishing your body. Focus on incorporating low-FODMAP vegetables such as carrots, spinach, and bell peppers, along with lean proteins like chicken, fish, or tofu.
Grains also play a vital role in your dietary regimen. Opt for low-FODMAP grains like quinoa, rice, or gluten-free pasta. When shopping, be vigilant about examining product labels, as some processed foods may contain hidden high-FODMAP ingredients. By prioritizing fresh produce, lean proteins, and compliant grains, you can relish a wide variety of delicious dinner options while adhering to your dietary restrictions. Don’t hesitate to experiment with different combinations to discover new flavors and textures that elevate your dining experience.
Time-Saving Strategies for Efficient Meal Preparation

Preparing low-FODMAP dinners doesn’t have to consume your entire day. By adopting time-saving techniques, you can streamline your cooking process, making it both efficient and enjoyable. One effective strategy is batch cooking, where you prepare larger quantities of meals that can be portioned and reheated throughout the week. This not only saves time but also ensures that you always have a satisfying low-FODMAP meal ready to go. Utilizing pre-prepared ingredients can also save precious minutes in the kitchen. Look for washed and chopped vegetables or pre-marinated proteins that align with your dietary needs. Additionally, plan for quick-cooking meals. Dishes like stir-fries or salads can typically be assembled in less than 30 minutes, making them ideal for busy days. Lastly, consider investing in kitchen gadgets such as slow cookers or pressure cookers, which can facilitate the cooking process while enhancing flavors with minimal effort.
Expert Tips for Creating Flavorful Low-FODMAP Dinners
Inspiring Success Stories of Enjoying Low-FODMAP Dinners
Learning from the experiences of others can provide invaluable insights into preparing delectable low-FODMAP dinners that are both satisfying and beneficial for your digestive health. Numerous individuals have embraced low-FODMAP diets and discovered a wealth of culinary possibilities. For instance, a simple yet delicious dinner could feature grilled chicken breast served with steamed broccoli and quinoa. This meal is not only easy to prepare but also nutrient-dense, delivering a balance of essential nutrients.
Another successful example involves incorporating international flavors; consider making a low-FODMAP Thai green curry using coconut milk, chicken, and a variety of low-FODMAP vegetables served over rice. Many individuals have creatively experimented with ingredients, such as assembling low-FODMAP tacos using corn tortillas, grilled bell peppers, and shredded chicken, topped with lactose-free cheese. These real-life examples demonstrate the creativity and diversity that can flourish within the framework of a low-FODMAP diet.
Actionable Steps for Cooking Low-FODMAP Meals with Ease
Cooking low-FODMAP meals can be straightforward when broken down into actionable steps. Start by gathering all your ingredients, ensuring they comply with low-FODMAP guidelines. Next, prepare your vegetables by washing, peeling, and chopping them as necessary. This not only expedites the cooking process but also enhances your overall cooking experience.
Once your ingredients are ready, focus on cooking methods that enhance flavor without introducing high-FODMAP elements. For example, when preparing a stir-fry, heat some olive oil in a pan, add your choice of protein, and cook until golden brown on both sides. Then, add your prepared vegetables and cook until they reach a tender-crisp texture, preserving their nutrients. Finally, season your dish with low-FODMAP herbs and spices, such as basil or ginger, to elevate the flavor without compromising your dietary restrictions. By following these straightforward steps, you can whip up delicious low-FODMAP dinners in no time.
Avoiding Common Pitfalls in Low-FODMAP Cooking
Navigating the world of low-FODMAP cooking can be challenging, and being aware of common mistakes can help you avoid potential pitfalls. One frequent error is overlooking hidden FODMAPs in packaged foods. Many seemingly safe products may contain high-FODMAP ingredients, such as garlic and onion powders, which could trigger symptoms.
Another common mistake is neglecting portion sizes. Certain low-FODMAP foods can cause issues when consumed in excess. For instance, while lactose-free dairy products are generally accepted, consuming them in large amounts may lead to discomfort. Additionally, some individuals mistakenly believe that all whole grains are low-FODMAP, which is not universally true. It’s crucial to research and verify the FODMAP content of each specific grain type.
Lastly, failing to seek support can lead to frustration. Engaging with online communities or consulting a dietitian knowledgeable about low-FODMAP diets can provide invaluable guidance and encouragement. By avoiding these common missteps, you can enhance your cooking experience and enjoy the benefits of a low-FODMAP lifestyle.
Tantalizing Low-FODMAP Dinner Recipes to Explore
Easy-to-Make Low-FODMAP Dinner Recipes for Every Palate
Creating simple low-FODMAP dinner recipes can transform your mealtime into an enjoyable and stress-free experience. One delightful option is grilled chicken with zucchini noodles, where you spiralize fresh zucchini and sauté it swiftly while marinating the chicken in olive oil, lemon, and herbs. This dish is not only visually appealing but also packed with flavors and nutrients, making it a wholesome choice.
Another straightforward recipe is a low-FODMAP stir-fry. Start by sautéing lean protein, such as beef or chicken, in sesame oil, adding carrots, bell peppers, and bok choy, all of which are low-FODMAP friendly. Finish the stir-fry with a splash of tamari sauce for a savory meal that’s both satisfying and compliant with your dietary needs. These recipes emphasize that adhering to a low-FODMAP diet doesn’t mean sacrificing flavor or enjoyment; instead, it opens up a world of culinary creativity.
Enhancing Flavor in Your Low-FODMAP Dinners
Enhancing the flavor of low-FODMAP dinners can significantly elevate your culinary experience, making each meal something to eagerly anticipate. The secret lies in utilizing a variety of herbs, spices, and sauces that are low in FODMAPs. Fresh herbs like basil, parsley, and mint can infuse vibrant notes into your dishes without introducing unwanted FODMAPs.
Experimenting with different spices can also add depth to your meals. Varieties like cumin, paprika, and turmeric are excellent choices for introducing warmth and complexity. Additionally, consider using low-FODMAP sauces, such as homemade pesto prepared without garlic or certain store-bought products that are certified low-FODMAP.
Feel free to marinate proteins using mixtures of olive oil, vinegar, and citrus juices to infuse them with flavor. For instance, a marinated salmon fillet grilled to perfection can be served alongside sautéed spinach and quinoa, creating a meal that bursts with flavor. By being inventive with flavors, you can keep your low-FODMAP dinners exciting and satisfying.
Exploring Delicious Vegetarian and Vegan Low-FODMAP Dinner Options
Catering to various dietary preferences while adhering to low-FODMAP guidelines can be both challenging and rewarding. Vegetarian and vegan low-FODMAP dinner options offer a diverse and fulfilling range of meals that everyone can enjoy. One such recipe is a quinoa and vegetable bowl. Cook the quinoa and toss it with roasted low-FODMAP vegetables, such as zucchini, carrots, and spinach, drizzled with a tahini dressing for a nourishing meal.
Another fantastic option is a chickpea salad, made with canned chickpeas (thoroughly rinsed) mixed with diced cucumber, bell peppers, and a simple lemon dressing. While chickpeas are generally classified as high-FODMAP, small portions may be tolerated by some individuals; therefore, it’s always advisable to check personal tolerances.
For a hearty dish, consider a low-FODMAP vegetable curry made with coconut milk and a variety of compliant vegetables. Serve it over rice for a filling and nourishing meal. By expanding your vegetarian and vegan repertoire, you can ensure your low-FODMAP dinners are both inclusive and delicious.
Effective Cooking Techniques for Low-FODMAP Dinners
Best Cooking Methods for Low-FODMAP Meal Preparation
The cooking techniques you employ can significantly impact the FODMAP content of your meals. Methods such as steaming, grilling, and roasting are particularly beneficial for low-FODMAP cooking. Steaming vegetables preserves their nutrients and flavor without introducing any high-FODMAP components. Grilling meats enhances their natural flavors while requiring minimal additional ingredients.
Roasting is another excellent technique, especially for vegetables. Roasting at high temperatures caramelizes the sugars, intensifying their flavor. When preparing a roast, toss your vegetables in olive oil and season them with low-FODMAP herbs and spices before placing them in the oven to achieve optimal taste.
Exercise caution with frying, as many oils and batters may contain high-FODMAP ingredients. Instead, concentrate on methods that allow the inherent flavors of your ingredients to shine, creating satisfying and wholesome meals without the risk of high-FODMAP triggers.
Effectively Using Herbs and Spices in Your Cooking
Utilizing herbs and spices effectively can dramatically elevate your low-FODMAP meals, adding layers of flavor without incorporating FODMAPs. Familiarizing yourself with low-FODMAP herbs such as basil, coriander, and rosemary will empower you to create vibrant dishes. These herbs not only enhance various cuisines but also offer additional health benefits due to their antioxidant properties.
When using spices, opt for varieties like paprika, cumin, and turmeric, known for their rich flavors and low-FODMAP status. Fresh herbs can be added towards the end of the cooking process to impart brightness, while dried herbs may be introduced earlier to allow their flavors to meld with the dish.
Experimenting with different herb and spice combinations can make your meals more creative and enjoyable. For instance, a mix of rosemary and thyme can enhance roasted potatoes, while a blend of cumin and coriander could elevate a vegetable curry. By thoughtfully incorporating herbs and spices, you’ll create low-FODMAP dinners that are not only nourishing but also bursting with flavor.
Smart Batch Cooking Strategies for Low-FODMAP Meals
Batch cooking is an excellent technique for maintaining a low-FODMAP diet while saving time throughout the week. Start by selecting a few recipes that can be prepared in larger quantities, such as soups, stews, or casseroles. Prepare these meals during weekends or your available time, allowing you to portion them out for future consumption.
When batch cooking, store your meals in suitable containers to maintain freshness. Glass containers or BPA-free plastic options are ideal for keeping your meals safe and easily accessible. Labeling your containers with dates can also help you track freshness.
Moreover, freeze portions that won’t be consumed within a few days to extend their shelf life. When reheating, do so gently to preserve the texture and flavor of your meals. By implementing these strategies, you’ll ensure you always have delicious low-FODMAP options available, reducing the temptation to stray from your dietary path.
Locating Low-FODMAP Ingredients While Shopping
Find Quality Low-FODMAP Ingredients with Ease
Identifying the right ingredients is crucial for success on a low-FODMAP diet. Many grocery stores now feature dedicated sections for gluten-free and dietary-restricted products, where you can discover a variety of low-FODMAP options. Local farmers’ markets can also serve as a treasure trove for fresh produce, offering seasonal vegetables that align with your dietary needs.
When grocery shopping, focus on the store’s perimeter, where you’ll typically find fresh fruits, vegetables, and lean proteins. Be vigilant about checking labels on packaged foods, as high-FODMAP ingredients can often be hidden in sauces and snacks.
Here are several shopping tips to keep in mind:
- Familiarize yourself with low-FODMAP brands and their offerings.
- Choose fresh, whole foods over processed items whenever possible.
- Engage with store staff to locate specific low-FODMAP products.
- Plan shopping trips around seasonal produce for maximum variety.
- Consider joining a local food co-op to access fresh, locally sourced ingredients.
- Explore online stores that specialize in dietary restrictions.
- Invest in a comprehensive low-FODMAP cookbook for recipe inspiration and ingredient recommendations.
- Utilize mobile apps to assist in identifying low-FODMAP foods while shopping.
By adopting a proactive approach to your shopping efforts, you can ensure access to a diverse array of low-FODMAP ingredients that support your health.
Interpreting Food Labels for Low-FODMAP Content Effectively
Understanding how to interpret food labels effectively can help you avoid high-FODMAP ingredients and make informed choices while shopping. Start by looking for allergen or dietary claims indicating the product may be gluten-free or suitable for a low-FODMAP diet. However, it’s crucial not to rely solely on these claims; always read the ingredient list for a comprehensive overview.
Be cautious of key ingredients like high-fructose corn syrup, honey, garlic, onion, and certain legumes, which are known to be high in FODMAPs. Products that list “natural flavors” may also contain hidden FODMAPs, so proceed with caution.
Familiarizing yourself with the specific ingredients used by different brands can streamline your shopping trips. Many brands now offer low-FODMAP certified products, making it easier to choose compliant items. By being diligent about label reading, you empower yourself to maintain your low-FODMAP lifestyle with confidence.
Budgeting Wisely for Your Low-FODMAP Grocery Shopping
Maintaining a low-FODMAP diet doesn’t have to strain your budget. With thoughtful planning and strategic shopping, you can enjoy a variety of low-FODMAP meals without overspending. Start by creating a grocery list centered around staple items like rice, quinoa, seasonal vegetables, and lean proteins.
When shopping, always compare prices between brands, and consider opting for store-brand products, which can often be more economical. Buying non-perishable items such as oats, rice, and lentils in bulk can also lead to long-term savings. Utilizing local farmers’ markets is an excellent strategy for budget-friendly shopping. Not only can you discover fresh low-FODMAP produce at competitive prices, but you also support local agriculture. To further maximize your budget, consider meal prepping and batch cooking, as these practices can help reduce food waste and ensure you’re making the most of your ingredients.
Online Resources for Discovering Low-FODMAP Ingredients
The rise of online shopping has made it easier than ever to find and purchase low-FODMAP ingredients conveniently. Numerous websites cater specifically to dietary restrictions, offering a variety of low-FODMAP products that may not be available in local stores.
Mobile apps can also be incredibly beneficial, with many designed to help users identify low-FODMAP foods while shopping. These apps often feature comprehensive databases and allow users to scan barcodes for quick identification.
Online communities and forums serve as excellent resources for recommendations on where to find low-FODMAP ingredients, as well as sharing recipes and tips. Joining these groups can provide valuable insights that make your shopping experience smoother and more informed. By leveraging these online resources, you can effectively shop for low-FODMAP ingredients from the comfort of your home.
Dining Out While Adhering to a Low-FODMAP Diet
Confidently Navigating Restaurant Menus
Dining out can present challenges for those on a low-FODMAP diet, but with the right strategies, you can enjoy meals confidently. Start by selecting restaurants renowned for accommodating dietary restrictions, as they are typically more willing to customize dishes to meet your needs.
When reviewing the menu, focus on simple dishes less likely to contain hidden FODMAPs, such as grilled proteins, salads, or steamed vegetables. Don’t hesitate to inquire with your server about specific ingredients, especially those that may not be immediately apparent, like sauces or dressings.
Communicating your dietary restrictions clearly can also make a significant difference. Politely explain that you are following a low-FODMAP diet and ask if the chef can prepare a meal that suits your needs. Many restaurants are more than willing to adjust their offerings, so don’t hesitate to request modifications that ensure your meal is both safe and enjoyable.
Smart Choices at Various Types of Restaurants
Successfully navigating menus at different types of restaurants while adhering to a low-FODMAP diet can be simplified with some knowledge. At Italian restaurants, opt for simple dishes like grilled fish or chicken, and request olive oil instead of creamy sauces. Pizza enthusiasts can select gluten-free crusts topped with low-FODMAP vegetables and lactose-free cheese.
For Asian cuisine, steer clear of dishes containing garlic or onion. Instead, choose steamed or stir-fried options rich in vegetables and protein, ensuring you request low-FODMAP sauces, such as tamari.
When dining at Mexican restaurants, corn tortillas filled with grilled meats and fresh vegetables can be a safe choice. Skip the beans and load your tacos with lettuce, tomatoes, and cheese. Knowing what to order at various types of restaurants can help you remain compliant with your diet while enjoying diverse flavors.
Effectively Communicating Your Dietary Needs
Effectively communicating your dietary requirements is crucial for a smooth dining experience while adhering to a low-FODMAP diet. Start by clearly stating your dietary preferences to your server upon arrival. Use specific language to describe your restrictions, emphasizing that you’re following a low-FODMAP diet and highlighting foods you need to avoid, such as garlic and onions.
Consider asking your server for recommendations; they often possess valuable insights into dishes that can accommodate dietary restrictions. Don’t hesitate to request modifications to existing menu items. Many chefs are willing to adapt dishes by removing high-FODMAP ingredients or substituting them with safer alternatives.
When dining with friends or family, educate them about your dietary needs so they can assist you in making informed choices. By fostering open communication, you’ll enhance your dining experience and feel empowered to adhere to your dietary guidelines without feeling left out.
Research-Backed Benefits of Low-FODMAP Dinners
Real-Life Health Improvements from Low-FODMAP Diets
Real-life accounts of individuals who have embraced low-FODMAP dinners illustrate the tangible benefits of this dietary approach. Many people report noticeable health improvements after adopting a low-FODMAP lifestyle. For example, one individual experienced a near-complete reduction in IBS symptoms, leading to newfound freedom in their daily activities and an overall enhancement in their quality of life.
Another person shared their journey toward relief from chronic bloating and discomfort after eliminating high-FODMAP foods from their diet. These success stories underscore the potential for low-FODMAP dinners to transform lives by alleviating debilitating symptoms and enhancing overall well-being. The shift to low-FODMAP dining transcends mere food choices; it’s about reclaiming the joy of eating and enjoying life.
Practical Steps for Achieving Long-Term Success on a Low-FODMAP Diet
Maintaining long-term success on a low-FODMAP diet requires a strategic approach to meal planning and ingredient selection. Start by identifying your personal triggers during the elimination phase, so you know what to avoid moving forward. Once you’ve established a list of safe foods, focus on incorporating them into your daily meals.
Regularly plan your shopping trips and meal prep sessions to minimize the risk of selecting high-FODMAP options when you’re pressed for time. Building a repertoire of go-to low-FODMAP recipes can also simplify your cooking routine and keep mealtimes exciting and diverse.
Consider seeking support from groups or online communities focused on low-FODMAP living. Sharing experiences and tips can bolster your motivation and provide valuable insights into maintaining dietary compliance. By implementing these practical steps, you’ll be well on your way to achieving sustained success on your low-FODMAP journey.
Understanding the Science Behind Low-FODMAP Diets
Understanding the science underpinning low-FODMAP diets can empower you to make informed dietary choices. Research indicates that FODMAPs can trigger digestive disturbances for individuals with IBS, leading to symptoms like bloating and abdominal pain. The low-FODMAP diet aims to mitigate these symptoms by minimizing the intake of fermentable carbohydrates that are challenging to digest.
Studies have shown that following a low-FODMAP diet can lead to a substantial reduction in IBS symptoms for many individuals. The structured approach of the diet, which includes elimination and reintroduction phases, allows people to identify personal triggers and tailor their diets accordingly. By understanding the scientific principles behind low-FODMAP diets, you can make informed dietary choices with greater confidence and purpose.
Strategic Nutritional Approaches for Balanced Low-FODMAP Meals
Creating balanced low-FODMAP dinners that meet your nutritional needs is essential for overall health. Focus on incorporating a variety of food groups into each meal. Aim to include lean proteins, healthy fats, and a mix of low-FODMAP vegetables.
For example, a well-rounded dinner could consist of grilled salmon, served with quinoa and roasted vegetables. This meal not only provides essential omega-3 fatty acids and protein but also delivers a range of vitamins and minerals from the vegetables, ensuring a nutritious, satisfying meal.
Additionally, incorporating healthy fats from sources like olive oil or avocado can enhance the flavor of your meals while supplying important nutrients. Ensuring a colorful plate filled with diverse ingredients will help you meet your nutritional needs while adhering to low-FODMAP guidelines. By employing these strategies, you’ll create meals that are both satisfying and healthy.
Maintaining a Sustainable Low-FODMAP Lifestyle
Reintroducing FODMAPs Safely into Your Diet
Reintroducing FODMAPs after the elimination phase is a critical step in identifying personal triggers. Begin by introducing one FODMAP category at a time, such as fructans or lactose, and monitor any symptoms for 3 to 7 days. This gradual process allows you to observe your body’s reactions and determine your tolerance levels effectively.
As you reintroduce foods, maintain a detailed diary of your meals and any symptoms you experience. This practice will help you identify specific foods that cause discomfort and those you can enjoy without issue. It’s essential to be patient during this phase, as some individuals may tolerate certain FODMAPs better than others.
Consult a healthcare professional or dietitian to guide you through this process, ensuring you make informed decisions while maintaining a balanced diet. By following these steps, you can safely reintroduce FODMAPs while gaining valuable insights into your dietary needs.
Strategies for Supporting Long-Term Adherence to a Low-FODMAP Diet
Maintaining adherence to a low-FODMAP diet over the long term can be challenging, but it is achievable with the right strategies. Building a strong support system is crucial; consider joining local or online communities where you can share experiences and resources. These connections can provide encouragement and practical tips to help you stay on track.
Meal planning and preparation play a pivotal role in adherence. By regularly preparing low-FODMAP meals, you can simplify the process of avoiding high-FODMAP temptations. Staying informed about seasonal produce and experimenting with new recipes can also keep your diet engaging and enjoyable.
Finally, continually educate yourself about FODMAPs and their sources. Understanding the science behind your dietary choices can reinforce your commitment and empower you to make informed decisions. With these strategies in place, you can successfully navigate your low-FODMAP lifestyle while relishing a diverse array of delicious meals.
Handling Social Situations While Following a Low-FODMAP Diet
Social situations can pose challenges when adhering to a low-FODMAP diet, but with strategic planning, you can navigate them successfully. When invited to events, consider discussing your dietary needs with the host beforehand. This allows them to accommodate your requirements, ensuring you have safe meal options available.
If you’re attending a potluck or gathering, consider offering to bring a dish that meets your dietary requirements. This guarantees that there will be something you can eat and introduces others to delicious low-FODMAP options that highlight the variety available.
During social outings, don’t hesitate to inquire about menu items at restaurants, focusing on simple preparations that are less likely to include hidden FODMAPs. Preparing a few conversational phrases about your dietary needs can also facilitate smoother communication, helping you feel more at ease. By employing these strategies, you can confidently enjoy social situations without compromising your dietary goals.
Systematic Planning for Your Low-FODMAP Meals and Snacks
Planning low-FODMAP meals and snacks is crucial for maintaining a healthy dietary lifestyle. Start by creating a weekly menu that includes breakfast, lunch, dinner, and snacks. Focus on incorporating a variety of low-FODMAP foods to keep your meals interesting and nutritionally balanced.
Consider meal prepping on weekends, where you can cook larger quantities of meals and portion them for the week ahead. This strategy saves time and helps you avoid high-FODMAP options when you’re busy. Include healthy snacks in your meal planning, such as low-FODMAP fruits like strawberries or oranges, or nut butter with rice cakes. Utilizing online resources and cookbooks focused on low-FODMAP recipes can inspire and help you diversify your meals. By taking a proactive approach to meal planning, you can ensure that you’re always prepared and maintain your low-FODMAP lifestyle with ease.
Effectively Monitoring and Managing Your FODMAP Intake
Monitoring and managing your FODMAP intake is essential for preventing symptoms and sustaining your health. Begin by keeping a detailed food diary, noting everything you consume along with any symptoms you experience. This practice will help you identify patterns and specific triggers, enabling you to make informed dietary decisions. Utilizing mobile apps designed for tracking FODMAPs can simplify this process, providing insights into your consumption levels and potential problem areas. As you become more acquainted with your body’s reactions, you’ll develop a better understanding of your personal tolerances.
Additionally, regularly reassess your dietary choices to ensure you’re staying within low-FODMAP limits while still enjoying a varied range of foods. This ongoing monitoring will empower you to manage your intake effectively, ensuring you maintain a healthy and satisfying low-FODMAP lifestyle.
Frequently Asked Questions About the Low-FODMAP Diet
What Are FODMAPs, and Why Should They Be Avoided?
FODMAPs are short-chain carbohydrates that can cause digestive issues for some individuals, particularly those with IBS. Avoiding them can help reduce symptoms like bloating and discomfort.
Can I Eat Fruits on a Low-FODMAP Diet?
Yes, but focus on low-FODMAP fruits such as strawberries, oranges, and bananas. Avoid high-FODMAP fruits, such as apples and pears.
Is It Difficult to Follow a Low-FODMAP Diet?
It may seem challenging at first, but with proper meal planning and a good understanding of ingredients, it becomes manageable. Many individuals find that it leads to significant relief from digestive issues.
How Long Should I Stay on a Low-FODMAP Diet?
Typically, the elimination phase lasts 4 to 6 weeks. After that, you can start reintroducing FODMAPs to identify personal triggers.
Are There Low-FODMAP Snacks I Can Enjoy?
Absolutely! Options like rice cakes with nut butter, low-FODMAP fruits, and homemade popcorn are great snack choices.
Can I Dine Out While on a Low-FODMAP Diet?
Yes, you can dine out by selecting restaurants that accommodate dietary restrictions and clearly communicating your needs to the staff when placing your order.
What Should I Do If I Experience Symptoms While Reintroducing FODMAPs?
If symptoms arise during reintroduction, return to your elimination diet and consult a dietitian for guidance on managing your dietary needs.
How Can I Ensure My Low-FODMAP Meals Are Balanced?
Aim to include a variety of lean proteins, healthy fats, and low-FODMAP vegetables in your meals to achieve a balanced nutritional intake.
Where Can I Find Low-FODMAP Recipes?
You can find a wealth of low-FODMAP recipes online, in dedicated cookbooks, and through mobile apps designed for dietary restrictions.
Are There Any Supplements I Should Consider on a Low-FODMAP Diet?
While it’s best to get nutrients from food, consider consulting a healthcare professional about potential supplements if you have specific dietary concerns.
Stay Updated with Our Latest Posts on Facebook!
The post How to Make Low-Fodmap Dinners: Simple Recipes for Everyone appeared first on https://cookinggods.com
The Article Low-Fodmap Dinners: Easy Recipes for Everyone to Enjoy Was Found On https://limitsofstrategy.com
-

Cherry Wood: Your Essential Guide to Sweet Smoke Flavor
Discover the Rich Flavors of Cherry Wood Smoking for Unforgettable Culinary Adventures
Understanding Cherry Wood and Its Culinary Benefits
Utilizing cherry wood for its remarkable smoking qualities transcends mere aesthetics and delves into the heart of culinary artistry. Sourced from the cherry tree, this wood is cherished not only for its striking reddish hue and intricate grain patterns but also for its exceptional ability to enhance flavors in cooking. In the world of smoking, cherry wood is renowned for imparting a delicate and sweet smoke flavor, making it an ideal choice for a wide variety of foods. This remarkable versatility, combined with its gentle sweetness, is a primary reason why both professional chefs and home cooks consistently opt for cherry wood in their smoking endeavors. Here are some key attributes that make cherry wood a favored selection:
- Mild Sweetness: Delivers a gentle sweetness that elevates flavors without overwhelming the palate.
- Visual Appeal: Infuses a captivating reddish tint to smoked dishes, enhancing presentation.
- Versatility: Harmonizes beautifully with an array of meats, fish, and vegetables.
- Accessibility: Easily obtainable from local suppliers and a variety of online retailers.
- Consistent Burn: Burns evenly, providing a steady stream of smoke for optimal flavor infusion.
Why Cherry Wood Is the Premier Choice for Smoking?
Integrating cherry wood into your smoking toolkit comes with a multitude of advantages that can significantly enhance the flavors of your culinary creations. One standout benefit is its capacity to deliver a mild, fruity flavor that complements the natural tastes of diverse foods. Unlike more intense smoking woods that can dominate the flavor profile, cherry wood offers a balanced smoking experience, making it especially suitable for those who prefer a more subtle smoke taste. Its adaptability allows it to enhance various meats, fish, and even vegetables, solidifying its status as an indispensable ingredient for any smoking aficionado.
Moreover, cherry wood isn’t limited to savory dishes; it also shines in the realm of desserts, adding a unique depth that is hard to replicate with other wood types. This versatility positions cherry wood as an invaluable asset for chefs looking to innovate and impress their guests. Its ability to seamlessly blend flavors makes it a favored choice for both novice cooks and seasoned smokers, ensuring that everyone can enjoy the art of smoking with outstanding results.
Are You Ready to Explore More?
Where to Find Premium Cherry Wood for Your Smoking Projects
Sourcing cherry wood for your smoking applications is a simple endeavor, as it can be procured from various locations across the United States. Many local lumberyards are typically well-stocked with an assortment of smoking woods, including cherry. Additionally, numerous online retailers specialize in grilling and smoking supplies, making it convenient to find high-quality cherry wood. When purchasing cherry wood, it is crucial to verify that it is untreated and free from harmful chemicals, as these can adversely affect both safety and flavor quality. Consider these reputable suppliers in the U.S. as potential sources:
- BBQGuys: A well-established supplier offering an extensive range of smoking woods.
- Oklahoma Joe’s: Provides cherry wood chips and chunks specifically designed for the smoking process.
- Amazon: Features various sellers offering cherry wood options, often accompanied by customer reviews.
- Woodland Direct: Specializes in different types of wood suitable for smoking and grilling.
Your Comprehensive Guide to Perfecting Sweet Smoke Flavor with Cherry Wood

How Cherry Wood Elevates the Flavor of Various Meats
The impact of cherry wood on different meats is consistently lauded by chefs and culinary enthusiasts, thanks to its mild flavor profile that enhances without overpowering. For example, when used with pork, cherry wood complements the natural sweetness of the meat, achieving a delightful balance that can elevate a simple pork shoulder to gourmet status. This principle holds true for chicken, where the sweet undertones of cherry wood can enrich the overall flavor, transforming smoked chicken into a dish that stands out on any dining table.
Beef also benefits significantly from cherry wood smoking, particularly with cuts like brisket or steak. The subtle sweetness melds seamlessly with the rich flavors of the beef, creating a nuanced dining experience that keeps diners coming back for more. Even fish, which generally requires a lighter touch during smoking, thrives under the influence of cherry wood. Delicate varieties such as salmon and trout absorb the sweet smoke without being overwhelmed, resulting in a beautifully flavored dish that showcases the fish’s natural qualities.
Best Practices for Smoking with Cherry Wood
To achieve optimal results when smoking with cherry wood, several best practices should be implemented. First and foremost, it’s essential to use cherry wood in moderation. Its sweet, fruity smoke can become overpowering if overused, so a cautious approach is vital. Additionally, soaking the wood chips for at least 30 minutes before use is another critical step. This soaking process allows the wood to absorb moisture, promoting a steady smolder and consistent smoke production rather than rapid burning. Here are actionable steps to enhance your smoking techniques:
- Prepare the Wood: Chop cherry wood into small chips or chunks and soak them for a minimum of 30 minutes.
- Monitor Temperature: Ensure your smoker is set to the appropriate temperature for the specific type of meat being prepared.
- Utilize a Water Pan: This helps maintain moisture within the smoker, enhancing the flavor profile of the cherry wood.
- Ensure Proper Ventilation: Adequate airflow is crucial; adjust the vents to maintain smoke flow without becoming too intense.
Insights from Culinary Experts on Cherry Wood’s Flavor Profile

Culinary experts consistently praise the delightful characteristics of cherry wood when used for smoking. Its flavor profile is often described as mild and sweet, making it an excellent option for beginners who may feel daunted by stronger woods such as hickory or mesquite. The gentle flavor does not overshadow the dish, allowing the food’s natural taste to shine while adding a subtle layer of complexity. This attribute proves especially beneficial when experimenting with diverse recipes.
In culinary contexts, cherry wood is frequently recommended for a variety of dishes ranging from smoked ribs to poultry. Its compatibility with an array of marinades and rubs amplifies its appeal, as it enriches the overall flavor without overshadowing the spices employed. Chefs often suggest beginning with cherry wood for those new to smoking, as it provides an accessible entry point into the world of wood-fired flavors. By incorporating cherry wood into your culinary arsenal, you unlock a realm of potential and creativity in flavor pairings.
Transforming Desserts with Cherry Wood Smoking Techniques
While many associate smoking primarily with meats, the potential for using cherry wood extends into the dessert realm, offering an innovative twist that can surprise and delight. The sweet smoke generated by cherry wood has the unique ability to elevate desserts such as ice cream, cakes, and even fruits, introducing an unexpected yet harmonious blend of flavors. For example, lightly smoking vanilla bean ice cream with cherry wood adds a delightful complexity that beautifully complements the dessert’s creaminess.
Furthermore, cherry wood can be utilized to impart rich flavors to fruits like peaches or plums. Smoking these fruits enhances their natural sweetness while providing a distinctive depth of flavor that is perfect for summer desserts. Techniques for employing cherry wood in dessert smoking involve keeping the smoke light and brief, ensuring that the core flavors of the dessert remain intact while still benefiting from the aromatic profile of the wood. As culinary creativity continues to evolve, cherry wood emerges as a versatile ingredient that can transform traditional desserts into extraordinary experiences.
Essential Steps for Preparing Cherry Wood for Smoking
Correctly Cutting and Storing Cherry Wood
Preparing cherry wood for smoking involves cutting it into appropriate sizes and storing it properly to maintain its quality. Begin by selecting healthy cherry wood that is free from disease or chemical treatments. When cutting, aim for small chips or chunks that will easily fit into your smoker or grill. Proper storage is crucial to prevent mold and preserve the wood’s integrity. Here are some useful storage tips to consider:
- Dry Environment: Store cherry wood in a cool, dry area to prevent moisture accumulation.
- Airtight Containers: Use airtight containers or bags to protect the wood from humidity.
- Label Clearly: Clearly mark your different wood types to avoid confusion when selecting smoking wood.
- Temperature Regulation: Keep wood away from extreme temperatures or direct sunlight to prevent degradation.
The Importance of Soaking Cherry Wood Before Use
Soaking cherry wood chips or chunks before smoking is a vital practice that can significantly enhance your smoking experience. By soaking the wood for 30 minutes to an hour, you allow it to absorb the moisture necessary for prolonged smoldering. This technique prevents the wood from igniting too quickly, which could result in a harsh or acrid smoke flavor that detracts from the overall taste of your food. While water is the most common soaking liquid, consider using other flavorful liquids, such as apple juice or wine, to introduce additional flavor notes.
The process begins by placing your cherry wood in a container filled with your chosen liquid. After soaking, drain any excess liquid before placing the chips in your smoker. The result is a gentle, consistent smoke that imparts the sweet, mild flavor for which cherry wood is renowned, enhancing your smoked dishes without overwhelming them. Soaking cherry wood also allows for better control over the smoking process, ensuring that you achieve the desired flavor profile while maintaining the integrity of the food being smoked.
Ensuring Safety When Smoking with Cherry Wood
Safety is paramount when using cherry wood for smoking, as the type of wood you select can significantly impact both flavor and health. Always ensure that the cherry wood you are using is untreated, as chemicals or preservatives can leach into the food, posing health risks. Before using any wood, inspect it for signs of mold, pests, or rot. If you notice any suspicious marks or odors, it’s best to discard the wood to avoid compromising the quality of your culinary creations.
Only select wood from reputable suppliers who can guarantee the safety of their products. When in doubt, stick to well-known brands or trusted local sources. Remember, the aim is to enhance flavors while ensuring a safe and enjoyable cooking experience. By prioritizing safety and quality in your selection of cherry wood, you can confidently create delectable smoked dishes that are both flavorful and safe to consume.
The Importance of Seasoning Cherry Wood for Flavor Enhancement
Seasoning cherry wood is a critical step that should not be overlooked if you want to enhance its flavor for smoking. Proper seasoning involves adequately drying the wood to reduce its moisture content, resulting in a cleaner burn and improved smoke output. Ideally, cherry wood should be seasoned for at least one month, although longer periods can yield even better results. During this time, it’s vital to store the wood in a well-ventilated area, protected from rain or excessive humidity.
The seasoning process not only enhances the flavor of the smoke but also helps prevent excessive creosote buildup, which can occur if the wood retains too much moisture. Properly seasoned cherry wood produces a sweet, mild smoke that perfectly enhances the flavors of your dishes. By taking the time to season your cherry wood correctly, you ensure that your smoking experience is as rewarding as possible, allowing the delicious flavors to shine through without unwanted bitterness.
Selecting the Best Cherry Wood for Smoking
Selecting the right cherry wood for smoking is essential for achieving the best possible results in your culinary endeavors. First, ensure that you choose wood from healthy, well-maintained trees. Diseased or damaged trees can impart off-flavors or harmful substances into your smoke. Additionally, avoid any cherry wood that has been chemically treated or artificially dried, as these processes can introduce undesirable elements into your food.
When sourcing cherry wood, look for pieces that exhibit a vibrant color and firm texture. Freshly cut cherry wood should emit a pleasant, fruity aroma, indicating its suitability for smoking. The best cherry wood for smoking should ideally be sourced locally, ensuring freshness and quality. By selecting the right cherry wood, you lay the groundwork for a successful smoking experience that enhances your dishes and delights the palate.
Ideal Foods to Pair with Cherry Wood Smoking
Smoking Pork with Cherry Wood for Enhanced Flavor
In the realm of pork smoking, cherry wood emerges as a premier choice. Its mild sweetness pairs beautifully with the natural flavors of pork, amplifying the meat’s inherent richness without overshadowing it. Whether you are preparing ribs, pork shoulders, or tenderloins, cherry wood can elevate each cut, creating a delicious balance of flavors that is sure to impress. The sweetness of the wood enhances the caramelization of the meat’s exterior, resulting in a delightful crust that adds texture and depth.
For optimal results, consider using a dry rub featuring spices like brown sugar, paprika, and garlic to complement the sweetness of cherry wood. This combination allows for a layered flavor profile that elevates your smoked pork to gourmet levels. Additionally, the vibrant red hue that cherry wood imparts gives your dishes an appealing visual presentation, making it a favored choice for entertaining and special occasions. With cherry wood as your smoking partner, you can transform traditional pork dishes into unforgettable culinary experiences.
Techniques and Tips for Smoking Poultry with Cherry Wood
The gentle, sweet smoke flavor from cherry wood makes it an ideal companion for poultry, particularly chicken and turkey. The light, fruity notes of cherry wood enhance the meat’s natural flavors, resulting in a dish that is both flavorful and aromatic. When smoking poultry, consider brining the bird beforehand to infuse moisture and flavor. The outcome is tender, juicy meat that pairs perfectly with the subtle sweetness of the cherry smoke.
For smoking whole birds, an effective technique involves using a dry rub that balances herbs like rosemary and thyme with elements that highlight the wood’s natural sweetness. This combination creates a harmonious flavor profile that leaves a lasting impression. Cherry wood works beautifully with all parts of poultry, from breasts to wings, offering versatility in meal preparation. By embracing cherry wood in your poultry smoking ventures, you can elevate simple meals into culinary masterpieces that captivate the senses.
Delicious Results: Smoking Fish with Cherry Wood
The mild smoke produced by cherry wood is exceptionally well-suited for smoking fish, especially delicate varieties such as salmon and trout. The gentle, sweet notes of cherry wood complement the fish’s natural flavors without overpowering them, resulting in a beautifully balanced dish. When smoking fish, it’s crucial to keep the smoking time relatively short to avoid drying out the meat. This ensures that the fish remains moist and flavorful as it absorbs the sweet smoke from the cherry wood.
For those looking to experiment, consider marinating your fish in a citrus-based marinade before smoking to allow the flavors to meld and create a unique taste experience. The interplay between citrus and sweet cherry smoke can yield delightful results. Given that cherry wood pairs so well with fish, it’s an excellent choice for entertaining guests or preparing a special meal that is sure to impress. The final dish not only tastes exquisite but also presents beautifully on the plate, making it a centerpiece for any culinary occasion.
Achieving Perfectly Smoked Beef with Cherry Wood
When smoking with cherry wood, the wood’s mild sweetness elevates the natural richness of beef, resulting in exceptional flavor. Cuts such as brisket, flank steak, and ribs particularly benefit from the subtle smokiness that cherry wood imparts. This wood adds depth that is ideal for those who appreciate a nuanced smoke flavor without the intensity of stronger woods, such as mesquite.
To maximize the impact of cherry wood when smoking beef, consider pairing it with robust spices that complement the sweet notes, such as black pepper, garlic, and onion powder. This combination allows both the spices and the cherry wood flavors to shine through, creating a multi-layered taste experience. Smoking beef with cherry wood is not just about flavor; it’s also about presentation. The beautiful red hue that cherry wood creates on the meat enhances its visual appeal, making it an excellent choice for gatherings and celebrations. With cherry wood, smoking beef becomes an art form that elevates every bite.
Enhancing Vegetables with Cherry Wood Smoking Techniques
Cherry wood is often an overlooked gem in smoking vegetables, offering a delicate, sweet smoke that can elevate the natural flavors of produce. Vegetables such as peppers, onions, and mushrooms are particularly well-suited for cherry wood smoking, as the sweet notes beautifully complement their inherent flavors. When smoking vegetables, it’s essential to keep the cooking time shorter, allowing the cherry wood flavor to permeate without drying them out.
The versatility of cherry wood encourages creativity in vegetable preparation. Consider tossing your vegetables in olive oil and a light seasoning of salt and pepper before placing them in the smoker. This method helps the smoke adhere to the vegetables while adding an extra layer of flavor. Smoking vegetables with cherry wood not only enriches their taste but also imparts an appealing char that enhances their presentation on the plate. Therefore, cherry wood can elevate your vegetable dishes, transforming them into flavorful accompaniments or even stand-alone delights.
Research-Backed Insights on the Benefits of Using Cherry Wood for Smoking
Studies on Cherry Wood’s Flavor Impact
Research indicates that cherry wood provides a unique flavor profile that enhances the smoking experience. Studies have demonstrated that its mild sweetness contributes to the overall taste of smoked foods without overpowering them, making it an excellent choice for a variety of dishes. For instance, taste tests comparing smoked foods reveal that those prepared with cherry wood often achieve higher satisfaction levels due to the balanced flavors it imparts.
Furthermore, culinary experts have noted that cherry wood’s versatility allows it to meld well with different types of meat and vegetables, creating a more nuanced flavor profile. This adaptability makes it a preferred choice for both professional chefs and home cooks alike, who seek a smoke that enhances rather than dominates their dishes. The growing popularity of cherry wood in smoking reflects its positive reception among consumers, signifying its significant impact on the culinary landscape.
Comparing Cherry Wood to Other Smoking Woods
When compared to stronger smoking woods like hickory or mesquite, cherry wood stands out as a milder alternative, offering a distinct sweet flavor profile. Hickory, while rich and robust, can easily overpower delicate proteins, making cherry wood a more versatile choice suitable for a wider variety of foods. This quality enables cooks to explore diverse flavor combinations without compromising the inherent tastes of their ingredients.
The mild smoke produced by cherry wood is particularly beneficial when smoking lighter meats, such as poultry or fish, where a heavy smoke flavor could detract from the dish. Cherry wood’s balanced sweetness allows for a harmonious blend of flavors, ensuring that the smoky essence enhances rather than overshadows. This characteristic makes cherry wood an ideal choice for those eager to delve into the world of smoking while preserving the authenticity of their ingredients.
Health Benefits of Smoking with Cherry Wood
Some studies suggest that smoking with cherry wood may reduce the formation of harmful compounds compared to smoking with other types of wood. This advantage stems from the milder combustion characteristics of cherry wood, which produces a smoke that is less harsh on the palate and potentially healthier for consumption. Cooking with cherry wood often yields more flavorful dishes that require less seasoning, thereby contributing to enhanced health benefits.
Moreover, the natural compounds found in cherry wood can impart unique antioxidants to the smoked food, offering added health benefits that other woods may lack. By choosing cherry wood for smoking purposes, you not only enhance flavor but also align your cooking practices with health-conscious choices. As the culinary landscape continues to evolve, the emphasis on utilizing healthier smoking materials, such as cherry wood, may play a pivotal role in how we approach smoking and flavor enrichment.
Mastering Cherry Wood Smoking Techniques
Techniques to Enhance Your Cherry Wood Smoking Experience
Mastering the art of smoking with cherry wood involves understanding various techniques that can elevate the overall experience. One effective method is to incorporate a water pan into your smoker, which helps to maintain moisture levels and create a more stable smoking environment. This approach allows cherry wood to smolder slowly, producing a consistent, flavorful smoke that permeates the food without drying it out.
Experimenting with different temperatures and smoking durations is also vital in perfecting your technique. Lower temperatures over extended periods often yield more profound flavors, allowing the cherry wood to work its magic on the food. Additionally, monitoring the moisture levels in the wood is beneficial, as well-dried wood will produce a cleaner smoke. By combining these techniques, you can enhance your cherry wood smoking skills and consistently achieve delicious, flavorful results.
Pairing Cherry Wood with Other Flavors for Unique Dishes
The natural sweetness of cherry wood makes it an excellent companion for various herbs and spices, creating a rich tapestry of flavors that can elevate your smoked dishes. Pairing cherry wood with herbs such as rosemary, thyme, and garlic enhances the overall flavor profile, providing a well-rounded taste experience. These combinations work particularly well with meats, where the robust flavors of the herbs harmonize with the mild sweetness of the smoke.
Additionally, considering sweet marinades or glazes that complement the cherry wood’s sweetness can further elevate your dishes. For instance, a honey glaze on smoked chicken can create a delightful contrast with the cherry smoke, resulting in a dish that is both sweet and savory. By experimenting with diverse flavor pairings, you can unlock new dimensions in your cooking, making cherry wood a versatile asset in your culinary toolkit.
Essential Tips for Beginners in Cherry Wood Smoking
For beginners eager to explore the world of cherry wood smoking, starting small is crucial. Begin by using small amounts of cherry wood to gauge its flavor intensity, gradually increasing the quantity as you become more familiar with its characteristics. This approach helps you find the perfect smoke flavor balance while minimizing the risk of overpowering your dishes.
Another important tip is to practice with different meats and vegetables, as each may respond uniquely to cherry wood smoke. Keep detailed notes on your smoking sessions, including the type of meat, smoking duration, and wood used, to track which combinations yield the best results. Over time, you’ll develop a keen understanding of how cherry wood interacts with various foods, allowing you to create flavorful smoked dishes with confidence.
Addressing Common Challenges in Cherry Wood Smoking
What to Do If the Smoke Is Too Strong?
If you notice that the smoke from cherry wood is excessively strong, several steps can help balance the flavors. First, consider reducing the amount of cherry wood used in the smoking process. A common error is using too much wood, which can lead to harsh smoke flavors. Adjusting the quantity will result in a gentler infusion of flavor.
Additionally, ensuring adequate ventilation in your smoker can help. Smoke buildup can intensify flavors, so keeping airflow open and allowing excess smoke to escape can mitigate the strength. By implementing these adjustments, you can appreciate the delightful nuances of cherry wood without overwhelming your dishes.
How to Address Inconsistent Smoke Flavor?
Inconsistent smoke flavor is a common issue that can arise during the smoking process. This problem often stems from varying moisture levels in the wood. To achieve a more consistent flavor, ensure that your cherry wood is uniformly soaked and dried before use. Testing the moisture content can also help determine if the wood is ready for smoking.
Moreover, maintaining a stable temperature in your smoker is crucial. Fluctuating temperatures can affect how the wood smolders and delivers smoke flavor, leading to inconsistencies. By monitoring your smoker’s temperature and ensuring even moisture levels in your cherry wood, you can achieve a more balanced and enjoyable smoking experience.
How to Prevent Over-Smoking with Cherry Wood?
Preventing over-smoking with cherry wood requires a careful approach to the amount of wood used and close monitoring of the smoking process. Using cherry wood sparingly is essential; a little goes a long way. Start with a small quantity and make adjustments as necessary, paying attention to the flavors developing during the smoking process.
Additionally, monitoring the size and type of food being smoked is important. Larger cuts may require longer smoking times, while smaller pieces will need less. Adjusting the amount of cherry wood accordingly helps avoid over-smoking and ensures balanced flavors. By practicing these techniques, you can maintain control over the smoking process and produce delicious, well-flavored foods.
Managing Temperature Fluctuations During Cherry Wood Smoking
Temperature control is crucial when smoking with cherry wood, as fluctuations can lead to uneven cooking and flavor distribution. To maintain a stable smoking temperature, regularly check the vents and adjust them to encourage consistent airflow. Proper ventilation ensures that smoke circulates evenly, which is essential for achieving the desired flavor profile.
Using a reliable thermometer can help you keep track of the internal temperature of both your smoker and the food being cooked. By making necessary adjustments and ensuring that your smoker maintains a consistent temperature, you can create a well-balanced smoking experience that highlights the sweet, mild flavors of cherry wood.
What Should You Do If the Cherry Wood Chips Burn Too Quickly?
If your cherry wood chips are burning too quickly, resulting in a harsh flavor, there are several strategies you can adopt to extend their burn time. One effective solution is to utilize larger chunks of wood instead of small chips. Larger pieces smolder more slowly, providing a steadier smoke output that enhances the flavors of your food over time.
Furthermore, soaking the chips for a longer duration before use can also help. A thorough soak allows the wood to retain moisture, which helps it smolder rather than burn. Implementing these techniques can lead to a more controlled smoking process, resulting in well-balanced flavors that showcase the sweet notes of cherry wood.
Innovative Cherry Wood Smoking Techniques
Cold Smoking with Cherry Wood: A Flavorful Technique
Cold smoking with cherry wood opens a world of culinary creativity, allowing you to infuse delicate flavors into ingredients without cooking them. This technique is particularly effective for cheeses, nuts, and even fruits. The gentle, sweet smoke produced by cherry wood enriches the natural flavors of these foods without overwhelming them, resulting in unique flavor profiles that surprise and delight the palate.
When cold smoking, it’s essential to keep the temperatures below 90°F to avoid melting or cooking the food. Utilizing a cold smoke generator can help maintain this temperature, allowing the cherry wood to work its magic over an extended period. Experimenting with this technique can yield delicious results, whether you’re creating smoked cheeses for a charcuterie board or adding depth to nuts for a sophisticated snack. Cherry wood truly shines in the realm of cold smoking, showcasing its versatility beyond traditional methods.
Creative Recipes to Try with Cherry Wood Smoking
The unique flavor profile of cherry wood lends itself to a variety of innovative recipes that can elevate your culinary repertoire. A popular dish involves cherry-smoked salmon, where the fish is marinated in a citrus-based marinade and then cold-smoked using cherry wood for a sweet, smoky finish. This dish pairs beautifully with a light salad or on a bagel with cream cheese, creating an elegant brunch option.
Another inventive application is cherry wood-smoked vegetables, where seasonal produce, such as zucchini and bell peppers, is lightly tossed in olive oil and smoked to enhance their natural sweetness. Additionally, consider experimenting with cherry wood-smoked cocktails, infusing spirits like bourbon or gin with a hint of cherry smoke for a delightful twist. These creative applications showcase the versatility of cherry wood, inviting endless culinary exploration.
Combining Cherry Wood with Other Woods for Enhanced Smoking Experiences
Combining cherry wood with other types of wood can create complex and intriguing flavor profiles that elevate your smoking experience. Pairing cherry wood with apple wood, for instance, results in a harmonious blend of sweet and fruity notes that complement a variety of meats and vegetables. This combination is particularly effective with poultry, where the mildness of both woods enhances the flavors without overpowering them.
Additionally, mixing cherry wood with oak can introduce a deeper, bolder flavor profile. This blend is perfect for smoking heartier cuts of meat, such as brisket or pork shoulder, as it balances the sweet notes of cherry with the robustness of oak. The art of mixing different woods allows for endless experimentation, enabling you to create unique flavor experiences that will delight and surprise your guests.
Frequently Asked Questions About Cherry Wood Smoking
What flavor does cherry wood impart when smoking?
Cherry wood imparts a mild, sweet smoke flavor that enhances the natural flavors of meats and vegetables without overpowering them.
Can I use cherry wood for cold smoking?
Yes, cherry wood is excellent for cold smoking, providing a sweet, aromatic flavor that pairs well with cheeses, nuts, and other delicate foods.
How long should I soak cherry wood chips before smoking?
Soak cherry wood chips for at least 30 minutes to an hour to ensure they smolder rather than burn, creating a consistent smoke.
Is cherry wood suitable for all types of meat?
Yes, cherry wood is versatile and pairs well with a variety of meats, including pork, chicken, beef, and fish, enhancing their natural flavors.
How do I store cherry wood for smoking?
Store cherry wood in a cool, dry place in airtight containers to prevent moisture and maintain its quality for smoking.
Can I mix cherry wood with other types of wood?
Absolutely! Mixing cherry wood with other woods, such as apple or oak, can create complex flavor profiles that enhance the taste of your smoked dishes.
What foods should I avoid smoking with cherry wood?
While cherry wood is versatile, it may not pair well with fish that require a very light smoke flavor, such as some whitefish; use it sparingly in these cases.
How can I tell if my cherry wood is suitable for smoking?
Ensure that your cherry wood is untreated, free from mold or pests, and has a pleasant, fruity aroma, indicating its suitability for smoking.
What should I do if the cherry wood smoke is too strong?
If the smoke is too strong, reduce the amount of wood used, ensure proper ventilation in your smoker, and monitor the smoking process closely.
What is the best way to cut cherry wood for smoking?
Cut cherry wood into small chips or chunks to fit your smoker, ensuring they are uniform in size for even burning during the smoking process.
Connect with us on Facebook!
The Article Using Cherry Wood for Sweet Smoke Flavor: A Guide appeared first on https://pitmastersarsenal.com
The Article Cherry Wood for Sweet Smoke Flavor: Your Essential Guide Was Found On https://limitsofstrategy.com
-

Cooking Without Power: Essential Tips and Techniques
Discover the Art of Cooking Without Electricity: An In-Depth Guide
Understanding the Concept of Cooking Without Electrical Appliances
Cooking without electricity is an intriguing culinary practice that emphasizes meal preparation using techniques that do not rely on electric or gas-powered appliances. This approach draws inspiration from age-old methods that have been cherished across diverse cultures for generations, encouraging innovation and resourcefulness in the kitchen. By delving into this style of cooking, individuals can discover practical, environmentally friendly, and sustainable methods that not only satisfy hunger but also foster creativity. Common techniques for cooking without electricity include:
- solar cooking
- <a href="https://survivalbite.com/open-fire-cooking-a-timeless-culinary-art/">open fire cooking</a>
- Haybox cooking
- Pit cooking
- Thermal mass cooking
- Utilizing a rocket stove
- Food preservation through fermentation and drying
Exploring these diverse cooking techniques not only enhances culinary skills but also cultivates a deeper understanding and appreciation for the rich cultural heritage embedded in these traditional practices, creating a meaningful connection to food and its origins.
Uncover the Numerous Advantages of Cooking Without Electricity
Embarking on the journey of cooking without electricity reveals a wealth of advantages that extend far beyond mere meal preparation. This approach significantly promotes sustainability by reducing reliance on fossil fuels and electricity, leading to a noticeable decrease in one’s carbon footprint. Additionally, cooking without electricity often proves to be more economical, as it leverages accessible resources instead of relying on costly energy sources. Furthermore, this culinary style fosters a stronger relationship with food, as individuals dedicate time and effort to craft their meals thoughtfully. Notable benefits of cooking without electricity include:
- Cost savings on utility bills
- Increased food security through enhanced self-sufficiency
- Environmental sustainability via reduced carbon emissions
- Improved health through the emphasis on fresh ingredients
- Strengthened community connections through shared culinary experiences
- Encouragement of culinary creativity and experimentation
By adopting these practices, individuals can transform their cooking experiences into enriching and fulfilling endeavors that resonate with their personal values and commitment to sustainability.
Key Tools You Need for Cooking Without Electricity Effectively
Equipping oneself with the right tools is essential for mastering the art of cooking without electricity. A variety of indispensable tools can simplify the meal preparation process, making the transition from traditional cooking methods seamless. Solar cookers effectively harness the sun’s energy, while fire pits provide a nostalgic outdoor cooking experience reminiscent of simpler times. Manual food processors and blenders enable ingredient preparation without electrical dependency. Here’s a comprehensive list of essential tools necessary for cooking without electricity:
- Solar cookers
- Fire pits or grills
- Rocket stoves
- Hayboxes or insulated cookers
- Portable charcoal grills
- Manual food processors
- Cast iron cookware
- Fermentation vessels
These essential tools empower cooks to explore a wide range of culinary possibilities while adhering to sustainable cooking practices that respect both the environment and cultural traditions.
Creative Techniques for Achieving Culinary Success Without Electricity

A multitude of techniques exists for cooking without electricity, each offering unique benefits and applications across various culinary traditions and environments. Solar cooking utilizes the sun’s energy—a plentiful renewable resource—for meal preparation. This method requires specialized equipment designed to efficiently capture and retain solar heat. Best practices for solar cooking include positioning the solar cooker directly towards the sun and utilizing dark-colored pots, which significantly enhance heat absorption for optimal cooking results.
Open fire cooking methods, such as grilling and roasting, provide an authentic culinary experience that often accompanies social gatherings and celebrations. Safety is paramount when cooking over an open flame; thus, ensuring proper ventilation, managing firewood effectively, and having a nearby water source for emergencies are critical precautions to take during these cooking sessions.
Thermal mass cooking employs retained heat for slow and even cooking, utilizing materials like bricks or stones to maintain warmth. To achieve maximum efficiency with this method, preheating the thermal mass before placing food inside is essential, ensuring optimal cooking conditions are achieved and maintained throughout the process.
Safety First: Key Considerations While Cooking Without Electricity
Safety is a top priority when cooking without electricity, as traditional cooking methods can present unique risks. Adequate ventilation is crucial, especially when cooking over open flames, to prevent the buildup of harmful gases. Proper fire handling requires using appropriate tools and maintaining a safe distance from flammable materials. Adhering to food safety guidelines is vital to prevent spoilage and foodborne illnesses. Important safety considerations include:
- Maintaining proper food storage temperatures
- Using clean utensils and cookware
- Ensuring sufficient ventilation when utilizing open flames
- Practicing good hygiene during food preparation
By following these safety measures, cooks can fully enjoy the myriad benefits of cooking without electricity while minimizing potential risks associated with traditional cooking methods.
Insights from Experts on Cooking Without Electricity
What Knowledge Can Culinary Professionals Share About Cooking Without Electricity?

Experts in sustainable living and culinary arts advocate for the practice of cooking without electricity, highlighting its numerous benefits for both individuals and the environment. Many culinary professionals stress the significance of selecting seasonal and locally sourced ingredients, which not only enhances flavor but also supports local economies. Real-world examples include chefs conducting workshops aimed at imparting traditional cooking methods that do not depend on modern conveniences. They promote techniques like open-fire cooking, demonstrating how to prepare delicious dishes while reducing reliance on electricity.
Furthermore, sustainability advocates argue that cooking without electricity can encourage healthier eating habits. By steering clear of processed foods, individuals are more inclined to consume fresh, whole ingredients. Chefs often inspire participation in community cooking events where participants can exchange knowledge and skills, nurturing a deeper appreciation for food and its origins while fostering community bonds.
How Can Cooking Without Electricity Enhance Your Health?
Cooking without electricity can significantly bolster health by promoting the use of fresh, unprocessed ingredients. This transition often results in meals that are nutrient-dense and free from artificial additives. Practical steps for adopting healthier cooking methods without electricity involve prioritizing local and seasonal produce, which not only supports local farmers but also guarantees the freshest ingredients are utilized. Embracing techniques like fermentation, which preserves nutrients, and employing methods such as solar cooking can further elevate meal quality and nutritional value.
Additionally, cooking without electricity encourages mindfulness in food preparation. Engaging with food—chopping vegetables or stirring pots over an open flame—can transform cooking into a meditative practice that enhances mental well-being. By focusing on the cooking process and being fully present, individuals can cultivate a healthier relationship with their food, leading to more conscious eating habits and improved overall health.
What Are the Environmental Advantages of Cooking Without Electricity?
The environmental impact of cooking without electricity is profound, as this approach can drastically lower carbon footprints and promote sustainable living practices. By avoiding traditional energy sources, individuals actively contribute to the reduction of greenhouse gas emissions. Expert evaluations suggest that methods such as solar cooking and open-fire cooking leverage renewable energy sources, thereby minimizing waste and environmental harm.
Moreover, cooking without electricity encourages the use of local ingredients, which reduces the environmental costs associated with transporting food over long distances. By adopting sustainable cooking practices, individuals can enhance their health while actively contributing to the preservation of the planet for future generations.
Advanced Strategies for Cooking Without Electricity
How to Optimize Solar Cooking for Maximum Efficiency?
Solar cooking utilizes the sun’s energy to prepare meals, positioning itself as an eco-friendly and sustainable alternative to traditional cooking methods. To maximize solar cooking, one must employ specific equipment—such as solar cookers or solar ovens—designed to concentrate sunlight effectively. Key practices for solar cooking include orienting the cooker to face the sun directly and adjusting its angle throughout the day, along with using dark, heat-absorbent pots to improve cooking efficiency.
Cooking times may vary based on sunlight intensity, so a degree of patience is essential. Foods particularly well-suited for solar cookers include rice, beans, and vegetables, which can be cooked in a single pot to minimize energy loss. Additionally, experimenting with various recipes tailored for solar cooking can yield delightful results while promoting energy conservation and environmental stewardship.
Exploring Techniques for Open Fire Cooking
Techniques for open fire cooking, including grilling or roasting over a campfire, are timeless practices that connect us to our culinary roots. While incredibly rewarding, cooking over an open flame demands careful attention to safety. Essential safety precautions include selecting a designated fire pit area away from flammable materials and always having a nearby water source to extinguish the fire if needed.
When preparing food, ensure that meats are cooked thoroughly to prevent foodborne illnesses, and use separate utensils for raw and cooked foods to avert cross-contamination. Exploring various cooking techniques—such as skewering vegetables or meats on sticks or using cast iron pots over coals—can lead to unforgettable culinary experiences under the open sky, fostering connections with nature and tradition.
Utilizing Thermal Mass for Efficient Cooking Methods
Thermal mass cooking is an innovative approach that leverages retained heat for slow cooking, presenting an efficient alternative to conventional cooking methods. This technique involves using materials such as bricks, stones, or specially designed thermal cookers that retain heat for extended periods. To maximize the efficiency of thermal mass cooking, preheating the thermal mass before placing food inside is crucial, ensuring that the cooking process remains uniform and effective throughout.
Foods particularly suited for this method include stews, soups, and grains, all of which benefit from the slow, even heat. Furthermore, this technique champions resourcefulness, often requiring minimal fuel and can be employed in various environments, from backyards to remote camping sites, thus promoting a sustainable cooking lifestyle.
Addressing Challenges Associated with Cooking Without Electricity
How to Manage Time Constraints When Cooking Without Electricity?
Cooking without electricity can sometimes present time constraints, especially with methods like solar cooking that require extended cooking durations. However, effective planning and preparation can alleviate these challenges. One strategy involves utilizing quicker cooking methods for fast meals, such as open-fire cooking or preparing dishes that can be left to cook slowly while engaging in other activities.
Batch cooking represents another effective tactic, allowing for the preparation of multiple meals simultaneously. By cooking larger quantities, individuals can save time during busy weeks by simply reheating or enjoying leftovers. Additionally, employing techniques like haybox cooking—where food is placed in an insulated container after initial boiling—can substantially decrease cooking time while still yielding delicious, fully cooked meals, making it easier to maintain a sustainable lifestyle.
Adapting Cooking Techniques to Weather Variability
Weather conditions can significantly influence cooking methods without electricity, particularly solar cooking, which heavily relies on sunlight. However, adapting cooking techniques to varying weather conditions is entirely achievable. For instance, on cloudy days, one can switch to open fire cooking or thermal mass cooking, both of which are less dependent on ideal weather conditions for successful meal preparation.
In inclement weather, consider indoor cooking options that utilize thermal mass materials or insulated pots. Additionally, planning meals according to local weather forecasts can optimize cooking times and methods, ensuring that meals are prepared efficiently, regardless of external conditions, and minimize disruptions to your cooking routine.
Effectively Managing Limited Resources in Cooking Without Electricity
Cooking without electricity often necessitates managing limited resources, such as fuel for open fire cooking or water for solar cooking. Developing effective resource management strategies is essential. Prioritizing efficiency by utilizing minimal fuel sources, like small branches or twigs for an open fire, can extend cooking capabilities while minimizing environmental impact.
Moreover, embracing cooking methods that require fewer resources, such as haybox cooking, can prove beneficial. This method employs insulation to retain heat without necessitating continuous fuel. Finally, preserving food through techniques like fermentation or drying can diminish the need for fresh ingredients, enabling cooks to optimize resources while minimizing waste and promoting sustainability.
Ensuring Food Safety Without Conventional Power Sources
Maintaining food safety while cooking without electricity is critical, particularly as traditional refrigeration methods may not be available. Proper storage and cooking techniques are essential to prevent spoilage and foodborne illnesses. First and foremost, ensure that all ingredients are fresh before use, especially perishables like meats and dairy products.
Utilizing cool storage methods, such as burying food in cool ground or employing insulated containers, can help maintain safe temperatures. Cooking food thoroughly, especially meats, is vital for eliminating harmful bacteria. Lastly, practicing rigorous hygiene during food preparation, such as washing hands and utensils, can significantly minimize the risk of contamination, ensuring safe and healthy meals.
Research-Backed Benefits of Cooking Without Electricity
What Do Studies Reveal About Nutritional Benefits?
Research indicates that cooking without electricity can preserve more nutrients in food compared to traditional cooking methods reliant on electricity or gas. Studies reveal that techniques like solar cooking and steaming help retain vitamins and minerals that may be lost through conventional high-temperature cooking methods, such as boiling.
Moreover, cooking without electricity often emphasizes the use of whole, unprocessed ingredients, contributing to higher nutritional quality in meals. Focusing on fresh produce fosters a diet rich in essential nutrients, leading to improved overall health. As a result, individuals adopting these cooking methods are likely to experience significant enhancements in their dietary habits and health outcomes, reflecting the powerful impact of food choices on well-being.
How Does Cooking Without Electricity Affect Mental Health?
Cooking without electricity has the potential to positively influence mental health by promoting mindfulness and reducing reliance on technology. Engaging in the tactile experience of preparing meals—chopping, mixing, and cooking—can serve as a form of meditation, allowing individuals to disconnect from the digital realm and reconnect with their surroundings.
Actionable steps for enhancing mental well-being through cooking without electricity include establishing a routine that integrates cooking as a form of self-care. This could involve setting aside time each week to experiment with new recipes or inviting friends or family to share in the cooking experience. Such activities foster a sense of community and connection, further enhancing mental health and promoting a balanced lifestyle.
How Does Cooking Without Electricity Encourage Environmental Sustainability?
Cooking without electricity significantly contributes to environmental sustainability by reducing greenhouse gas emissions associated with traditional cooking methods. By harnessing renewable energy sources, such as solar or biomass, individuals can lessen their reliance on fossil fuels. Expert evaluations indicate that implementing these practices not only diminishes carbon footprints but also supports a sustainable lifestyle that respects the planet and its resources.
Additionally, cooking without electricity frequently encourages a lifestyle centered around local and seasonal ingredients, minimizing the environmental costs associated with transporting food over long distances. This holistic approach enhances appreciation for the environment, as individuals become more mindful of their food sources and the impact of their choices on the planet, ultimately contributing to a healthier ecosystem.
How Can Cooking Without Electricity Strengthen Social Connections?
Cooking without electricity can significantly foster social connections by promoting communal cooking and shared meals. Traditional cooking methods often unite families and communities, encouraging collaboration and bonding over shared culinary experiences that transcend generations.
One effective way to reinforce community ties is by organizing potlucks or community cooking events, where individuals can exchange recipes and cooking techniques while enjoying each other’s company. Moreover, teaching friends or family members how to cook without electricity creates opportunities for shared experiences and learning, further deepening relationships through the joy of food preparation and the stories that accompany it.
Incorporating Cooking Without Electricity Into Everyday Life
How to Integrate Cooking Without Power into Your Daily Routine?
Integrating cooking without electricity into daily life requires thoughtful planning and adaptability. Start by making small adjustments to your routine, such as dedicating one day a week to exploring solar cooking or open-fire techniques. Gradually expanding this practice fosters a smoother transition, making it a more enjoyable and rewarding experience.
Additionally, consider meal prepping for the week using cooking methods that don’t require power. For example, utilize haybox cooking for slow-cooked meals or prepare larger batches of food that can be easily reheated. Over time, these practices will become second nature, allowing cooking without electricity to seamlessly become an integral part of your culinary lifestyle and routine.
How to Introduce Children to the Joy of Cooking Without Electricity?
Teaching children to cook without electricity can instill invaluable life skills while promoting sustainability. This educational experience can be engaging and enjoyable by making learning fun through hands-on activities and interactive cooking sessions that ignite curiosity and creativity.
Consider organizing family cooking nights where children can assist in meal preparation using traditional methods like open-fire cooking or solar cooking. Encourage creativity by allowing them to select ingredients and experiment with recipes, fostering a sense of ownership over their culinary creations. This approach not only builds essential skills but also deepens their appreciation for food and its origins, laying the foundation for a lifelong love of cooking and sustainability.
Finding Harmony Between Modern and Traditional Cooking Techniques
Finding balance between modern and traditional cooking methods allows for flexibility and variety in meal preparation. Combining these approaches can optimize efficiency while still honoring culinary traditions. For example, a modern slow cooker can be used alongside traditional methods like solar cooking, resulting in a diverse array of meal options that cater to various preferences and occasions.
The benefits of this balance include the opportunity to experiment with new techniques while still enjoying the comfort and familiarity of modern conveniences. This fusion can lead to innovative recipes that reflect both contemporary and traditional influences, celebrating the best aspects of both culinary worlds and enriching the overall cooking experience.
How to Tackle Challenges and Limitations of Cooking Without Power?
Addressing common challenges, such as time constraints and weather conditions, is essential to make cooking without electricity more feasible and enjoyable. Effective planning and preparation can mitigate these obstacles. For instance, utilizing quicker cooking methods, like open-fire cooking, can save time when preparing meals, allowing for a more efficient workflow in the kitchen.
Moreover, having backup plans for adverse weather conditions—such as maintaining alternative cooking methods—can ensure that meals are consistently prepared without electricity. Additionally, embracing resourcefulness and creativity in the kitchen can transform limitations into opportunities for culinary innovation, enriching the overall cooking experience and fostering a sense of accomplishment.
Emerging Innovations in Cooking Without Electricity
What Are the Latest Innovations in Cooking Without Power Technologies?
Innovations in cooking without electricity technology are continually evolving, introducing new and efficient methods for meal preparation. Recent advancements include solar cookers designed for enhanced efficiency, such as parabolic solar cookers that effectively concentrate sunlight, enabling faster cooking times while maintaining energy conservation.
Other innovations involve the development of portable biomass stoves that utilize waste materials, thus reducing environmental impact while providing cooking solutions in off-grid settings. As technology continues to advance, these new tools will further enhance the practicality of cooking without electricity, making it more accessible to a wider audience and promoting sustainable practices throughout the culinary landscape.
The Importance of Cooking Without Power in Sustainable Living
Cooking without electricity plays a vital role in sustainable living, promoting eco-friendly practices that diminish reliance on non-renewable energy sources. By embracing these methods, individuals contribute to a more sustainable lifestyle that minimizes waste and prioritizes local food sources, fostering a sense of responsibility towards the environment.
Moreover, cooking without electricity cultivates mindfulness in consumption, encouraging awareness of resource usage and food origins. This lifestyle choice benefits individuals and has a broader impact on the community and environment, creating a ripple effect that contributes to a more sustainable future for everyone involved.
Cultural and Community Aspects of Cooking Without Electricity
Cooking without electricity nurtures cultural and community connections, often rooted in traditional methods and shared experiences. Celebrating these culinary practices helps preserve cultural heritage while advocating for sustainable living, enriching the culinary landscape for generations to come.
Community events focused on cooking without electricity can unite individuals, allowing them to share stories, recipes, and techniques. This collective experience not only strengthens community bonds but also keeps cultural traditions alive, ensuring that valuable knowledge and skills are passed down through time, enriching the lives of those who participate.
Frequently Asked Questions About Cooking Without Electricity
What Are the Most Effective Cooking Methods Without Electricity?
The most effective methods for cooking without electricity include solar cooking, open fire cooking, haybox cooking, and thermal mass techniques. Each of these methods offers unique benefits, such as sustainability and efficiency, making them ideal for those looking to reduce their reliance on electrical appliances.
How Can I Start Cooking Without Electricity?
Begin by incorporating small changes into your cooking routine, such as utilizing a solar cooker on sunny days or experimenting with open fire cooking during camping trips. Gradually build your skills and confidence over time to enhance your culinary repertoire and embrace the joys of traditional cooking.
What Tools Are Essential for Cooking Without Electricity?
Essential tools for cooking without electricity encompass solar cookers, fire pits, rocket stoves, insulated hayboxes, and manual food processors. These tools facilitate various cooking techniques efficiently and effectively, empowering individuals to explore diverse culinary experiences without relying on electricity.
Is Cooking Without Electricity Safe for Food Preparation?
Yes, cooking without electricity can be safe if proper food safety practices are followed, including thorough cooking, maintaining hygiene, and ensuring appropriate food storage to prevent spoilage and contamination. By adhering to these guidelines, cooks can enjoy the benefits of traditional cooking methods safely.
Can Cooking Without Electricity Result in Financial Savings?
Absolutely! Cooking without electricity can lead to significant savings on energy bills, as it decreases reliance on electricity and gas. Additionally, sourcing local ingredients can further reduce grocery expenses, contributing to a more budget-friendly culinary lifestyle.
How Does Cooking Without Electricity Benefit the Environment?
Cooking without electricity aids in lowering carbon footprints by utilizing renewable energy sources and minimizing waste. It promotes sustainable practices that significantly benefit the planet and its ecosystems, aligning with the growing need for environmentally conscious living.
What Health Advantages Are Associated with Cooking Without Electricity?
Cooking without electricity often results in healthier meals, as it emphasizes fresh ingredients and avoids processed foods. This dietary focus can lead to enhanced nutrition and improved overall health, encouraging individuals to adopt a more balanced and wholesome lifestyle.
Can Children Learn Cooking Skills Without Electricity?
Yes! Teaching children to cook without electricity can impart valuable skills and foster a sense of sustainability. It can be an engaging and educational experience that nurtures creativity in the kitchen while instilling important life lessons about food and cooking.
How Can I Maximize Efficiency When Cooking Without Electricity?
To maximize efficiency, plan your meals, utilize batch cooking techniques, and experiment with time-saving methods like haybox cooking or thermal mass cooking to minimize fuel consumption. These strategies can enhance your culinary experience while promoting sustainability.
What Common Challenges Are Associated with Cooking Without Electricity?
Challenges include time constraints, weather dependencies, limited resources, and ensuring food safety. Nevertheless, effective planning and adaptability can help overcome these hurdles successfully, making cooking without electricity a rewarding and fulfilling endeavor.
Discover more on our journey at X!
The post Cooking Without Power: Essential Techniques and Tips appeared first on Survival Bite.
The Article Essential Techniques and Tips for Cooking Without Power Was Found On https://limitsofstrategy.com
-

Citrus BBQ Marinade Recipe for Delicious American Grilling
Unleash Flavor with the Perfect Citrus BBQ Marinade Ingredients
Choosing the Best Citrus Fruits for Your Flavorful Marinade
Selecting the right citrus fruits is a vital step in creating a Citrus BBQ Marinade that delights your taste buds. Fruits like oranges, lemons, limes, and grapefruits offer unique flavor profiles and varying levels of acidity. For example, oranges provide a sweet, juicy foundation that beautifully balances the tanginess of the marinade, while lemons introduce a sharp and zesty flavor that enhances any grilled meat. Limes are known for their vibrant citrus notes, delivering a tartness that appeals to those seeking bold flavors. Furthermore, grapefruits can add a subtle bitterness, enriching the complexity of your marinade. Exploring these diverse flavors allows you to elevate your BBQ experience, particularly during outdoor grilling sessions on warm summer afternoons.
When selecting your citrus fruits, prioritize fresh and ripe options. The quality of your chosen citrus directly influences the effectiveness of the marinade. Opt for fruits that feel heavy for their size and showcase vivid colors, indicating peak juiciness and flavor. Remember, the success of a well-crafted marinade hinges on the quality of its components, making careful selection a crucial step.
Enhancing Your Marinade with Essential Spices and Herbs
To craft a Citrus BBQ Marinade that bursts with flavor, it is essential to incorporate key spices and fresh herbs. Spices such as paprika, which brings sweet and smoky undertones, significantly contribute to the depth of the marinade, while cumin adds a warm, earthy flavor that complements the citrus zest beautifully. Additionally, garlic powder delivers a savory kick that enhances the overall taste experience.
Fresh herbs also play a crucial role in elevating your marinade. Cilantro adds a refreshing herbal brightness that harmonizes perfectly with citrus, while thyme introduces an aromatic, slightly floral note. The skillful combination of these spices and herbs with citrus creates a well-balanced and flavorful marinade that seeps into the meat, ensuring each bite is juicy and rich in flavor.
Enhancing Your Marinade with Flavorful Additions
To create an exceptional Citrus BBQ Marinade, consider the addition of flavor enhancers that will beautifully complement the acidity of the citrus. Ingredients like honey can introduce a delightful sweetness that balances the sharp citrus notes, resulting in a harmonious flavor profile. On the other hand, soy sauce contributes a savory depth and umami flavors that pair remarkably well with grilled meats. For a more complex taste, think about incorporating Worcestershire sauce, which offers a tangy and slightly sweet flavor that enhances your marinade.
These enhancements not only elevate the flavor but also assist in tenderizing the meat. When combined thoughtfully, these ingredients create a marinade that is both delicious and multifaceted, inviting a delightful array of flavors to your BBQ gathering.
Step-by-Step Instructions for Crafting the Perfect Marinade

Juicing Citrus Fruits for Optimal Flavor Extraction
Juicing citrus fruits is a straightforward yet fundamental step in the creation of your Citrus BBQ Marinade. To effectively extract the juice, you can use a juicer or opt for the traditional hand-juicing method. Here’s a simple process to efficiently juice your citrus fruits:
- Begin by selecting fresh citrus fruits and washing them thoroughly to remove any dirt or residues.
- Roll the fruits on a countertop to loosen the juices inside, making extraction easier.
- Slice the fruits in half and press them into the juicer or squeeze them by hand for maximum juice extraction.
- Use a strainer to eliminate seeds and pulp, ensuring a smoother marinade consistency.
This method guarantees that you capture all the flavorful juice while keeping your marinade free from unwanted bits. The freshness and quality of the fruit have a direct impact on the flavor of your marinade, making this step essential for a successful BBQ experience.
Mixing Ingredients for a Flavorfully Balanced Marinade
Once you’ve extracted the juice, it’s time to combine the ingredients for your Citrus BBQ Marinade. Start by pouring the freshly squeezed citrus juice into a mixing bowl. Next, add your selected spices, herbs, and any additional flavor enhancers. Using a whisk or fork, thoroughly mix these components to ensure an even distribution of flavors throughout the marinade.
The goal is to create a vibrant mixture where the acidity of the citrus, the warmth of the spices, and the aromas of the herbs blend together harmoniously. This process not only merges the flavors but also activates the aromas, tantalizing your senses and preparing you for an enjoyable grilling experience.
Optimal Marinating Time and Techniques for Best Results

The ideal marinating time for your meat can vary based on the type and thickness of the cut. For chicken, marinating for a minimum of 2 to 4 hours generally yields flavorful results. For tougher cuts of beef, extending the marinating time can significantly improve tenderness and flavor, often benefiting from an overnight marination. It’s essential to use a zip-lock bag or a covered dish to guarantee that the marinade coats the meat evenly.
During the marination process, it’s imperative to refrigerate your meat to prevent bacterial growth. Turning the meat in the marinade at intervals can also help ensure even coverage, allowing the flavors to penetrate more deeply and effectively.
Choosing the Best Citrus Fruits for Maximum Impact in Your Marinade
Selecting the right citrus fruits can dramatically affect the success of your Citrus BBQ Marinade. Focus on freshness by examining fruits for any blemishes or soft spots. Look for lemons, limes, or oranges that are firm and vibrant in color, as these characteristics indicate ripeness and juiciness.
Consider the balance of acidity and sweetness that each fruit offers. For instance, lemons are highly acidic, delivering a sharp tang that can cut through richer meats. Limes, with their lively acidity, provide brightness, while oranges contribute sweetness that can balance savory spices. Understanding the flavor profiles of your selected fruits will assist you in crafting a well-rounded marinade that enhances your BBQ experience.
Safe Storage and Reuse of Marinades: Best Practices
Properly storing your marinades is essential for maintaining their flavor and safety. Unused Citrus BBQ Marinade can be stored in an airtight container in the refrigerator for up to 3 days. Ensure it is sealed tightly to avoid contamination and to preserve freshness.
If you have leftover marinade that hasn’t come into contact with raw meat, it can be reused for marinating other dishes. However, it is crucial to boil the marinade first to eliminate any bacteria before reusing it. This step is vital for ensuring food safety, allowing you to enjoy the rich flavors without any health risks.
Expert Tips for Crafting an Outstanding Citrus BBQ Marinade
Key Elements that Contribute to an Effective Marinade
The effectiveness of a marinade lies in its ability to penetrate the meat, imparting flavor while also tenderizing it. The natural acids found in citrus fruits help break down the proteins in the meat, resulting in a tender and juicy final product. This process, known as denaturation, alters the meat’s texture, making it more enjoyable to consume.
Moreover, the inclusion of spices and herbs plays a significant role in enhancing flavor. They contribute aromatic compounds that infuse the meat with their essence as it marinates. By understanding the science behind marinades, you can manipulate the components to achieve the desired flavor and texture for your BBQ dishes.
Understanding Marinating Times for Optimal Results
The marinating time can significantly influence the ultimate taste and texture of your grilled meat. For chicken, marinating for 2-4 hours is generally sufficient to allow flavors to meld without overwhelming the meat. Conversely, tougher cuts of meat, like beef brisket or pork shoulder, can benefit from a longer marination period, often up to 12 hours or overnight. The thicker the cut, the longer it typically needs to absorb flavors and tenderize effectively.
Always consider the type of meat you’re marinating; delicate proteins like shrimp or fish require much shorter marination times, usually around 30 minutes to 1 hour, as prolonged exposure can result in a mushy texture. Understanding these timelines will help you achieve optimal results each time you fire up the grill.
Valuable Insights from BBQ Experts on Citrus Use
Learning from seasoned BBQ pitmasters can provide invaluable insights into the techniques of effectively using citrus in marinades. Many professionals stress the importance of maintaining a balance of flavors—excessive acidity can overwhelm the meat, while insufficient acidity may lead to blandness.
A common recommendation is to incorporate citrus zest along with the juice. The zest contains aromatic oils that amplify the citrus flavor, lending a more vibrant taste profile. Additionally, many experts suggest marinating at room temperature for about 30 minutes before grilling, allowing the meat to absorb flavors while also reducing cooking time. By following these expert tips, you can elevate your Citrus BBQ Marinade to new heights of excellence.
Choosing the Best Citrus Varieties for Your Marinades
Understanding the best citrus varieties is essential for enhancing your Citrus BBQ Marinade. Lemons are often favored for their sharp acidity, making them excellent for balancing the richness of fatty meats. Limes, with their intense flavor, are ideal for chicken and seafood, offering a fresh zest that brightens the dish.
Oranges provide a layer of sweetness and are particularly effective in marinades for pork, where their sweetness can create a caramelized crust when grilled. Grapefruits, though less conventional, can impart a unique bitterness that pairs wonderfully with stronger flavors. Experimenting with these varieties allows for personalized marinades that cater to different meats and individual tastes, ensuring a delightful BBQ experience.
The Unique Advantages of Citrus in BBQ Marinades
Enhancing Flavor Profiles with Citrus
Citrus fruits are transformative in BBQ marinades. Their bright, tangy flavors create a refreshing contrast to the rich, smoky notes of grilled meats. The addition of citrus not only balances the heaviness of meats but also elevates the overall flavor profile, resulting in a more enjoyable dining experience.
The versatility of citrus allows for innovative flavor combinations. A marinade featuring lemon or lime can impart a refreshing zing, while orange juice can add sweetness that rounds out the dish. This dynamic interplay between flavors makes citrus an indispensable ingredient in any BBQ enthusiast’s toolkit, capable of elevating simple grilled dishes into gourmet experiences.
Natural Meat Tenderizing Properties of Citrus
One of the primary benefits of incorporating citrus in marinades is its ability to tenderize meat. The natural acids present in citrus fruits break down tough muscle fibers and connective tissues, resulting in a more tender texture. This attribute is particularly advantageous for cuts of meat that are naturally tougher, as the citrus acids work to soften them.
Utilizing citrus not only enhances tenderness but also helps infuse the meat with moisture. As the meat absorbs the marinade, the acidity of the citrus interacts synergistically with the spices, creating a juicy, flavorful final product. This tenderizing effect is critical for achieving the ultimate BBQ experience, ensuring that every bite is succulent and rich in flavor.
Health Benefits of Including Citrus in Your Marinades
Incorporating citrus into your BBQ marinades offers several health advantages. Citrus fruits are rich in vitamin C, which supports immune function and promotes skin health. Additionally, they are loaded with antioxidants that help combat inflammation and oxidative stress, contributing to overall wellness.
Using citrus in marinades can also minimize the need for excessive salt or sugar, leading to healthier BBQ meals without sacrificing flavor. By opting for citrus, you not only enhance the taste of your dishes but also prioritize nutritional benefits, ensuring that your BBQ gatherings are both delicious and health-conscious.
Proven Techniques for Crafting an Impressive Citrus BBQ Marinade
Best Citrus Combinations for Flavorful Marinades
Experimenting with various citrus combinations can yield delightful results in your Citrus BBQ Marinade. The right pairings can enhance your marinades and tailor them to specific meats. Here are some popular combinations to consider trying:
- Orange and lime for a sweet-tart balance.
- Lemon and grapefruit for a refreshing, slightly bitter twist.
- Lime and orange for a tropical touch.
- Mandarin and lemon for a sweeter, less acidic profile.
These combinations allow you to discover unique flavor profiles that can complement a wide range of meats, from chicken to pork to seafood. Adjust ratios based on your taste preferences and feel free to get creative; the possibilities are virtually endless.
Achieving Balance Between Acidity and Sweetness in Marinades
Finding the perfect balance of acidity and sweetness is fundamental in creating a well-rounded Citrus BBQ Marinade. A successful marinade should manage the sharpness of the citrus alongside sweet elements to form a harmonious flavor. To achieve this balance, consider adjusting the ratio of citrus juice to sweet components such as honey, agave syrup, or brown sugar.
Start by incorporating small amounts of sweetener into your marinade and tasting as you go. This gradual approach allows you to experience the evolving flavors and identify the sweet spot that complements the acidity. Remember, the goal is to enhance the meat’s flavor while ensuring that no single element overshadows the other.
Utilizing Citrus Zest for Enhanced Flavor Depth
Incorporating citrus zest into your marinade can significantly amplify the overall flavor experience. The zest contains essential oils that are fragrant and flavorful, providing an aromatic boost that the juice alone cannot deliver. Adding zest from lemons, limes, or oranges introduces an extra layer of complexity and brightness to your marinade.
When using zest, ensure that you only grate the outermost layer of the citrus peel, avoiding the bitter white pith beneath. This technique yields a burst of flavor that elevates the marinade’s profile, transforming it from ordinary to extraordinary. Citrus zest can truly enhance your Citrus BBQ Marinade into something remarkable.
Effective Application and Cooking Techniques for Superior BBQ Results
Properly Applying the Marinade to Meat for Optimal Flavor
To maximize flavor absorption, ensure that the meat is evenly coated with your Citrus BBQ Marinade. Begin by placing the meat in a zip-lock bag or a shallow dish, then pour the marinade over it, making sure all surfaces are covered. Use your hands or a brush to massage the marinade into the meat, ensuring it penetrates deeply.
Allow the meat to rest in the marinade for the recommended time based on the type and thickness, as previously discussed. Keeping the meat refrigerated during this period is essential for food safety and optimal flavor integration. This method guarantees that each bite is infused with the vibrant flavors of your marinade.
Grilling Techniques for Perfectly Cooked Marinated Meat
Grilling marinated meat requires careful attention to detail to prevent burning the sugars in the marinade. Always preheat your grill to medium heat to achieve a proper sear without charring. Once the grill is ready, place your marinated meat on the grates, ensuring that it isn’t overcrowded, as this can lead to steaming instead of grilling.
Turn the meat periodically to ensure even cooking and to create those beautiful grill marks. Using a meat thermometer can help you check doneness without cutting into the meat, preserving its juicy integrity. This meticulous technique ensures that your marinated meat is perfectly cooked, juicy, and bursting with flavor.
Importance of Resting and Serving After Grilling
After grilling, it’s crucial to allow your meat to rest for a few minutes before serving. Resting allows the juices to redistribute throughout the meat, resulting in a tender, moist final product. A general guideline is to rest larger cuts for at least 5-10 minutes, while smaller pieces can rest for approximately 3-5 minutes.
For serving, consider garnishing the grilled meat with fresh citrus slices or herbs to enhance both presentation and flavor. This simple addition not only elevates the dish visually but also provides a fresh burst of citrus aroma that beautifully complements the grilled meat.
Best Practices for Storing and Reusing Marinades
Proper storage of your Citrus BBQ Marinade is critical for preserving flavor and ensuring food safety. Unused marinades can be stored in an airtight container in the refrigerator for up to 3 days. Always label containers with the date to maintain freshness.
If you plan to reuse marinades, it’s essential to boil the marinade before applying it again to cooked meats. This step ensures that any bacteria from the raw meat are eliminated, allowing you to safely enjoy the rich flavors without any health risks. Following these guidelines will ensure that your marinades remain both safe and flavorful.
Frequently Asked Questions About Citrus Marinades
Can I use any citrus fruit for my marinade?
Absolutely! You can utilize a variety of citrus fruits such as lemons, limes, oranges, and grapefruits to craft a flavorful marinade. Each fruit brings its own distinctive flavor profile that can enhance your dish.
How long should I marinate chicken in citrus?
Chicken should typically be marinated for approximately 2 to 4 hours in citrus marinades to achieve optimal flavor and tenderness without compromising texture.
Is it safe to reuse citrus marinade?
You can safely reuse citrus marinade as long as it hasn’t come into contact with raw meat. Always boil it before reusing to eliminate any bacteria.
Can citrus marinades work for seafood?
Definitely! Citrus marinades are fantastic for seafood, helping to enhance flavor and tenderize delicate fish or shellfish.
What are the best spices to use with citrus in marinades?
Some popular spices to pair with citrus in marinades include paprika, cumin, garlic powder, and black pepper. These spices beautifully complement the acidity of citrus.
How do I know when my meat is done grilling?
The best method to determine if your meat is done is to use a meat thermometer. For chicken, aim for an internal temperature of 165°F, while beef varies based on the cut and desired doneness.
Can I make my marinade ahead of time?
Yes, you can prepare your citrus marinade in advance and store it in the refrigerator for up to 3 days before use.
What meats work best with citrus marinades?
Citrus marinades are effective with various meats, including chicken, pork, beef, and seafood. The flavors from citrus enhance each type differently.
What is the role of honey in a citrus marinade?
Honey serves as a sweetener that balances the acidity in citrus, creating a more harmonious flavor profile in your marinade.
Does marinating time affect the flavor?
Yes, marinating time significantly influences flavor absorption. Longer marinating times typically yield richer flavors, especially for tougher cuts of meat.
Connect with us on Facebook!
The Article How to Make a Citrus BBQ Marinade: A US Guide appeared first on https://pitmastersarsenal.com
The Article Citrus BBQ Marinade Recipe: A Guide for Americans Was Found On https://limitsofstrategy.com
-

Smoker Temperature Gauge Installation: Your Essential US Guide
Unlock the Secrets to Selecting the Perfect Smoker Temperature Gauge for Your Barbecue Mastery
Explore the Different Types of Smoker Temperature Gauges for Optimal Cooking
Selecting the perfect smoker temperature gauge is essential for passionate barbecue aficionados who want to elevate their grilling skills to the next level. In the diverse U.S. market, you’ll primarily find two main types: analog and digital gauges. Analog gauges function through a dial mechanism with a needle that indicates the temperature levels. Many barbecue enthusiasts favor these analog gauges for their straightforward design and reliable performance, especially when used in traditional setups. They typically operate without batteries, can endure high heat, and are cherished by purists who appreciate classic barbecue methodologies.
Conversely, digital gauges have gained immense popularity due to their remarkable accuracy and often feature backlit displays for easy visibility, regardless of lighting conditions. A wide array of digital models includes extra functionalities such as timers and alarms, which are incredibly useful for managing cooking times effectively. Some top-tier digital options even offer mobile connectivity, enabling you to monitor temperatures remotely—a substantial advantage during extensive smoking sessions.
Your decision between an analog and a digital gauge ultimately hinges on your personal preferences and smoking styles. If you prioritize simplicity and reliability, an analog gauge may be your best fit; on the other hand, if you desire sophisticated features and exceptional accuracy, investing in a digital gauge can greatly enhance your smoking experience.
Are You Ready to Engage Your Senses?
Key Features to Consider When Selecting Your Smoker Temperature Gauge
When you’re in the market for a smoker temperature gauge, several essential features can significantly enhance your cooking experience. The foremost aspect is accuracy; your gauge should deliver real-time readings that accurately reflect the internal conditions of your smoker. A top-notch gauge will maintain a tolerance of less than five degrees Fahrenheit, ensuring that your meats consistently reach the perfect doneness.
Durability is another vital consideration, particularly for smokers that habitually endure high temperatures and outdoor elements. Opt for gauges made from stainless steel or other heat-resistant materials to prevent wear and tear over time. Ease of reading is also crucial; choose gauges with large, clear dials or displays that can be easily viewed from a distance. If you often cook in low-light situations, consider models equipped with illuminated screens or well-marked indicators to enhance visibility.
Lastly, seek out additional features such as wireless connectivity, temperature threshold alerts, and programmable settings, which can greatly enhance convenience, especially during lengthy smoking sessions. By prioritizing these key attributes, you can choose a smoker temperature gauge that perfectly aligns with your specific needs and amplifies your overall barbecue experience.
Where to Find the Best Smoker Temperature Gauges for Your Needs
In the United States, you can discover smoker temperature gauges at various retailers, catering to a broad spectrum of preferences and budget constraints. Local hardware stores often serve as an excellent starting point, showcasing a selection of gauges you can assess firsthand. This hands-on experience is particularly advantageous for those who value the opportunity to ask questions and gain insights from knowledgeable staff members.
For a more extensive variety, online retailers like Amazon and Walmart feature vast inventories of gauges that range from budget-friendly options to high-end models. Shopping online not only allows you to peruse customer reviews and compare prices but often leads to better deals and exclusive promotions.
Additionally, specialty barbecue shops offer an outstanding alternative, stocking gauges specifically designed for smoking and grilling. These establishments frequently carry high-quality, professional-grade instruments and can provide expert advice on the best gauge for your specific smoker.
Whether you choose to shop online or visit a physical store, be sure to evaluate aspects like warranty and return policies, as these can offer invaluable peace of mind regarding your purchase.
Comprehensive Guide for Installing and Calibrating Your Smoker Temperature Gauge

Proper installation and calibration of your smoker temperature gauge are crucial for obtaining accurate readings and enhancing your overall smoking experience. Begin by selecting the ideal location on your smoker, preferably at the level of the cooking chamber, as this will ensure that the gauge accurately reflects the actual temperature where the meat is being cooked. This strategic positioning is key for achieving precise temperature readings, which are essential for optimal cooking results.
After identifying the best spot, meticulously follow the installation instructions provided with your gauge. Equally important is regular calibration. Without proper calibration, the temperature readings may be misleading, which could result in overcooked or undercooked meats that do not meet your culinary standards.
To calibrate your gauge, utilize a secondary thermometer to compare readings. Adjust the gauge according to the manufacturer’s instructions until both thermometers display the same temperature. It is advisable to perform this calibration at least once per season or after significant temperature fluctuations in your cooking environment.
By ensuring both proper installation and calibration, you will enjoy a more precise smoking process and elevate your cooking results, transforming each barbecue session into a triumphant success.
Preparing Your Smoker for the Installation of the Temperature Gauge: Essential Steps to Follow
Implementing Essential Safety Measures Prior to Installation
Before beginning the installation of your smoker temperature gauge, prioritizing safety is critical to avoid potential accidents. Always confirm that your smoker is completely cool and, if applicable, unplugged. Working with a hot smoker poses significant burn risks and other injuries, underscoring the importance of patience throughout this process.
If your smoker has recently been used, allow it to cool down for at least 30 minutes to an hour. This waiting period is not only vital for your safety but also helps prevent accidents during installation. Additionally, ensure that the area surrounding the smoker is free from any flammable materials, including paper towels, grilling tools, and wood piles, as these could pose hazards.
Lastly, wear appropriate protective gear, such as gloves and safety glasses, particularly when using power tools during installation. Implementing these straightforward yet effective safety measures will ensure a smooth installation process without any unpleasant surprises.
Essential Tools Needed for a Successful Installation

Installing a smoker temperature gauge requires just a few common tools, most of which can be easily acquired from your local hardware store. The primary tool you’ll need is a drill, which you’ll use to create a hole in your smoker for the gauge. Ensure you have the correct drill bit size that corresponds with the gauge’s stem diameter for a proper fit.
You will also need screws and a screwdriver to secure the gauge to your smoker. If your gauge comes with a mounting bracket, check whether additional hardware is necessary for installation. A small wrench or pliers may also be beneficial, especially if your gauge has nuts that require tightening.
Finally, having a measuring tape or ruler handy can assist you in pinpointing the precise location for the installation, ensuring accurate placement. By gathering these tools in advance, you will streamline the installation process and enhance your chances of success.
Cleaning and Preparing the Smoker Surface for Accurate Gauge Installation
Before proceeding with the installation of your smoker temperature gauge, it’s crucial to thoroughly clean and prepare the installation surface. This step is vital for ensuring a secure fit and accurate temperature readings. Start by using a soft cloth or sponge to wipe down the area where you plan to install the gauge. Remove any grease, soot, or debris that may have accumulated from past grilling sessions, as these can interfere with the gauge’s performance.
If your smoker has a painted or coated surface, be cautious not to scrub too vigorously, as this could damage the finish. Instead, use a mild detergent mixed with warm water to gently clean the surface. Rinse thoroughly and allow it to dry completely before proceeding with the installation.
Additionally, inspect the designated area for any rust or corrosion that could hinder the gauge’s installation. If you discover any issues, take the necessary steps to address them using appropriate rust treatment products. Ensuring a clean and well-prepared surface will facilitate an easy installation and help maintain the longevity of your smoker temperature gauge.
A Comprehensive Step-by-Step Guide to Installing Your Smoker Temperature Gauge
Identifying and Marking the Optimal Installation Location
Choosing the ideal location for your smoker temperature gauge is crucial for achieving accurate readings. Start by selecting a spot on your smoker that offers a clear view of the thermometer while keeping a safe distance from direct heat sources. Typically, the best location is near the cooking chamber, where the gauge can effectively monitor the temperature.
Once you’ve identified the location, use a pencil or marker to clearly mark the spot. Ensure the mark is at an appropriate height for easy viewing without requiring you to bend down or strain. For optimal results, utilize a measuring tape to ensure symmetry and alignment with any other gauges on your smoker.
It’s advisable to step back and visually assess the marking before proceeding to drill. This final check guarantees that the gauge’s placement will not obstruct any cooking processes or lids on your smoker. Taking the time to mark accurately will lay the groundwork for a smooth and successful installation.
Drilling the Hole for Your Gauge Installation
With your installation spot marked, it’s time to drill the hole for your smoker temperature gauge. Selecting the correct drill bit size is vital; it should match the diameter of the gauge’s stem for a snug fit. Using the wrong size can complicate securing the gauge, ultimately leading to inaccurate readings.
Position your drill perpendicular to the smoker’s surface to create a straight hole. Begin at a slow speed to avoid damaging the smoker’s material, then gradually increase the speed as you drill through. Clear any metal shavings or debris as you go to maintain a tidy work area.
After drilling through the surface, double-check the size and cleanliness of the hole. It should allow the gauge to fit securely without being overly tight, ensuring ease of installation. A well-drilled hole will significantly enhance the gauge’s accuracy and overall longevity.
Securing the Gauge After Installation for Optimal Accuracy
Once you have drilled the hole, the next step is to secure the gauge in place. Begin by gently inserting the gauge’s stem into the drilled hole. Ensure it fits snugly without requiring excessive force, as this could damage both the gauge and the smoker.
After inserting the gauge, use the screws or nuts provided with it to secure it appropriately. You may need a small wrench or screwdriver to tighten these components adequately. Exercise caution not to over-tighten, as this can lead to damage or misalignment of the gauge.
After securing the gauge, take a step back and visually inspect it to confirm it is level and correctly positioned for optimal reading. The gauge should be easily visible from a comfortable distance, allowing you to monitor your smoker’s temperature without hassle. Proper installation is critical for maintaining accurate readings, making this final step essential for a successful smoker setup.
Expert Tips for Successfully Installing a Smoker Temperature Gauge
Real-Life Success Stories of Gauge Installations
Across the United States, barbecue enthusiasts have significantly enhanced their smoking experiences by successfully installing temperature gauges. For instance, in Texas, a backyard pitmaster opted for a digital gauge on his offset smoker, enabling him to maintain the perfect temperature for brisket throughout the lengthy smoking process. This installation not only contributed to his award-winning recipes but also allowed him to monitor temperatures from the comfort of his home through a smartphone app.
In Colorado, a competitive barbecue team selected an analog gauge for their vertical smoker. They appreciated the simplicity of the gauge, which required no batteries and provided reliable readings even at high altitudes, where temperature fluctuations can be more pronounced. Their choice paid off during competitions, as they consistently produced perfectly smoked ribs that impressed judges.
In Florida, a family successfully installed multiple gauges on their smoker, allowing them to monitor various cooking zones. This approach enabled them to experiment with different smoking techniques, yielding delicious results and igniting a newfound passion for barbecue. These examples illustrate how diverse installation strategies can lead to successful outcomes across varied smoking environments and preferences.
Effective Strategies for Troubleshooting Common Gauge Issues
Even with optimal installations, there may be occasions when smoker temperature gauges fail to provide accurate readings. If you find your gauge is not delivering correct readings, start by checking for loose connections. Ensure that the gauge is securely fastened and that there are no gaps between the gauge and the smoker.
If connections are intact, recalibrating the gauge may be necessary. Use a secondary thermometer to compare readings, and adjust the gauge according to the manufacturer’s instructions to ensure accuracy.
If issues persist, consider implementing the following troubleshooting steps:
- Inspect for damage: Look for cracks or breaks in the gauge that could affect its functionality.
- Check the gauge’s placement: Ensure it’s not positioned too close to direct heat sources.
- Verify the smoker’s temperature: Use a secondary thermometer to confirm that the smoker is reaching the expected temperature.
- Consult the warranty: If the gauge is new and not functioning correctly, check if it’s covered under warranty for replacement.
By following these steps, you can quickly identify and resolve common problems with your smoker temperature gauge, ensuring reliable cooking results every single time.
Expert Placement Insights for Maximum Gauge Accuracy
The placement of your smoker temperature gauge is critical for ensuring accurate readings. Experts recommend positioning the gauge at the cooking chamber level to capture the most precise internal temperature while the smoker is in operation. This allows the gauge to accurately reflect the cooking environment, which is essential for maintaining control over the smoking process.
Avoid placing the gauge too close to direct heat sources, as this can lead to consistently higher readings, potentially resulting in overcooked meats. Instead, consider positioning it slightly off-center or even on the opposite side of the heat source to minimize temperature fluctuations and improve accuracy.
Here are some expert tips for optimal gauge placement:
- Position the gauge at the desired level within the cooking chamber for accurate readings.
- Keep the gauge away from direct flames or heat sources.
- Consider multiple gauges for different cooking zones if your smoker design permits.
- Ensure the gauge is visible from your cooking station for easy temperature monitoring.
By strategically placing your smoker temperature gauge, you can enhance your cooking precision and achieve consistently excellent results.
The Importance of Regular Maintenance for Your Smoker Temperature Gauge
Regular maintenance of your smoker temperature gauge is essential for ensuring its longevity and accuracy. Just as you would not neglect the upkeep of your smoker, your gauge also requires attention to function optimally. Cleaning the gauge frequently keeps it free from grease and soot buildup, which can obstruct readings and diminish performance.
It’s advisable to inspect the gauge regularly for any signs of wear or damage. Look for cracks in the glass face, corrosion on the body, or any discrepancies in the readings. If you observe any issues, address them promptly to prevent further complications and ensure reliable performance.
Here are some maintenance tips to keep your smoker temperature gauge in top condition:
- Clean with a soft cloth and mild detergent on a regular basis.
- Inspect for signs of rust or damage and replace if necessary.
- Ensure connections remain tight and secure after each use.
- Store the smoker covered to protect the gauge from environmental factors.
By incorporating these maintenance practices into your routine, you will not only extend the life of your smoker temperature gauge but also ensure that your cooking remains consistently excellent, enhancing your overall grilling experience.
A Breakdown of Different Types of Smoker Temperature Gauges for Informed Decision-Making
Understanding the various types of smoker temperature gauges available can help you make an informed decision that best suits your needs. Generally, analog and digital gauges are the most prevalent. Analog gauges are renowned for their durability and simplicity, as they require no batteries and provide consistent readings even in extreme temperatures. They typically feature large dials that are easy to read at a glance, making them ideal for traditional setups.
In contrast, digital gauges offer advanced features, such as wireless connectivity and backlit displays, making them user-friendly, especially during nighttime cooking or low-light conditions. Some models can log temperature data over time, providing you with deeper insights into your smoking sessions and allowing for more precise control.
Here’s a quick overview of the different types:
- Analog Gauges: Durable, battery-free, straightforward to use, perfect for traditional setups.
- Digital Gauges: High accuracy, often equipped with additional features such as alarms, making them ideal for tech-savvy users.
- Wireless Gauges: Facilitate remote monitoring, perfect for extended cooking sessions.
- Infrared Gauges: Deliver quick surface temperature readings, useful for checking grill hot spots.
By understanding the advantages and drawbacks of each type, you can make a well-informed decision that enhances your smoking experience and achieves the best possible cooking results.
The Indispensable Necessity of Calibrating Your Smoker Temperature Gauge
Understanding the Critical Role of Calibration
Calibration of your smoker temperature gauge is vital for ensuring its accuracy. Accurate readings are crucial in smoking, where maintaining the appropriate temperature can significantly influence the flavor and texture of your meats. A poorly calibrated gauge can lead to overcooked or undercooked food, resulting in disappointing outcomes even for the most experienced pitmasters.
Calibration helps expose any discrepancies between the gauge’s readings and the actual temperatures, enabling you to make adjustments as needed. Regular calibration also prolongs the life of your gauge by preventing unnecessary strain from incorrect readings, ensuring that it continues to operate optimally for years to come.
To ensure your gauge maintains its accuracy, plan to calibrate it at least once per season or whenever you notice inconsistencies in its readings. Adopting this proactive approach will help guarantee consistent, high-quality smoking results every time you fire up your grill.
A Practical Guide to Calibrating Your Smoker Temperature Gauge
Calibrating your smoker temperature gauge is a straightforward process that can be accomplished using a separate, reliable thermometer. Start by placing the secondary thermometer next to the smoker’s gauge, ensuring both instruments are exposed to the same air temperature for accurate comparison.
Next, preheat your smoker to a set temperature, ideally one that you frequently use during smoking sessions. Allow both gauges to stabilize for about 15 to 20 minutes, then compare the readings. If there is a discrepancy, adjust your smoker’s gauge according to the manufacturer’s guidelines, which may involve a simple twist or adjustment of its calibration screw.
If your gauge does not feature a calibration option, take note of the difference and compensate for it during your next smoking session. By following these steps, you can ensure your gauge remains reliable and accurate, resulting in perfectly smoked meats every time you grill.
Determining the Frequency of Calibration for Your Gauge
To maintain the accuracy of your smoker temperature gauge, frequent calibration is advisable. Calibration should ideally occur at least once per season and more often if there are significant temperature fluctuations or after extensive use.
If you’ve recently purchased a new gauge, it’s wise to calibrate it before its initial use. The manufacturer may not perfectly calibrate new gauges, and checking them ensures you start your smoking endeavors on the right foot.
Additionally, if you notice discrepancies in your readings, such as a gauge indicating a much higher or lower temperature than expected based on your smoking experience, it’s time for recalibration. By adhering to these recommendations, you’ll ensure your smoker temperature gauge remains accurate, providing you with dependable readings throughout your barbecue sessions.
Essential Tools Required for Effective Calibration
Calibrating your smoker temperature gauge does not require an extensive toolkit. However, a few essential tools can ensure a smooth calibration process. First and foremost, you will need a reliable thermometer—this can be either an instant-read thermometer or another type that you trust for accuracy.
Additionally, a small wrench or pliers may be necessary if your gauge has calibration screws that require adjustment. Having a calibration key, if provided by the manufacturer, can also be beneficial and streamline the process.
Finally, a notepad or a digital device for note-taking during calibration can help you keep track of any adjustments made and discrepancies noted. By gathering these tools in advance, you’ll facilitate the calibration process and ensure your gauge delivers precise readings when you’re ready to smoke.
Grasping the Functionality of a Smoker Temperature Gauge
Understanding the Mechanics Behind Temperature Measurement
A smoker temperature gauge measures the internal temperature of your smoker, playing a vital role in maintaining the desired cooking temperature. The mechanism typically involves a probe that senses heat and a dial or digital display that conveys this temperature to the user.
In analog gauges, a bi-metallic strip or thermocouple reacts to heat, causing a needle to move along a calibrated scale. Digital gauges, in contrast, utilize a sensor to detect temperature changes and convert those readings into a digital format for easier interpretation.
Key components of thermometer mechanisms include:
- Sensing Element: Detects temperature changes within the smoker.
- Display: Presents the temperature readings (dial for analog, screen for digital).
- Calibration Mechanism: Allows for adjustments to ensure accuracy.
- Housing: Protects internal components from the environment of the smoker.
Understanding how these components work together enhances your appreciation of the gauge and aids in troubleshooting any issues that may arise.
The Critical Importance of Temperature in the Smoking Process
Temperature control is fundamental in the smoking process, as it directly impacts the flavor, texture, and safety of your meats. Each type of meat necessitates specific temperature ranges to achieve optimal cooking results, making it essential to maintain consistency throughout the smoking journey.
For instance, brisket typically benefits from a low and slow approach, with temperatures ranging between 225°F and 250°F, which allows the connective tissues to break down and results in tender meat. On the other hand, poultry needs to reach an internal temperature of 165°F for safety; however, many pitmasters prefer smoking it at slightly higher temperatures for enhanced flavor and texture.
Understanding the importance of temperature also extends to food safety, as cooking meats at safe temperatures helps prevent the risk of foodborne illnesses. By closely monitoring temperatures with your smoker gauge, you can ensure that your smoked dishes turn out delicious and safe for consumption.
Factors That Influence Gauge Accuracy and Performance
Several factors can impact the accuracy of your smoker temperature gauge, potentially compromising the quality of your smoking results. One of the primary factors is the gauge’s placement. If the gauge is positioned too close to direct heat or flames, it will register higher temperatures, leading to uneven cooking.
Calibration is another critical aspect. A gauge that hasn’t been calibrated regularly can produce readings that deviate from actual temperatures, resulting in frustration during cooking.
Moreover, the quality of the gauge itself also plays a role. Lower-quality gauges may not provide reliable readings, while high-quality models often feature more accurate sensors and superior construction, ensuring longevity and precision.
By understanding these factors, you can take proactive measures to ensure your gauge operates effectively and provides accurate readings throughout your smoking sessions.
The Advantages of Using a Smoker Temperature Gauge
Achieving Consistent Cooking Results with Every Use
One of the most significant benefits of using a smoker temperature gauge is the marked improvement in cooking consistency. With precise temperature readings readily available, you can maintain optimal cooking conditions throughout the entire smoking process. This consistency is vital for achieving the ideal flavor profile and texture in your meats.
For example, when smoking ribs, keeping a steady temperature between 225°F and 250°F allows the meat to cook uniformly, rendering fat and collagen into tender, juicy bites. Without a reliable gauge, it becomes easy to fluctuate between temperatures, leading to dry or undercooked meat that fails to impress.
Moreover, the ability to monitor temperatures throughout the cooking process provides greater control, helping you make necessary adjustments as needed. This translates to less guesswork and more dependable outcomes, whether you are a novice or an experienced pitmaster seeking to refine your skills.
Enhancing Food Safety Standards Through Accurate Measurements
Utilizing a smoker temperature gauge also plays a crucial role in bolstering food safety. Monitoring the internal temperature of meat ensures it reaches safe levels, thereby reducing the risk of foodborne illnesses. For example, poultry should be cooked to an internal temperature of at least 165°F, while pork and beef have their specific safe limits as well.
By employing a temperature gauge, you can verify that your meats reach these temperatures without needing to cut into them, which can lead to moisture loss and a less appealing final product. This is particularly vital for larger cuts of meat, where assessing internal temperatures can be challenging without reliable tools.
Regularly checking the temperature also allows you to avoid the “danger zone” of 40°F to 140°F, where bacteria can proliferate, ensuring that your culinary creations are not only delicious but also safe for consumption.
Convenient Monitoring Solutions for Effortless Cooking Experiences
A smoker temperature gauge provides unparalleled ease of monitoring during your cooking sessions. Rather than having to lift the smoker lid continually to check on the meat, which can lead to heat loss and extended cooking times, you can simply glance at your gauge to assess the temperature.
Digital gauges, in particular, often come equipped with features like remote monitoring and alarms that notify you when your smoker reaches a predetermined temperature. This convenience allows you to focus on other tasks, socialize with guests, or relax while your food cooks, all while maintaining confidence that you’re effectively managing your smoking game.
By utilizing a temperature gauge, you streamline your cooking process, resulting in a more enjoyable and less stressful smoking experience, regardless of your skill level.
Maintaining Your Smoker Temperature Gauge for Optimal Longevity
Essential Cleaning Practices for Peak Performance
To keep your smoker temperature gauge functioning at its best, regular cleaning is essential. Over time, grease, soot, and other residues can accumulate, obstructing readings and negatively impacting performance. Start by using a soft cloth dampened with mild detergent to wipe down the gauge, ensuring you avoid abrasive cleaners that could scratch the surface.
For deeper cleaning, especially if the gauge has been exposed to heavy smoke, a mixture of vinegar and water works wonders. Soak a cloth in this solution and gently wipe the gauge, allowing it to penetrate any tough buildup. Rinse thoroughly with water to eliminate any cleaning agents.
After cleaning, ensure the gauge is completely dry before reattaching it to your smoker. Regular cleaning not only maintains the accuracy of your readings but also prolongs the gauge’s life, ensuring it remains a reliable tool for all your smoking endeavors.
Protecting Your Gauge from Environmental Factors for Enhanced Longevity
Safeguarding your smoker’s temperature gauge from the elements is crucial for its longevity and optimal performance. Exposure to rain, snow, or extreme temperatures can damage the internal components of the gauge, leading to inaccurate readings or complete failure.
When your smoker is not in use, consider covering it with a protective tarp or investing in a smoker cover that shields it from moisture and UV rays. This simple precaution can prevent rust and corrosion, significantly extending the life of your gauge.
Additionally, if you’re using a digital gauge, removing it when the smoker is not in operation—especially if it’s portable—can protect it from potential damage. Store it in a cool, dry place to safeguard it against environmental factors. By implementing these preventive measures, you can ensure your gauge remains in excellent condition and ready for your next barbecue adventure.
Identifying When to Replace Your Smoker Temperature Gauge for Reliable Performance
Understanding when to replace your smoker temperature gauge is crucial for maintaining cooking quality. If you notice that your gauge consistently provides inaccurate readings, even after calibration, it may be time for a replacement.
Additionally, if the glass face becomes cracked or damaged, it compromises the gauge’s integrity and readability, necessitating a new purchase. Regular inspections are essential—if you find rust or corrosion on the gauge body that cannot be cleaned, it’s likely time for a replacement to ensure reliable performance.
Another sign that you need a new gauge is if it fails to respond quickly to temperature changes. A sluggish response time can lead to mismanagement of your smoking environment, resulting in unsatisfactory cooking results. By being proactive and replacing your gauge when necessary, you guarantee the best possible outcomes for all your grilling endeavors.
Your Most Frequently Asked Questions Answered for Clarity and Confidence
How often should I calibrate my smoker temperature gauge?
It’s recommended to calibrate your smoker temperature gauge at least once per season or whenever you notice discrepancies in readings that could affect performance.
How do I know if my temperature gauge is accurate?
To test accuracy, compare your gauge’s readings with those of a reliable secondary thermometer, adjusting as necessary for any discrepancies identified during the comparison.
Can I use a digital thermometer for my smoker?
Yes, digital thermometers are excellent for smokers, providing precise readings and various features, such as alarms and remote monitoring capabilities, that enhance your cooking experience.
What should I do if my gauge is reading too high?
Check the gauge’s placement to ensure it’s positioned away from direct heat, recalibrate it if necessary, and consider the possibility of damage if issues persist.
How can I clean my smoker temperature gauge effectively?
Use a soft cloth dampened with mild detergent, or a vinegar-water solution for tougher residue, ensuring the gauge is dry before reinstalling it.
What type of temperature gauge is best for beginners?
Analog gauges are often recommended for beginners due to their simplicity and reliability; however, digital gauges are also user-friendly and provide accurate readings that facilitate the learning process.
Is it necessary to disconnect the gauge when not in use?
While not always necessary, removing a digital gauge can protect it from moisture and damage when the smoker is not in operation, prolonging its lifespan.
Can I install the gauge myself?
Absolutely! Installing a smoker temperature gauge is a straightforward process that can be completed with basic tools by following the manufacturer’s instructions closely.
What temperature should my smoker be set at for ribs?
For optimal results, set your smoker to maintain a temperature of about 225°F to 250°F when cooking ribs for the best flavor and tenderness.
How long does a smoker temperature gauge typically last?
With proper care and maintenance, a quality smoker temperature gauge can last several years. However, it’s essential to replace it if you notice inaccuracies or physical damage that could impact its performance.
Connect with us on Facebook for More Tips!
The Article How to Install a Smoker Temperature Gauge: A US Guide appeared first on https://pitmastersarsenal.com
The Article Install a Smoker Temperature Gauge: Your Essential US Guide Was Found On https://limitsofstrategy.com
-

VR Cooking Simulations: An Immersive BBQ Experience in the US
Unleash Your Grilling Potential with Virtual Reality BBQ Simulations in the USA
Understanding the Concept of Virtual Reality BBQ Simulations
Engaging in Virtual Reality (VR) BBQ simulation represents a revolutionary leap in technology, allowing users to fully immerse themselves in a three-dimensional culinary experience centered around a BBQ grill. By donning a VR headset, users can virtually interact with a grill, providing them with the unique opportunity to learn a variety of grilling techniques, explore an array of recipes, and feel the authentic excitement of BBQ cooking. Key features that distinguish VR BBQ simulations include:
- Highly immersive 3D environments that faithfully replicate actual BBQ setups.
- Interactive tutorials meticulously crafted to assist users in mastering diverse grilling techniques.
- Feedback systems that monitor progress and optimize skill enhancement.
- Realistic auditory and visual cues that recreate the genuine ambiance of BBQ cooking.
- Customizable recipes and a variety of cooking scenarios tailored to individual tastes and preferences.
- Multiplayer functionalities that facilitate social cooking engagements with friends and family members.
This transformative approach to BBQ training attracts both passionate cooking enthusiasts and seasoned professionals, enabling them to elevate their BBQ skills in a secure, controlled setting. This method is particularly appealing to individuals in the United States, where BBQ culture is not just prominent but celebrated as a cherished tradition.
The Impact of VR on BBQ Culture Across America
The evolution of VR in BBQ cooking simulations has taken a unique path in the United States, showcasing a fascinating blend of technological advancement and culinary artistry. Initially, VR was primarily utilized for basic cooking tutorials and educational programs. However, its integration into BBQ culture has undergone substantial growth over the years, marked by significant milestones such as:
- Early 2000s: Initial attempts at VR cooking games that highlighted various culinary techniques.
- 2010: Introduction of the first dedicated VR cooking simulation software aimed specifically at BBQ aficionados.
- 2015: Implementation of advanced graphics and physics engines to improve realism in BBQ simulations.
- 2020: Dramatic rise in popularity accelerated by the COVID-19 pandemic, as home cooking became a necessity.
- Present Day: Extensive use in culinary education and BBQ competitions nationwide.
These pivotal advancements underline how VR has not only transformed culinary practices but has also emerged as a distinctive educational resource within the BBQ culture in the United States, fostering a new generation of grilling enthusiasts.
Ready to Dive into the Virtual BBQ World?
Exploring the Accessibility of VR BBQ Simulations Across the USA
The availability of VR BBQ simulations in the United States is rapidly increasing, significantly broadening the reach of this innovative technology to a diverse audience. Users can now access VR BBQ simulations from various sources, including tech retail outlets, online marketplaces, and culinary training institutions. Several key elements contribute to this growing accessibility, such as:
- Availability at major tech retailers like Best Buy and online platforms such as Amazon.
- Collaborations with culinary schools offering specialized VR training programs.
- Affordable VR headsets and software options catering to a variety of budgets.
- A selection of free and premium applications available for download across various VR platforms.
As VR technology continues to advance, an increasing number of users are likely to engage in BBQ simulations for personal enjoyment or to improve their professional skills, thus enriching the BBQ culture throughout the nation.
Expert Insights on Enhancing BBQ Skills Through Virtual Reality

Enhancing Your BBQ Skills with Virtual Reality
Utilizing VR for BBQ cooking simulations significantly boosts BBQ skills by offering a risk-free environment where individuals can practice without fear of mishaps. Immersing themselves in a virtual space enables users to experiment with various techniques and recipes, thereby enhancing their confidence and proficiency. For instance, a family in Texas prepared for their inaugural backyard cookout using a VR BBQ simulator. By honing their grilling techniques virtually, they succeeded in impressing their friends with perfectly cooked ribs and brisket.
Moreover, virtual lessons provide users with instant feedback on their techniques. With VR simulations that identify common mistakes, users can adjust their approaches during practice sessions, leading to more rapid skill development compared to traditional learning methods. A BBQ competition team in Florida, for example, leveraged VR to perfect their smoking technique, which significantly enhanced their chances of winning regional contests. This immersive training methodology is proving invaluable in the pursuit of BBQ mastery throughout the country.
Identifying Challenges Associated with VR BBQ Simulations
Despite the myriad advantages of VR BBQ simulations, several challenges merit attention. A primary limitation is the absence of real sensory feedback. Users miss out on experiencing the delightful aromas of grilled meats or the flavors of their culinary creations, which can impede the learning process. Furthermore, these simulations often fail to account for the unpredictable elements present in real-life BBQ, such as weather variations and fluctuations in grill performance. Expert assessments indicate that while current VR technology can replicate many aspects of grilling, it does not fully simulate the complete sensory experience of traditional BBQ cooking.
Another hurdle involves the initial investment required for high-quality VR equipment, which may dissuade potential users. However, as technology progresses and gains mainstream acceptance, it is anticipated that costs will decrease. Additionally, advancements in sensory technology may lead to future improvements, such as implementing haptic feedback and olfactory features, enriching the overall BBQ training experience. As developers continue to innovate, there is great potential for overcoming these limitations in the near future.
Effective Strategies for Optimizing VR BBQ Training

To fully harness the advantages of VR BBQ simulations, users should adhere to specific best practices designed to enhance their training experience. Consistent practice sessions are essential, as regular engagement plays a crucial role in developing grilling expertise. Users should allocate time to engage with VR simulations, focusing on different techniques and recipes during each session to expand their skill set.
Furthermore, it is vital to utilize VR as a complementary tool alongside real-world experiences. Participating in actual BBQ sessions after practicing in VR reinforces the skills learned and prepares users to handle real-life challenges effectively. For example, a group in California alternated between VR practice and weekend cookouts, reporting substantial improvements in their techniques and confidence levels. Additionally, connecting with fellow users of VR BBQ simulations fosters a community of learners who share insights and experiences, further enriching the overall training process.
Integrating VR BBQ Simulations into Culinary Education
Incorporating VR BBQ simulations into culinary education offers a revolutionary method for teaching cooking techniques. Culinary schools across the United States are beginning to embrace this technology, providing students with immersive learning experiences that were previously unattainable. In standard classroom environments, students can engage in VR simulations that enable them to practice grilling techniques in a safe, controlled atmosphere, minimizing risks while maximizing educational benefits.
For example, a culinary school in New York has successfully integrated VR BBQ training modules, allowing students to practice everything from igniting a grill to managing cooking temperatures in real-time. This hands-on approach cultivates a deeper understanding of complex BBQ techniques compared to traditional instructional methods. Moreover, instructors can monitor student progress through simulation software, enabling personalized guidance and feedback tailored to each learner’s specific needs. Consequently, these educational institutions are equipping the next generation of culinary professionals with the essential skills required to excel in the competitive BBQ landscape.
The Role of VR in Professional BBQ Competitions
In the competitive BBQ arena, VR serves as an invaluable training resource for participants. By allowing competitors to refine their techniques and strategies, VR alleviates many physical resource constraints. Participants can practice their skills in diverse virtual environments, simulating the various cooking conditions and challenges they may encounter during actual competitions.
A notable example is a BBQ team from Kansas City that utilized VR simulations to prepare for the prestigious World BBQ Championship. By perfecting their seasoning techniques and timing through repeated virtual practice, they significantly improved their performance in crucial judging categories. Furthermore, VR allows competitors to visualize their cooking processes, enabling them to identify areas for improvement before competing against other skilled teams. As the competitive BBQ landscape evolves, VR is becoming an indispensable tool for those seeking to gain a competitive edge.
Understanding the Key Benefits of VR BBQ Simulations
Enhancing Safety in BBQ Cooking Practices
One of the most significant benefits of VR BBQ simulations is their ability to enhance safety in the cooking process. Traditional BBQ cooking is associated with inherent risks, including burns and accidents related to hot equipment. By practicing in a virtual setting, users can build confidence and master techniques without encountering the physical hazards associated with actual grilling.
In states like Texas, where BBQ is a cultural staple, the risk of accidents tends to increase during the busy cookout season. VR simulations can provide critical training in safety practices, such as properly handling hot surfaces and safely using grilling tools, thus helping to minimize injury incidents. Additionally, users can learn how to respond effectively in emergencies, such as grease fires, through realistic simulations that prepare them for unpredictable situations. This emphasis on safety not only protects individuals but also fosters a culture of responsible grilling within communities.
Cost-Effective Benefits of VR BBQ Training
Utilizing VR for BBQ training proves to be a financially savvy alternative to traditional methods. One of the primary economic advantages lies in the reduction of physical materials, leading to decreased waste. Aspiring chefs no longer need to purchase large quantities of meat and other ingredients for practice, as they can now explore and experiment virtually.
Moreover, VR training systems typically come with comprehensive software packages that allow users to explore a variety of recipes and techniques without incurring the ongoing costs associated with physical cooking classes. In regions like California, where culinary schools are adopting VR technology, students discover that they can complete their training more economically while still achieving exceptional educational outcomes. By integrating technology with culinary education, users can significantly lower their overall training expenses while mastering vital BBQ skills.
Environmental Benefits of VR BBQ Simulations
The environmental impact of VR BBQ simulations is significant. With growing concerns regarding climate change and carbon footprints, utilizing VR for barbecue training can positively contribute to environmental conservation efforts across the United States. By minimizing the number of actual BBQ sessions, users can reduce their carbon emissions associated with cooking.
Additionally, cutting down on food waste represents another crucial aspect of VR simulations. Instead of discarding poorly cooked dishes, users can practice and perfect their recipes without generating excess waste. In states like Oregon, where sustainability is a priority, culinary institutions are leveraging VR technology to promote eco-friendly practices among future chefs and BBQ enthusiasts. As communities become increasingly aware of their environmental impact, incorporating VR BBQ simulations into training programs offers a pathway to more responsible cooking practices.
How VR BBQ Simulation Technologies Operate
Essential Hardware for VR BBQ Simulations
To effectively utilize VR BBQ simulations, users require specific hardware. A VR headset is essential, acting as the primary interface for immersion. Popular choices include the Oculus Quest 2 and HTC Vive, both of which deliver rich and immersive experiences. Additionally, compatible controllers are vital for navigating the virtual space and interacting with the simulated BBQ apparatus.
Some advanced setups may require additional sensors or cameras to accurately track movements and enhance the realism of the experience. For instance, the Valve Index features finger-tracking controllers that simulate precise hand movements, contributing to the immersive quality of BBQ simulations. As technology advances, increasingly affordable and user-friendly VR hardware options are becoming available, making it easier for BBQ enthusiasts to engage in training from the comfort of their homes.
Exploring Software Solutions and Applications for VR BBQ
A wide variety of software and applications exist for VR BBQ simulations, catering to a broad spectrum of users. From free applications to specialized paid programs, numerous options are available to meet diverse needs and budgets. Noteworthy applications include BBQ Simulator and Grill Master VR, both of which provide comprehensive training experiences focused on different aspects of grilling.
Furthermore, many platforms now incorporate social features that allow users to connect with others and share their experiences. Some applications even introduce competitive elements, enabling users to participate in virtual BBQ contests, adding an exciting dimension to the learning process. As the demand for VR BBQ simulations continues to grow, developers are actively innovating, expanding available options, and enhancing the overall user experience.
Integrating VR with Real BBQ Equipment
The future of VR BBQ simulations lies in their potential integration with actual BBQ equipment. Some advanced simulations can synchronize with real grills and cooking devices, offering a more immersive and authentic training experience. This integration allows users to practice their skills in a virtual context while directly applying those practices in real-world scenarios.
For example, a simulation platform could connect to a smart grill that monitors temperature and cooking times. Users would receive immediate feedback within the VR environment while controlling the physical grill, creating a seamless learning experience. As technology progresses, the convergence of virtual and physical cooking is expected to become increasingly common, making VR BBQ simulations an invaluable resource for both aspiring chefs and seasoned veterans.
Skill Development and Training in VR BBQ
VR BBQ simulations feature customized training modules designed to enhance grilling techniques and safety protocols. Users can engage in targeted practice sessions that focus on essential skills, such as meat preparation, marination, and cooking durations. With integrated immediate feedback systems, users can correct mistakes and refine their techniques in real-time.
For instance, culinary schools throughout the Midwest are providing students access to modules that simulate various meat cuts and optimal cooking practices for each. This focused training approach assists students in grasping the complexities of BBQ cooking while reinforcing safety measures, ultimately preparing them for both home grills and professional kitchens. As educational tools, these VR simulations not only bolster skill development but also nurture a new generation of skilled BBQ enthusiasts equipped with the knowledge and experience to thrive.
Encouraging Social Interaction and Multiplayer Features in VR BBQ
Many VR BBQ simulations incorporate social and multiplayer features, enhancing the grilling experience by allowing users to connect with friends and fellow BBQ enthusiasts. These interactive options enable users to collaborate and engage in virtual settings, promoting a sense of community and camaraderie. From competitive cook-offs to cooperative recipe challenges, the social dynamics of VR BBQ simulations enrich the overall enjoyment of the grilling process.
In states like Florida, where BBQ festivals are common, these simulations can serve as preparatory tools for real-life events, allowing enthusiasts to practice and strategize together. Users can exchange tips and techniques, fostering camaraderie while honing their skills. As the popularity of VR cooking continues to rise, the incorporation of social features will undoubtedly play a significant role in shaping the future of BBQ culture.
Strategic Approaches for Utilizing VR in BBQ Cooking Simulations
Integrating VR into BBQ Competitions
Incorporating VR into BBQ competitions can significantly enhance participants’ training and preparation. By simulating competitive environments, aspiring competitors can practice under pressure without the limitations of physical resources. Contestants can leverage VR to rehearse their cooking techniques, perfect their timing, and refine their flavor profiles.
An actionable strategy involves developing a structured training schedule that includes VR practice sessions. Competitors should identify specific techniques they wish to improve and concentrate on those during their virtual training. Additionally, they can utilize VR to analyze their previous competition performances, pinpointing areas for improvement based on simulated feedback. As more BBQ competitions recognize the value of VR training, this technology could become a standard tool in the preparation toolkit for serious competitors.
Implementing VR BBQ Simulations in Educational Institutions
Educational institutions across the United States are increasingly adopting VR BBQ simulations to teach culinary students about BBQ techniques and safety. These programs offer an innovative and engaging method for students to acquire essential skills, bridging the gap between theoretical knowledge and practical application. Notably, a culinary school in Chicago has integrated VR simulations into its curriculum.
In this program, students use VR to practice cooking techniques, experience various grilling conditions, and even participate in virtual competitions. This hands-on experience not only enhances learning but also equips students for the real-world challenges they may encounter in the culinary field. As culinary schools recognize the advantages of VR technology, the adoption of these simulations is likely to expand, paving the way for a new generation of BBQ-savvy professionals.
Personalizing and Customizing VR BBQ Experiences
Customization and personalization are critical for the effectiveness of VR BBQ simulations. Users can tailor their virtual experiences to align with their preferences, enhancing engagement and facilitating skill development. For example, users can select specific recipes, adjust difficulty levels, and even design their own virtual grills to reflect their individual styles.
Expert insights suggest that this level of personalization is vital for maximizing the effectiveness of VR training. By allowing users to focus on areas that pique their interest or present challenges, they are more likely to remain motivated and continue enhancing their performance. Furthermore, culinary schools can incorporate personalized learning paths into their VR training modules, accommodating various skill levels and learning styles. As this trend toward personalization progresses, it will enrich user experiences and deepen connections to BBQ culture.
Emerging Trends Shaping VR BBQ Simulations Across the USA
Innovations Transforming the Future of VR Technology for BBQ
The future of VR BBQ simulations appears promising, with ongoing technological advancements set to improve realism and functionality. Innovations in graphics, processing power, and user interfaces are expected to create more immersive experiences, allowing users to feel as though they are genuinely grilling in a real-world environment. For instance, enhancements in graphics rendering could enable more realistic smoke and fire effects, elevating the overall sense of presence.
As technology continues to evolve, we can also anticipate the integration of artificial intelligence within VR BBQ simulations. This could lead to more dynamic interactions, where users receive tailored feedback based on their individual cooking styles and preferences. As these advancements materialize, they will undoubtedly broaden the possibilities for both recreational and professional BBQ training.
Cross-Integration with Other Culinary Simulations
Looking ahead, VR BBQ simulations may increasingly merge with other culinary simulations, creating comprehensive virtual cooking experiences. This convergence could allow users to explore various cooking styles and techniques, blending BBQ with baking, sautéing, and other culinary arts within a single platform.
For example, a user might engage in a virtual cooking school that encompasses BBQ, pastry-making, and global cuisines, facilitating an expansion of their culinary skills. This holistic approach not only enriches learning but also fosters creativity among users as they experiment with diverse cooking methodologies. As the demand for versatile culinary training rises, the fusion of VR BBQ simulations with other culinary disciplines is likely to become a significant trend in the industry.
Market Growth and Consumer Adoption of VR BBQ Simulations
The market for VR BBQ simulations in the United States is projected to experience substantial growth as consumer adoption accelerates. Factors driving this expansion include the rising popularity of home cooking trends, the increasing allure of immersive technology, and the growing acknowledgment of VR as a valuable training resource. Recent occurrences, such as the COVID-19 pandemic, have sparked heightened interest in home BBQ cooking, amplifying the demand for virtual training solutions.
As more consumers become aware of the advantages of VR BBQ simulations, we can expect a surge in new products, services, and platforms specifically tailored for BBQ enthusiasts. This growth will benefit both amateur cooks and professional chefs, offering innovative avenues for refining skills and exploring new culinary techniques.
Future Sensory Feedback Innovations in VR BBQ Simulations
Future VR BBQ simulations may incorporate advanced haptic and olfactory technologies, significantly enhancing sensory realism and user immersion. By integrating haptic feedback devices, users could physically feel the heat of the grill and the texture of various meats, creating a more authentic cooking experience.
Moreover, olfactory technology could allow users to experience the enticing aromas of grilled meats and spices, making the training process even more engaging and immersive. As these technologies become available, they are poised to revolutionize how users interact with VR BBQ simulations, delivering an unparalleled level of realism that closely resembles the actual BBQ cooking experience. The potential for enhanced sensory feedback will undoubtedly strengthen the effectiveness of training, bridging the gap between virtual and real-world cooking.
Educational Implementation of VR BBQ Simulations in Culinary Institutions
Ultimately, VR BBQ simulations are expected to see increased adoption in culinary schools throughout the United States for training purposes. As these institutions recognize the value of immersive learning experiences, they will integrate VR into their curricula, offering students safe and cost-effective methods to practice BBQ techniques.
By leveraging VR technology, culinary schools can prepare students for the complexities of real-world cooking environments while ensuring safety and minimizing food waste. As more educational establishments incorporate VR BBQ training, the next generation of culinary professionals will be better equipped to address the challenges of the culinary industry, ultimately enriching the overall quality of BBQ culture in the United States.
Frequently Asked Questions About VR BBQ Simulations
What is a VR BBQ simulation?
A VR BBQ simulation is an immersive virtual reality experience that allows users to practice grilling techniques in a safe environment, enhancing their BBQ skills without real-world risks.
How does VR improve BBQ skills?
VR enhances BBQ skills by providing a risk-free space for practicing techniques and experimenting with recipes, enabling users to gain confidence and proficiency through immediate feedback.
What limitations exist with VR BBQ simulations?
Current limitations include a lack of real sensory feedback, such as aroma and taste, as well as initial costs associated with high-quality VR equipment, which may discourage some users.
How can VR be integrated into cooking education?
VR can be integrated into cooking education by offering immersive training experiences that allow students to practice BBQ techniques in a controlled, safe setting, augmenting traditional teaching methods.
What role does VR play in BBQ competitions?
VR serves as a valuable training tool for BBQ competitors, enabling them to refine their techniques and strategies in simulated environments before facing real-life challenges.
How do VR BBQ simulations enhance safety?
VR BBQ simulations improve safety by allowing users to practice cooking techniques without the risks of burns or accidents associated with actual grilling, promoting responsible cooking habits.
What are the financial advantages of using VR for BBQ training?
Utilizing VR for BBQ training is cost-effective as it eliminates the need for physical materials, reduces food waste, and offers affordable software options compared to traditional methods.
How do VR BBQ simulations impact the environment?
VR BBQ simulations positively impact the environment by decreasing the need for actual cooking sessions, which lowers carbon emissions and minimizes food waste.
What hardware is necessary for VR BBQ simulations?
Hardware requirements include a VR headset, compatible controllers, and potentially additional sensors to provide an immersive experience in BBQ cooking simulations.
What future trends can we anticipate in VR BBQ simulations?
Future trends may include advancements in sensory feedback technology, integration with other culinary simulations, and increased adoption in culinary schools, enhancing the overall learning experience.
Connect with us on Facebook!
The Article Using VR for BBQ Cooking Simulations: A US Experience appeared first on https://pitmastersarsenal.com
The Article VR BBQ Cooking Simulations: An Immersive US Experience Was Found On https://limitsofstrategy.com