Category: Plant Care

Auto Added by WPeMatico

  • Fruiting Vines for Brisbane Pergolas: Kiwi, Passionfruit & More

    Fruiting Vines for Brisbane Pergolas: Kiwi, Passionfruit & More

    A considerable number of homeowners aspire to enhance their outdoor spaces with a vibrant touch of greenery, particularly through the addition of pergolas. Previously, we explored the finest flowering plants that complement pergolas beautifully, but this time, we will embark on an exciting journey into the realm of growing delicious fruits!

    Incorporating fruiting vines to embellish your pergola serves multiple purposes: it not only establishes a welcoming shaded outdoor area perfect for relaxation and social gatherings but also enables you to savor the delectable taste of fresh, homegrown fruit. In the subtropical climate of Brisbane, a plethora of fruiting vines flourish, providing delicious harvests while enriching your backyard with lush natural greenery and refreshing shade, transforming it into a serene oasis.

    It is crucial to understand that not every fruiting vine is suitable for pergolas. Certain varieties, such as kiwi vines, demand a strong structure to bear their heavy growth patterns, while others, like passionfruit, grow swiftly and require regular pruning to maintain their desired shape and overall vitality.

    Below is an extensive guide outlining the top fruiting vines that are exceptionally well-suited for pergolas in Brisbane, complete with their growing requirements and essential tips to ensure that healthy, productive plants flourish in your garden.

    1. Passionfruit (Passiflora edulis) – Your Top Choice for Pergola Coverage

    Best suited for: Brisbane gardens, rapid growth, delightful fruit production, and creating pollinator-friendly habitats

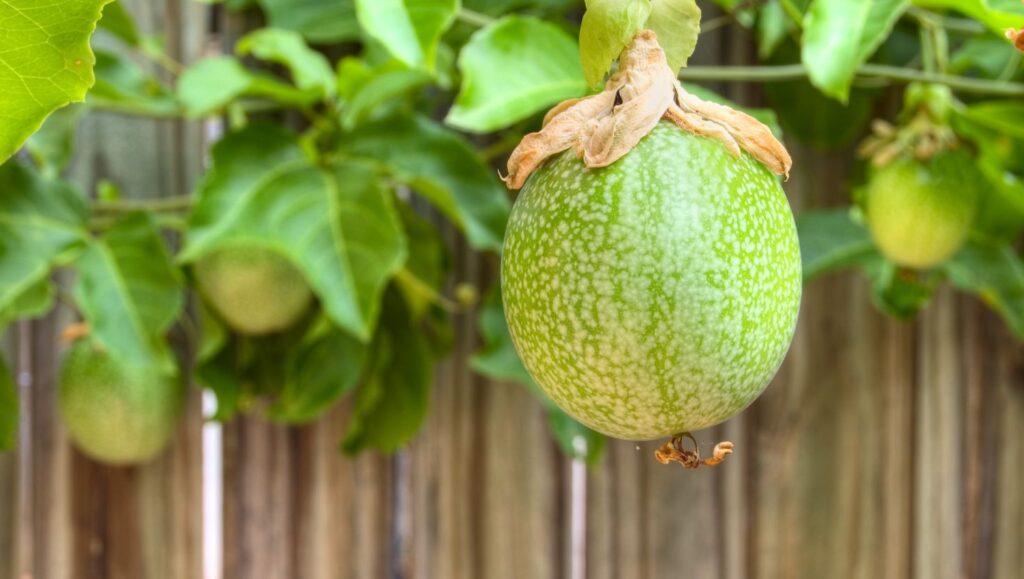
    Passionfruit stands out as an exceptional option for draping over a pergola, as it produces lush green foliage, stunning purple and white flowers, and sweet, tropical fruit that excites the taste buds. This fast-growing tendril climber has the potential to cover a pergola in just one growing season, offering a swift way to enhance your outdoor living space.

    Essential Growing Conditions for Thriving Passionfruit

    • Sunlight: Requires full sun exposure, meaning a minimum of 6 hours of direct sunlight daily for optimal growth
    • Soil: Prefers well-drained, slightly acidic soil with a pH level between 6.5–7.5, enriched with organic matter for best results
    • Watering: Needs deep watering 2–3 times a week, particularly during dry spells, to maintain consistently moist soil
    • Fertilizing: A high-potassium fertilizer should be applied every 4–6 weeks throughout the growing season to enhance productivity
    • Pruning: Regular pruning after fruiting is essential to promote fresh growth and prevent excessive overgrowth

    Top Passionfruit Varieties Perfect for Brisbane’s Climate

    • Nellie Kelly (Grafted Purple Passionfruit) – Famous for its strong disease resistance and impressive productivity
    • Panama Red & Panama Gold – Produces larger fruit, is heat-tolerant, and flourishes in subtropical conditions
    • Sweet Granadilla (Passiflora ligularis) – Provides aromatic fruit but prefers slightly cooler temperatures for optimal growth

    Expert Tips for Successfully Cultivating Passionfruit on Your Pergola

    • Train young vines along the pergola beams to encourage uniform growth and coverage across the structure
    • Regularly prune excess growth to improve airflow and sunlight penetration, which are vital for healthy vines
    • Plant near a fence or trellis to offer additional support, ensuring the vines have adequate structure to climb

    2. Kiwi Fruit (Actinidia deliciosa) – A Robust Climber Demanding Strong Support

    Best suited for: Large, sturdy pergolas capable of supporting the weight of vigorous growth

    Kiwi vines are recognized for being vigorous and heavy growers, necessitating a very robust pergola to adequately support their weight. As deciduous plants, they shed their leaves in winter, allowing sunlight to filter through during the cooler months when shade is less essential, making them an excellent choice for year-round gardening.

    Key Growing Conditions for Optimal Kiwi Fruit Production

    • Sunlight: Thrives in full sun exposure, ensuring it receives adequate light for vigorous growth
    • Soil: Requires well-drained, fertile soil enriched with compost to support robust growth
    • Watering: Needs regular watering, particularly during dry spells, to prevent stress on the plant
    • Fertilizing: Application of organic compost and slow-release fertilizer in spring will nourish the plant
    • Pruning: Regular pruning is essential to manage growth effectively and enhance fruit yield

    Understanding Kiwi Pollination Needs for Successful Fruiting

    Kiwi vines are dioecious, meaning they possess distinct male and female plants. To ensure successful pollination and fruitful production, it is necessary to have at least one male plant for every 4–5 female plants, promoting optimal pollination rates and fruit yield.

    Best Kiwi Varieties for Brisbane’s Unique Climate and Conditions

    • Hayward Kiwi – The most popular variety, requiring a male pollinator for fruit production
    • Bruno Kiwi – Noted for its early fruiting and vigorous growth, making it a favorite among gardeners
    • Issai Kiwi – A self-pollinating variety, ideal for smaller gardens with limited space

    Effective Strategies for Growing Kiwi Fruits on a Pergola

    • Install sturdy wooden or steel support beams to accommodate the vine’s weight, ensuring safety and stability
    • Space vines at least 3–4 meters apart to allow for adequate spread and airflow between plants
    • Regular pruning is necessary to manage excessive growth effectively, keeping vines healthy and productive

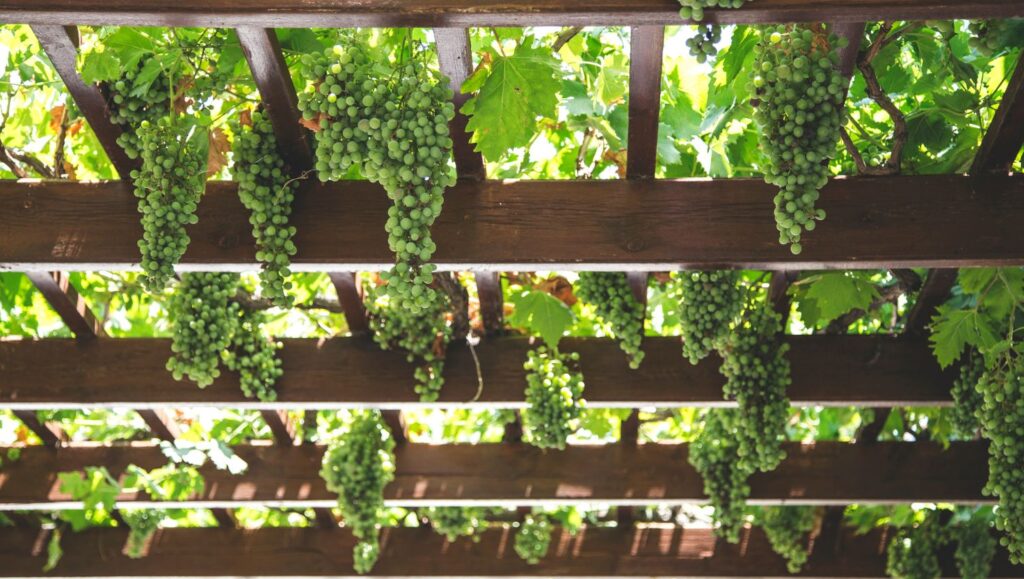
    3. Grapes (Vitis vinifera) – Elevate Your Outdoor Space with a Mediterranean Flair

    Best suited for: Traditional garden pergolas that provide shaded outdoor dining and relaxation

    Grapes offer a fantastic option for pergolas, providing dense shade during the hot summer months, while allowing sunlight to filter through in winter when they lose their leaves. They require seasonal pruning but are generally regarded as low-maintenance once established, making them a sought-after choice for many gardeners.

    Optimal Growing Conditions for Thriving Grape Vines

    • Sunlight: Requires full sun, ideally a minimum of 6 hours of sunlight daily for healthy growth
    • Soil: Prefers well-drained sandy or loamy soil that supports vibrant root health
    • Watering: Needs deep watering weekly during dry periods to maintain adequate moisture levels
    • Fertilizing: Application of organic mulch and balanced fertilizer in spring is beneficial for growth
    • Pruning: Essential for removing excess wood and promoting fruit production, keeping vines healthy

    Best Grape Varieties for Brisbane Gardens

    • Flame Seedless – Renowned for its sweet red grapes, perfect for snacking fresh
    • Sultana (Thompson Seedless) – Ideal for fresh eating or drying, offering versatility
    • Black Muscat – Produces large, juicy fruit with a rich flavor, excellent for dessert wines

    Expert Tips for Successfully Cultivating Grapes on Your Pergola

    • Prune annually to maintain shape and encourage fruiting spurs for maximum yield
    • Train vines along pergola beams to achieve uniform coverage and support for healthy growth
    • Utilize netting to protect fruit from birds during ripening season to ensure a productive harvest

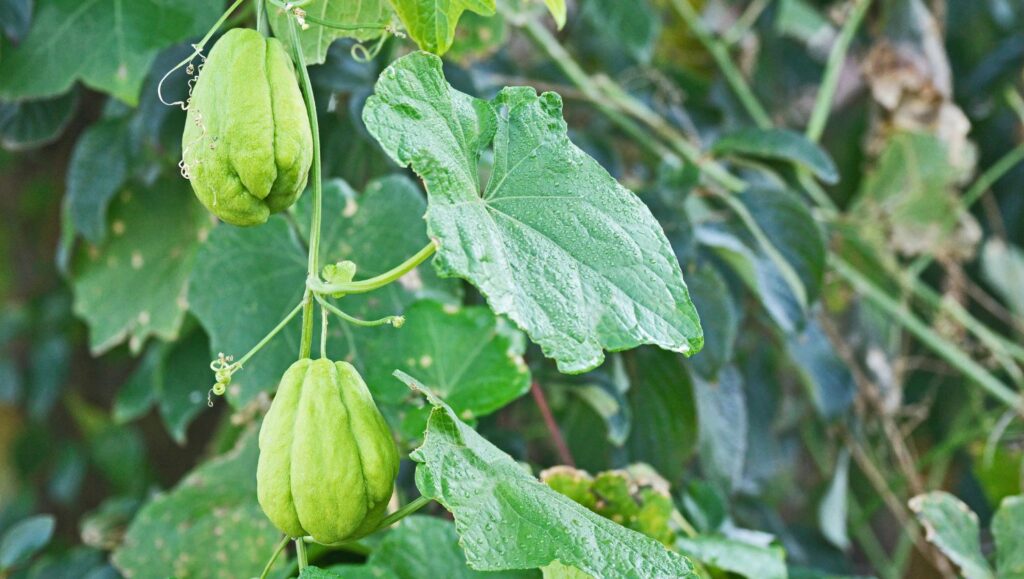
    4. Choko (Sechium edule) – A Fast-Growing, Low-Maintenance Climbing Vine for Effortless Coverage

    Best suited for: Gardeners seeking low-maintenance options and quick coverage for their outdoor pergolas

    Choko (also referred to as chayote) is a fast-growing vine that produces abundant pear-shaped fruit. It is remarkably low-maintenance and can effectively cover a pergola within just a few months, making it an ideal choice for creating inviting shady areas. Be careful not to confuse it with the “moth plant,” which is quite different.

    Pergolas(8)

    Optimal Growing Conditions for Choko to Thrive

    • Sunlight: Thrives best in full sun to partial shade, adapting well to various light conditions
    • Soil: Requires well-drained, compost-enriched soil that fosters healthy root development
    • Watering: Needs regular watering during dry months to keep the plants sufficiently hydrated
    • Fertilizing: Benefits from organic compost and seaweed-based fertilizers to enhance growth
    • Pruning: Regular trimming is vital for controlling growth and maintaining the desired shape

    Expert Tips for Successfully Growing Choko on Your Pergola

    • Choko vines tend to spread quickly, so be prepared for frequent pruning to maintain control
    • Fruits develop on long tendrils, making them easy to spot and harvest when ripe
    • This vine can tolerate drier conditions, making it a suitable choice for Brisbane’s climate

    Identifying the Key Differences: Moth Plant vs. Choko

    Many gardeners in Brisbane cultivate choko (Sechium edule) as a manageable vine for edible fruit and rapid pergola coverage. However, some may mistakenly grow the moth plant (Araujia sericifera), a toxic, fast-spreading vine native to South America and classified as an invasive weed in Queensland. Initially introduced as an ornamental plant, it has since emerged as a significant pest, smothering native vegetation and aggressively spreading across the landscape.

    If you’re cultivating choko or other climbing vines, it is essential to learn how to identify and eradicate moth plants before they proliferate and threaten your garden and local ecosystems.

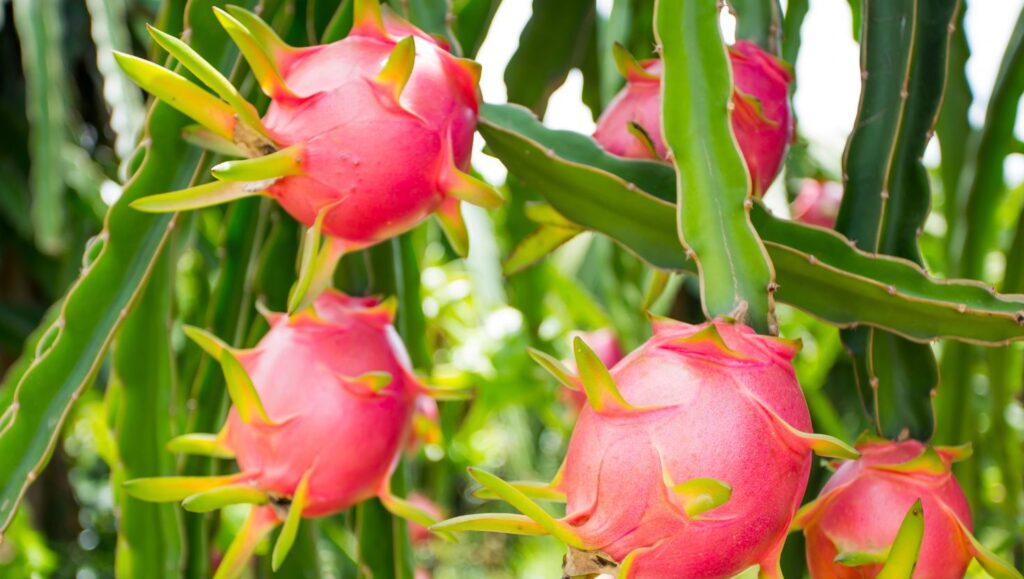
    5. Dragon Fruit (Hylocereus spp.) – An Exotic Climbing Cactus for Unique Edible Landscapes

    Best suited for: Unique edible landscapes and gardens designed for low water usage

    Dragon fruit is a cactus vine recognized for its strikingly vibrant pink or yellow fruit filled with sweet, refreshing flesh. This remarkable plant demonstrates a high level of drought tolerance, making it an excellent candidate for low-maintenance gardens that thrive in Brisbane’s climate.

    Optimal Growing Conditions for Successfully Cultivating Dragon Fruit

    • Sunlight: Requires full sun to thrive, ensuring it receives ample light for robust growth
    • Soil: Thrives in well-drained, sandy soil enriched with organic matter to support vibrant root health
    • Watering: Minimal; requires deep watering only during dry months, making it very low-maintenance
    • Fertilizing: Light applications of organic fertilizer are recommended every 2 months to encourage growth
    • Pruning: Regularly monitor growth to keep it in check and encourage upward climbing

    Best Dragon Fruit Varieties to Cultivate

    • White-fleshed dragon fruit – Offers a mild, sweet flavor, perfect for fresh consumption
    • Red-fleshed dragon fruit – Renowned for its intense sweetness and high antioxidant content, making it a favorite
    • Yellow dragon fruit – Smaller in size but exceptionally sweet, adding diversity to your garden

    Best Practices for Growing Dragon Fruit on a Pergola

    • Provide a sturdy trellis or pergola support, as dragon fruit can become quite heavy and requires stability
    • Be aware that flowers bloom at night and are typically pollinated by bats or moths, so timing is crucial for success
    • Consider hand pollination to boost fruit yield, especially in areas with fewer natural pollinators

    Selecting the Ideal Fruiting Vine for Your Pergola

    Each fruiting vine showcases unique growth habits, weight requirements, and pruning necessities. For example, passionfruit is perfect for rapid coverage, whereas kiwi and grapes need sturdier pergolas to support their growth. Meanwhile, dragon fruit offers a distinctive edible option with minimal water needs, making it ideal for gardeners seeking a low-maintenance solution.

    Ready to create the perfect pergola to support your fruiting vines?
    Contact Pergolas Brisbane at (07) 3064 0661 for expert consultation on custom pergola design and installation tailored to meet your garden’s unique needs.

    Best Fruiting Vines for a Pergola in Brisbane – Passionfruit, Kiwi & More

    The Article: Fruiting Vines for Brisbane Pergolas: Passionfruit, Kiwi & More first appeared on https://writebuff.com

    The Article Fruiting Vines for Brisbane Pergolas: Passionfruit, Kiwi & More Was Found On https://limitsofstrategy.com

  • Catnip Cultivation: Tips for Maximum Growth and Success

    Catnip Cultivation: Tips for Maximum Growth and Success

    Master Catnip Cultivation: Expert Strategies for Vibrant and Flourishing Growth

    Engaging in the art of growing <a href="https://unitypets.com/catnip-secrets-you-never-knew-existed/">catnip</a> (Nepeta cataria) promises a rewarding experience for gardeners, herbalists, and cat enthusiasts alike. This remarkable herb not only enhances the aesthetics of your garden with its lush foliage and aromatic leaves but also captivates our feline friends, making it an essential addition to many households. Beyond its charm for cats, catnip boasts a wide array of culinary and medicinal applications, enriching your gardening endeavors. In this comprehensive guide, we will explore every facet of catnip cultivation, including expert tips on selecting the ideal planting site, soil preparation techniques, nurturing your plants for optimal growth, and harvesting techniques to ensure maximum flavor and potency of your catnip leaves.

    Furthermore, we will cover essential maintenance practices, including effective watering strategies, pest and disease control, and seed harvesting methods, ensuring your catnip flourishes throughout the growing season. Whether you’re just starting your gardening journey or are a seasoned horticulturist eager to experiment with new herb varieties, this article will provide you with vital insights to successfully cultivate robust catnip plants and reap their numerous benefits.

    Lush green catnip plants with detailed leaves and budding flowers in a vibrant garden, under the sun, with a happy cat and gardening tools.

    Selecting the Ideal Spot for Your Thriving Catnip Garden

    Identifying the perfect location for your catnip garden is crucial for promoting optimal growth and increasing overall productivity. Catnip thrives in areas with full sunlight, making it essential to select a garden spot or balcony that receives a minimum of six hours of direct sunlight daily. This sunlight exposure is vital for stimulating vigorous growth and enhancing the aromatic qualities of the leaves. Moreover, pay close attention to the drainage properties of your soil, as excess moisture can lead to unfavorable conditions like root rot, threatening the vitality of your catnip plants.

    If you plan on planting catnip in a garden bed, consider the shade cast by adjacent plants to ensure they do not overshadow your catnip. Raised beds are advantageous if your soil is dense or poorly draining, as they facilitate improved water management. For container gardening, opt for pots that are at least 12 inches deep to provide sufficient space for root expansion. It is also wise to select a premium potting mix that promotes excellent drainage and aeration, creating the ideal conditions for your catnip to flourish.

    Step-by-Step Guide to Preparing Soil for Optimal Catnip Growth

    Proper soil preparation is a fundamental component of cultivating healthy catnip, as this herb thrives in nutrient-rich environments. Catnip prefers slightly alkaline soil, with an ideal pH level ranging from 6.1 to 7.8. To accurately measure your soil’s pH, consider utilizing a soil pH testing kit, readily available at most garden centers or online.

    If your soil is overly acidic, you can increase the pH by adding materials such as pulverized limestone or wood ash. Conversely, if your soil is too alkaline, consider incorporating sulfur or organic matter like pine needles or well-composted leaves to effectively lower the pH. Additionally, enhancing soil drainage is paramount; mixing organic materials, such as compost or well-rotted manure, into your soil will alleviate compacted areas and enrich it with vital nutrients. This thorough preparation lays the groundwork for your catnip plants to thrive and develop robustly.

    Your Complete Guide to Planting Catnip Seeds or Seedlings Successfully

    Catnip can be cultivated from seeds or purchased as seedlings from local nurseries and gardening centers. If you opt to start from seeds, the best practice is to sow them directly into your prepared soil during the spring, after the last frost date in your region. For effective seed-to-soil contact, evenly distribute the seeds and lightly cover them with a thin layer of soil before gently watering them to encourage germination.

    Alternatively, you may initiate catnip seeds indoors 6-8 weeks prior to the anticipated last frost date, then transplant the seedlings outside once the weather warms up. For optimal germination, place the seeds in moist seed-starting trays and position them in a warm, sunny location or under grow lights. When transplanting, ensure that seedlings are spaced 18 to 24 inches apart to promote healthy growth and adequate air circulation. After transplanting, water the plants thoroughly to help them establish strong roots in their new environment.

    Essential Watering Techniques for Sustaining Healthy Catnip Growth

    Consistent moisture is key to the health and vitality of catnip plants. While catnip is remarkably drought-tolerant once established, maintaining consistent soil moisture during the early growth stages is crucial for fostering robust root development. Water your catnip plants deeply, allowing moisture to penetrate the soil effectively and reach the root zone.

    To prevent fungal diseases, avoid overhead watering. Instead, consider utilizing a soaker hose or drip irrigation system to gradually deliver moisture as the plants mature. Regularly monitor soil moisture levels, particularly during hot and dry spells, and adjust your watering schedule to keep the soil consistently moist without becoming waterlogged. Additionally, applying a layer of mulch around the base of the plants helps retain soil moisture while suppressing weed growth, reducing the need for frequent watering and promoting healthy plant growth.

    Effective Strategies for Maintaining Thriving Catnip Plants Throughout the Season

    While catnip is generally regarded as a low-maintenance herb, implementing basic care practices can significantly enhance its health and productivity. To ensure your catnip plants receive the essential nutrients for optimal growth and flowering, apply a balanced, slow-release fertilizer once or twice during the growing season. Regularly deadhead wilted flowers to encourage continuous blooming throughout the season, and remove yellowed or damaged leaves to increase airflow around the plants, thereby minimizing the risk of fungal infections.

    Stay vigilant for signs of pests or diseases, including aphids, spider mites, or powdery mildew, and implement preventive measures as needed. Many common garden pests can be effectively managed using insecticidal soap or neem oil, while ensuring proper spacing and airflow can help prevent fungal diseases from taking root. By following these maintenance strategies, you can enjoy flourishing catnip plants throughout the entire growing season.

    Harvesting Catnip at the Right Time for Maximum Flavor and Potency

    Harvesting catnip leaves at the optimal time is crucial for maximizing their flavor and potency. The best moment to collect catnip leaves is just before the plant begins to flower, as this is when the essential oils are at their peak concentration. To harvest, use clean, sharp scissors to cut the stems just above a set of leaves, ensuring that some foliage remains on the plant to encourage regrowth.

    Limit your harvesting to no more than one-third of the plant’s foliage at any one time. This practice allows the plant to continue photosynthesis and generate new growth. Once harvested, catnip leaves can be enjoyed fresh or dried for later use. To dry catnip leaves effectively, find a warm, dry location with good ventilation, and bundle the stems together, hanging them upside down. Once fully dried, separate the leaves from the stems and store them in an airtight container, away from light and heat, to preserve their flavor and potency for future enjoyment.

    Managing Catnip Growth to Prevent Invasiveness in Your Garden

    Catnip is known for its vigorous growth and can become invasive if not properly managed. To prevent overcrowding and maintain control over your catnip patch, consider planting it in containers or raised beds. This approach allows for easier management and limits its spread throughout your garden. Alternatively, planting catnip alongside other vigorous herbs or perennial plants, such as mint or lavender, can help keep its growth in check.

    Regularly removing excess growth and dividing overcrowded clumps will further help prevent catnip from overtaking your garden space. If you choose to cultivate catnip in a container, be prepared to repot the plants once they outgrow their current pots. Pruning the plants regularly will help maintain a compact and tidy appearance while promoting bushy new growth, ensuring your catnip remains a visually appealing addition to your garden.

    Exploring the Incredible Benefits of Catnip for You and Your Pets

    Once you have successfully cultivated catnip, you can enjoy its numerous benefits both in your garden and beyond. While catnip is a beloved natural treat for cats, it can also be utilized in a variety of herbal drinks, sachets, and culinary recipes. To create catnip tea, steep a teaspoon of dried catnip leaves in boiling water for 5-10 minutes, then strain and serve. This soothing tea offers a mild, earthy flavor that is appreciated for its calming and relaxing properties.

    You can also craft homemade cat toys, sachets, and perfumes using fresh or dried catnip leaves. Consider sewing dried catnip leaves into small fabric pouches or combining them with aromatic herbs like lavender or chamomile to create a delightful herbal mix. In your garden, catnip attracts beneficial pollinators such as bees and butterflies, making it an excellent addition to any pollinator-friendly space. Its potent scent also effectively deters pests like aphids, squash bugs, and flea beetles, enhancing its role as a companion plant for vegetables and other sensitive crops. By following these cultivation guidelines, you can successfully grow catnip and enjoy its myriad benefits, whether you’re a cat lover providing a natural treat or an herbalist exploring catnip’s culinary and medicinal potentials.

    Proven Methods for Propagating New Catnip Plants Effectively

    Propagation involves creating new catnip plants from established ones, and there are several effective methods for doing so, including division, stem cuttings, and root cuttings. To maintain healthy and productive plants, established catnip should be divided every 2-3 years during the spring or fall. Gently remove the plant from its soil using a sharp knife or spade, ensuring that each division contains ample roots and foliage. Replant the divisions in prepared soil or containers and water thoroughly to help them acclimate to their new environment.

    For stem cuttings, select mature, healthy catnip plants in the spring or early summer. Using a clean, sharp knife, cut 4-6 inch long stems from the parent plant, making the cut just below a node. To promote root formation, dip the cut end of the stem in rooting hormone after removing the lower leaves. Place the cuttings in potting soil within a container, ensuring the soil remains evenly moist. Mist the cuttings regularly to prevent them from drying out until roots develop, facilitating successful propagation.

    Root cuttings can be harvested from dormant catnip plants in the fall or early spring. Carefully remove a portion of the plant’s root system using a sharp shovel or garden fork, ensuring that you include several thick, healthy roots. Cut the roots into 2-3 inch pieces, making a clean cut below each node, and plant them horizontally in a pot filled with damp potting mix, covering them with a thin layer of soil. Maintain moisture in the soil and place the pot in a warm, well-lit area until new shoots emerge, ensuring vibrant new growth.

    Best Practices for Overwintering Your Catnip Plants Successfully

    In colder climates, catnip plants may die back to the ground or enter a dormant state during winter. Implementing effective overwintering strategies can significantly increase the chances of your plants surviving until spring. One reliable method is to apply organic mulch around the base of the plants in late October to prevent soil freezing and protect the roots from harsh winter conditions. Suitable materials for mulching include straw, shredded leaves, and pine needles. This layer of mulch not only conserves moisture but also inhibits weed growth, contributing to overall plant health.

    In late autumn or early winter, cut back the stems of catnip plants to a few inches above ground level to remove any damaged or decayed leaves, encouraging fresh growth in spring. Dispose of or compost the trimmed debris to reduce the risk of attracting pests and diseases. In regions experiencing severe winter conditions, consider using frost cloth or floating row covers to shield your catnip plants from extreme weather. Secure the coverings with stakes or rocks to prevent them from blowing away in the wind. By following these overwintering techniques, you can help ensure your catnip plants thrive year after year, providing you with a bountiful harvest.

    Strategies for Effective Pest and Disease Management in Catnip Cultivation

    While catnip is generally resistant to pests and diseases, it can still be susceptible to common garden issues, including aphids, spider mites, powdery mildew, and other fungal infections. Regularly inspect your catnip plants for signs of pest infestations, such as distorted foliage, yellowing leaves, or visible insects. Many of these common garden pests can be effectively managed using pesticide soap, neem oil, or horticultural oil. Be sure to follow the manufacturer’s instructions for application, ensuring thorough coverage of the foliage to achieve maximum effectiveness.

    Implementing proper plant spacing, enhancing air circulation, and avoiding overhead watering are all effective strategies for preventing fungal diseases like powdery mildew and leaf spots. If you detect any fungal diseases, promptly remove and dispose of the affected plant material to prevent the spread of spores. To help avert future outbreaks, consider utilizing fungicides containing sulfur or copper, but always adhere to label instructions to avoid harming your plants. By employing these pest and disease control strategies, you can keep your catnip plants healthy and flourishing throughout the growing season.

    Harvesting Catnip Seeds for Future Planting and Sustainable Gardening

    If you’re interested in saving seeds from your catnip plants for future cultivation or sharing with fellow gardeners, it’s essential to harvest them at the appropriate time and store them correctly to ensure their viability. Allow your catnip plants to flower in late summer or early autumn. As the seed heads mature, they will turn brown and dry out. Cut the seed heads from the plants and place them in a paper bag or container to catch any seeds that may fall.

    After harvesting, allow the seed heads to dry thoroughly in a warm, well-ventilated area for 1-2 weeks. Once dried, gently crush the seed heads to release the seeds, then sift them through a fine mesh sieve or seed screen to remove any debris and chaff. After cleaning, store your catnip seeds in a cool, dry container, such as a glass jar or a sealable plastic bag. Label your seeds with the date and variety to keep track of them effectively. When stored properly, catnip seeds can remain viable for 1-2 years or even longer, enabling you to cultivate healthy plants for many growing seasons ahead. By following these techniques for harvesting and storing catnip seeds, you can enjoy this delightful herb for years to come.

    The Article: Catnip Cultivation: Essential Tips for Thriving Growth Appeared First On Unity Pets.

    The Article Catnip Cultivation Tips for Optimal Growth and Success Was Found On https://limitsofstrategy.com

  • Learning To Grow Catnip

    Learning To Grow Catnip

    Learning To Grow Catnip

    Growing catnip (Nepeta cataria) can be an enjoyable experience for gardeners, herbalists, and cat owners.

    This versatile herb, known for its lovely foliage, aromatic leaves, and alluring effect on feline friends, is relatively easy to grow and has several utilitarian and medicinal benefits.

    Catnip is a fantastic addition to any garden or home because it is a natural treat for cats and a tasty complement to herbal drinks and gourmet meals.

    In this comprehensive guide, we’ll go over the step-by-step process of growing catnip, from selecting the right location and preparing the soil to harvesting leaves and propagating plants.

    In addition, we’ll go over essential maintenance tasks like watering, pest and disease control, and seed harvesting to keep your catnip plants healthy and productive throughout the growing season.

    Whether you’re a first-time gardener hoping to try herb cultivation or an experienced green thumb looking to widen your horizons, this article will teach you everything you need to know about growing healthy catnip plants and reap their advantages.

    learning to grow catnip

    Choosing a location: 

    Choosing the right location for cultivating catnip is crucial to its health and productivity. Catnip grows in direct sunlight. Locate an area of your garden or balcony that receives at least six hours of sunlight daily.

    Furthermore, ensure that the soil drains well to avoid waterlogging, which can injure catnip plants in various ways, including root rot.

    When growing catnip in a garden bed, consider the neighbouring plants and their sunshine requirements to minimise shading. Raised beds are also useful if your soil is dense or poorly drained.

    When growing plants in pots, ensure the pot is at least 12 inches deep to allow the roots to expand. To guarantee optimal growth, use a high-quality potting mix that provides adequate drainage and aeration.

    Preparing the soil.

    Catnip needs nutrients to thrive, and soil preparation is essential. Catnip demands slightly alkaline soil with a pH ranging from 6.1 to 7.8. To check the pH of your soil, use a soil pH testing kit, which is available in garden centres.

    Add pulverised limestone or wood ash to raise the pH if your soil is too acidic. If your soil is too alkaline, you can lower the pH by adding sulphur or acidic organic matter such as pine needles or composted leaves.

    In addition to adjusting the pH, it is vital to improve soil drainage by adding organic matter like compost or well-rotted manure. This will help to loosen compacted soil and provide the nutrients required for plant growth.

    Planting Seeds or Seedlings

    Catnip can be grown from seeds or bought as seedlings from nurseries or garden centres. If you start from seed, place catnip seeds directly into prepared soil in the spring after your area’s last frost date. To guarantee the best seed-to-soil contact, scatter the seeds evenly and cover them with a thin layer of soil before gently watering.

    Alternatively, start catnip seeds indoors 6-8 weeks before the latest expected frost date and then transplant the seedlings outside when the weather warms. To enhance germination, put the seeds in damp seed-starting trays and place them in a warm, sunny location or under grow lights.

    Place seedlings 18 to 24 inches apart before transplanting them outside to ensure healthy growth and air circulation. Water the transplanted plants thoroughly to allow them to establish roots in their new surroundings.

    Watering

    Catnip plants require adequate moisture to remain healthy and vigorous. While catnip is very drought-tolerant once established, it is vital to keep the soil moist throughout the plant’s early growth stages to guarantee proper root development.

    Water catnip plants deeply, allowing water to saturate the soil and into the root zone. Overhead irrigation can spread fungal diseases; thus, it is best avoided. Instead, use a soaker hose or drip irrigation system to water the plant gradually as it matures.

    Monitor soil moisture often, especially during hot, dry weather, and adjust watering frequency to keep the soil moist but not waterlogged. Mulching around plant roots keeps the soil moist and the weeds at bay, needing less watering.

    Maintenance

    While catnip is a low-maintenance plant, some primary care can keep it healthy and productive. To ensure that catnip plants get the nutrients they need for development and flower production, use a balanced, slow-release fertiliser once or twice during the growing season.

    Deadhead wilted flowers regularly to ensure they continue to bloom throughout the season. Remove any yellowed or damaged leaves to increase airflow and lower the risk of fungal infection.

    Monitor the plants for signs of pests or diseases, such as aphids, spider mites, or powdery mildew, and take appropriate precautions. Many common garden pests can be controlled with insecticidal soap or neem oil, and proper spacing and airflow can help prevent fungal disease.

    organic cut catnip

    Harvesting 

    Harvesting catnip leaves at the right time is essential for maximising their potency and flavour. Catnip leaves are best picked just before the plant blossoms when the essential oils are most concentrated.

    Cut the stems just above a set of leaves using clean, sharp scissors, leaving some foliage on the plant to promote regrowth. Harvest no more than one-third of the foliage at once to allow the plant to continue photosynthesizing and creating new growth.

    Once collected, catnip leaves can be utilised fresh or dried for later use. A warm, dry location with adequate ventilation is excellent for drying catnip leaves, so bundle the stems and hang them upside down. After drying, separate the leaves from the stems and keep them in an airtight container away from light and heat to preserve their flavour and potency.

    Managing Growth 

    Catnip spreads quickly and can be invasive if not properly treated. Put your catnip patch in containers or raised beds to prevent overcrowding and control your catnip patch.

    Alternatively, combine catnip with other vigorous herbs or perennial plants, such as mint or lavender, to help restrict its growth. Removing extra growth and splitting overcrowded clumps can also help prevent catnip from taking over your landscape.

    If you’re growing catnip in a container, prepare to repot the plants after they outgrow their current pots. You can also prune the plants regularly to keep them compact and neat. Remove any dead or lanky growth to promote bushy new growth.

    Enjoying the benefits 

    Once you’ve grown catnip, you can enjoy its many benefits in the garden and beyond. Catnip is a famous cat treat but can also be used in herbal drinks, sachets, and recipes.

    To make catnip tea, soak a teaspoon of dried catnip leaves in boiling water for 5-10 minutes, then drain and serve. Catnip tea has a mild, earthy flavour and is widely used for its calming and relaxing properties.

    You may also use fresh or dried catnip leaves to produce homemade cat toys, sachets, and perfumes. Sew dried catnip leaves into a small fabric pouch or combine them with scented herbs such as lavender or chamomile to make a delicious herbal combination.

    In the garden, catnip can attract beneficial pollinators such as bees and butterflies, making it a perfect addition to any pollinator-friendly environment. Its strong scent can also deter pests such as aphids, squash bugs, and flea beetles, making it an excellent companion plant for vegetables and other sensitive crops.

    By following these steps, you can successfully grow catnip and get its myriad benefits in your garden and home. Whether you’re a cat lover trying to offer your feline pet a natural treat or a herbalist investigating catnip’s culinary and medical applications, growing this versatile herb is a rewarding experience that will please and satisfy you.

    Propagation 

    Propagation is the process of producing new catnip plants from existing ones. Catnip can be propagated in various ways, including division, stem, and root cuttings.

    Established catnip plants should be divided every 2-3 years, in the spring or autumn, to prevent overcrowding and refresh them. Before dividing the root ball into smaller pieces, gently remove the plant from its soil with a sharp knife or spade, ensuring that each split contains enough roots and foliage. Replant the divisions in prepared soil or containers and water thoroughly to help them settle.

    Take stem cuttings from mature, healthy catnip plants in the spring or early summer. Cut 4-6 inch long stems from the parent plant, just below a node, with a clean, sharp knife. To promote root formation, soak the cut end of the cutting in the rooting hormone after removing the bottom leaves.

    Soak the cuttings in potting soil before placing them in a container. Keep the soil evenly moist, and spray the cuttings often to prevent them from drying until roots develop.

    Root cuttings can be taken from dormant catnip plants in the autumn or early spring. Using a sharp shovel or garden fork, carefully remove a part of the plant’s root system, including many thick, strong roots.

    Cut the root into 2-3 inch pieces, making a clean cut below each node. Plant the root cuttings horizontally in a pot filled with wet potting mix, then top with a thin layer of earth. Keep the soil moist and place the pot in a warm, light location until new shoots emerge.

    Overwintering 

    Catnip plants in colder climates may die back to the ground or go dormant throughout the winter. Proper overwintering strategies can help protect the plants and keep them alive until the following spring. 

    Mulching: To prevent soil freezing and preserve plant roots from winter, spread an organic mulch over plant bases in late October. Examples include straw, shredded leaves or pine needles. Mulching also helps to maintain soil moisture and prevent weed growth, which improves plant health overall. 

    Cutting Back: Cut back the stems of catnip plants to a few inches above ground level in late autumn or early winter to eliminate harm or decaying leaves and encourage the regrowth of new growth during the spring. To prevent pests and illnesses from spreading, dispose of the clipped material or compost it. 

    Protective Coverings: In places with frigid temperatures or heavy snowfall, try covering catnip plants with a layer of frost cloth or floating row cover to shield them from the cold and other severe weather. Secure the coverings with pegs or rocks to keep them from flying away in the wind. 

    By following these measures to overwinter your catnip plants, you can help secure their survival while enjoying strong, vivid growth year after year. 

    Pest and Disease Control 

    While catnip is generally resistant to pests and diseases, it can be impacted by typical garden pests such as aphids, spider mites, powdery mildew, and fungal infections. 

    <span data-preserver-spaces="true">Pest Control:</span> Check catnip plants regularly for signs of pest infestation, such as twisted foliage, yellowing leaves, or the appearance of insects. 

    Many common garden pests, such as aphids and spider mites, can be controlled using insecticide soap, neem oil, or horticultural oil. 

    Follow the manufacturer’s directions and thoroughly coat the foliage to ensure optimal effectiveness. 

    Disease Control: Powdery mildew and leaf spots are fungal infections that can be reduced by preventative measures such as correct plant spacing, good air circulation, and avoiding overhead watering. 

    If fungal diseases emerge, remove and dispose of the afflicted plant material immediately to prevent spore dissemination. Fungicides containing sulphur or copper can be applied to prevent fungal diseases; however, follow the label directions carefully to avoid plant harm. 

    These pest and disease control strategies will help your catnip plants stay healthy and thrive throughout the growing season. 

    Harvesting seeds. 

    If you wish to save seeds from your catnip plants for later use or to share with friends and gardeners, you must harvest them at the appropriate time and store them appropriately to ensure their viability. 

    Seed Harvesting: Let catnip plants blossom and set seed in late summer or early autumn. As the seed heads grow, they become brown and dry. Harvest the seed heads by cutting them from the plants and storing them in a paper bag or container to catch any seeds that may fall out. 

    Seed Cleaning: After harvesting the seed heads, let them dry thoroughly in a warm, well-ventilated place for 1-2 weeks. After drying, gently crush the seed heads to release the seeds, then sift them through a fine mesh sieve or seed screen to eliminate any debris or chaff. 

    Seed Storage: Once cleaned, place the catnip seeds in a container and keep them in a cool, dry place. This could be a glass jar or a resealable plastic bag. Keep track of your seeds by labelling the container with the date and variety. Catnip seeds that have been adequately preserved can last 1-2 years or more, allowing you to grow healthy plants season after season. 

    Following these steps to harvest and store catnip seeds, you can have this tasty herb on hand for years.

    The post Learning To Grow Catnip appeared first on Unity Pets.

    The Article Learning To Grow Catnip Was Found On https://limitsofstrategy.com

  • The Best Bonsai Tree For Newcomers

    The Best Bonsai Tree For Newcomers

    The Best Bonsai Tree For Newcomers

    The Best Bonsai Tree For Newcomers: Fortunately, many species of bonsai trees and plants may be maintained effectively by those with little experience in the art.

    Even experienced enthusiasts seeking a good bonsai gift should remember the basics because it’s easy to forget what you know when your practices become second nature and instinct. You miss critical information when introducing bonsai to your friends who are bonsai beginners.

    Nothing is as simple to sell as bonsai for bringing nature into your house or yard at a low price. This post highlights certain bonsai species that are great for novices.

    There are low-cost bonsai available, as well as those that require little upkeep. There are various possibilities for selecting a bonsai that fits your aesthetic, whether it is a more classic appearing bonsai tree or a more robust tree that may appear less traditional.

    Because they endure so long, bonsai plants are very inexpensive. However, be aware of the low prices; bonsai plants can live for over a hundred years; with proper care, your bonsai may be the only pet you buy that will survive you.

    The bonsai’s compact size makes it a great potted plant for your desk, dining table, or outside garden. However, different types of bonsai necessitate special care and attention. To choose the most significant bonsai trees, you must first understand the many types of plants and their origins.

    the best bonsai tree for beginners

    ahm articles

    Bonsai Dimensions

    Most wild trees are too large to be kept in a basic pot. This, however, is different. Some mountain bonsai species can reach fairly significant sizes, but lowland bonsai trees are chosen for their more diminutive stature and are so-called bonsai trees.

    Bonsai Maintenance

    Bonsai takes ongoing attention to stay healthy. Whatever variety of bonsai plants you choose, it will all require some pruning and maintenance.

    According to bonsai lovers, this procedure helps the owner comprehend the necessity of meticulously caring for a living organism, freeing their minds from the burdens of everyday life and focusing their attention on the meticulous care associated with the art of gardening.

    Discovering The Ideal Bonsai Tree

    The bonsai comes in various styles, so you may select the one that best meets your aesthetic preferences. Each variety necessitates a different level of attention.

    Trees that shed their leaves

    Many lovely bonsai kinds are deciduous, which means their leaves change colour and fall off as the seasons change. Japanese red maple and cherry bonsai trees, among others, turn vibrant hues in the fall.

    A deciduous tree can become naked in the winter, but it allows you to observe the seasons change, which many bonsai owners appreciate.

    With temperatures exceeding 35 degrees Fahrenheit, a deciduous tree requires outdoor care. It should be moved indoors when winter weather drops below freezing. To keep external pests at bay, deciduous trees require specific care.

    Evergreen Trees

    Like a pine tree, an evergreen bonsai keeps green throughout the season. Cypress, cedar, pine, and spruce variations are included in this form of bonsai. This style of bonsai requires far less care than others.

    They may be kept indoors in a reasonably calm environment and need sunlight, particularly in the morning. Gardeners frequently keep this sort of bonsai near a window but remove it in the afternoon to avoid the intense midday sun.

    Trees in bloom

    Flowers or fruit will grow on a flowering bonsai. The Chinese scent tree and the Chinese blossoming white serisse are two examples. These trees live up to their name by emitting citrus scents like orange and lemon.

    A blooming tree, which comes in deciduous and evergreen types, can be kept indoors. It is vital to fertilise such a tree to boost the nutrients required for flowering.

    The History of Bonsai

    Bonsai is an ancient East Asian custom of planting and caring for small trees as pets or in potted gardens. With its serene spirit and aroma, bonsai is about bringing a small piece of nature into our lives to soothe the artificial environment around us.

    Bonsai, a Japanese phrase for a plant or tree in a container with ancient Chinese roots, became popular over a thousand years ago. Bonsai trees are miniature natural sceneries generally sold with moss, pebble, and rock sculpture at the base, giving the tree the appearance of a new or complete environment rather than a conventional houseplant in soil.

    Life becomes so dull without modest oases of nature strategically placed around us. Sterile, plant-free environments are typically tricky, and as far as houseplants go, beginner bonsai trees are among the easiest, longest-lasting, and most satisfying to manage.

    Even experienced amateur bonsai growers will discover helpful ideas here to help them figure out how to give a bonsai to a newbie.

    Overall, bonsai is a gratifying activity that you might also motivate your friends to take up.

    Nature’s majesty and grandeur embody a unique, calm form of beauty that no human can dispute. Most people interested in bonsai trees for beginners have a love of nature that they wish to express and incorporate more into their lives.

    As people have moved to increasingly urbanised areas and cities, we have seen a growing conflict. We like nature, but we also desire the security of a house, so recreating nature in our living areas has become increasingly difficult.

    bonsai care for newcomers

    Beginner’s Guide to Bonsai Trees

    First, bonsai trees are genetically identical to their adult clones and cousins despite their small size. There are “dwarf” cultivars for sale in the bonsai market. However, they are bred specifically to keep the future plant’s leaf size small.

    Nonetheless, whether pruned or potted, bonsai trees naturally grow smaller leaves and are stopped from expanding to a typical tree size. Similar to how goldfish grow to fit into their containers,


    Finding a happy balance when watering is challenging for a newbie bonsai planter.

    Overwatering your bonsai might cause root rot. Therefore, it is crucial to learn if the soil around your bonsai tree should be constantly moist or relatively dry.

    Evergreen bonsai plants, for example, require more water and must keep their soil moist, whereas tropical bonsai trees require less water and are more susceptible to root rot.

    Keep a constant eye on the plant to ensure it remains healthy and free of pests.

    Surprisingly, bonsai tree fruits are not necessarily smaller than mature tree fruits. Pomegranates, apples, figs, lemons, limes, oranges, and other citrus fruits grow and are edible on bonsai trees.

    A full-grown Meyer lemon would undoubtedly weigh down the limb of a little bonsai lemon tree.

    The most effective pruning techniques for bonsai beginners.

    Cutting wayward twigs and branches with old, decaying fruit and blooms give your tree the best opportunity of growing and blooming again as soon as possible. The pencil rule helps determine which tool to use while pruning your bonsai tree.

    Any sharp, durable scissors will suffice for branches less than the diameter of a pencil. To avoid scarring on your bonsai tree, prune as close to the base (or trunk) as feasible. This will also help to reduce your plant’s healing time.

    Concave shears are necessary for any branches greater than the diameter of a pencil. These shears have a curled tip and resemble fingernail clippers rather than scissors.

    It’s crucial to remember that while cutting branches off your bonsai tree is quick and easy, getting new growth is a tedious and patient process. Therefore, a good tip for beginners is to chop your bonsai tree sparingly and be patient.

    Compared to other options, working with bonsai is the most cost-effective approach to growing actual fruit in your house.

    Bonsai Hawaiian Umbrella

    There are many excellent bonsai plants, but one of the most popular and least expensive is the Hawaiian Umbrella Bonsai Tree (click here to see the lowest prices). Because of its resilience to desiccation and lack of light, this plant, also known as the small umbrella, golden Hawaiian umbrella, or Schefflera arboricola, is highly resilient and arguably the easiest to care for. Of course, all plants require light and water to survive. Still, the Hawaiian Umbrella can do without these necessities for longer than any other bonsai tree species, making it an excellent choice for a beginner’s first bonsai tree.

    Hawaiian umbrella trees are tropical plant that is native to Taiwan. David Fukumoto, a Hawaiian resident, promoted them as bonsai trees, hence the Hawaiian allusion in their name. It’s a frequent misperception that these plants are indigenous to Hawaii, which is likewise tropical.

    The most challenging aspect of these Hawaiian umbrella bonsai trees is shaping them into a “typical” bonsai shape, as they have a mind of their own regarding growth. Because their branches grow densely, it is accessible to under or over-prune them.

    Aside from the Hawaiian Umbrella, another incredible beginner bonsai species is the Ficus, a reasonably straightforward tree resistant to grower blunders and easy to cultivate inside. Outdoor bonsai trees are harder to care for since they must be moved indoors when the temperature falls below freezing for an extended period. The Ficus need light through a window to thrive indoors, keeping it in the “simple” category for sale.

    bonsai tree in garden

    Bonsai of Baby Jade

    Jade plants are undeniably beautiful, and baby jade is even more fascinating because the leaves remain so little. Because it forgives the owner if he forgets to water it, jade makes an excellent bonsai plant. Baby jade plants store a significant amount of water in their leaves, which they can access if the gardener is dehydrated or inattentive.

    Pine from Norfolk Island

    The traditional Norfolk miniature pine is an excellent bonsai tree. With its Christmas tree-like aroma, this species complements practically any style. The Norfolk pine is not a pine tree, although it does require a few hours of sunlight per day to survive. Like almost all other bonsai species, this bonsai requires more water in the summer and less in the winter. Norfolk Island bonsais thrive on soil that is nearly dry but not entirely dry.

    Bonsai tree of Japanese red maple

    The leaves turn a rich scarlet over the summer months. The Japanese Red Maple Bonsai Tree is highly upright, and the leaves may be pruned back to less than an inch, making it excellent for bonsai.

    Bonsai Tree of Sea Grapes

    It is a bushy, shoreline tree that grows mainly in the southern sections of Florida. However, this bonsai starter tree is distinct in that, while its leaves are frequently exceedingly huge, they can easily be trimmed down to an inch and a half and still look fantastic. Many people prefer the Sea Grape bonsai tree because the leaves self-heal after being cut, resulting in a distinctive and stunning crimson edge.

    Bonsai Tree of Chinese Elm

    This bonsai starter tree is ideal because, unlike other bonsai starter trees that do better outdoors or indoors, the Chinese Elm bonsai tree can grow in both environments. Many people like this bonsai tree because of its shape and beautiful foliage. While this tree demands sunlight in the summer, it requires some dormancy in the winter.

    The Brazilian rain bonsai tree and the Himalayan cedar bonsai tree are the two last alternatives for a bonsai beginning tree. They are both relatively inexpensive and will only reach a height of approximately 15 inches.

    The Buddha’s Ear

    This classic bonsai is also known as Chinese taro or Buddha’s hand. It bears a lemon yellow fruit that is ornamental but not edible. The tree is relatively simple to maintain. It is also utilised in a variety of traditional Chinese medicines.

    Important Bonsai Instruments

    Once you’ve decided on the perfect bonsai plant, you’ll need some essential garden tools. Pruning shears, an indoor humidifier, root rakes, and specialised fertilisers are among them.

    Although finding a simple, easy-to-grow bonsai is pretty easy, using these tools will ensure your plant’s long-term health.

    Benefits of Bonsai

    For thousands of bonsai lovers worldwide, the plant provides an opportunity to relax and reflect on the simple things in life, and you will reap the benefits of this hobby as you learn more about bonsai culture.


    The post The Best Bonsai Tree For Newcomers appeared first on https://gqcentral.co.uk

  • Bonsai Trees For The Home

    Bonsai Trees For The Home

    Bonsai Trees For The Home

    Bonsai Trees For The Home: It is a common misconception that bonsai trees must be kept inside.

    Most bonsai, like regular trees, should be kept outside to enjoy all four seasons.

    Only tropical and subtropical plants can grow inside, where temperatures are persistently high and consistent throughout the year.

    bonsai trees for the home

    ahm articles

    Which bonsai is most suited to indoor cultivation?

    Various tropical and subtropical trees can be grown indoors.

    The ficus is exceptionally hardy and tolerates low humidity, making it an excellent choice for beginners.

    Other popular indoor bonsai are dwarf jade tree, fukien tea (Carmona), Hawaiian umbrella (Schefflera), and sweet plum (Sageretia).

    If you choose one of these trees and adequately care for it, your bonsai will thrive indoors.

    Why can’t I keep temperate, non-tropical bonsai indoors?

    Temperate trees, as previously indicated, require a period of dormancy over the winter.

    During this season, the yearly growth cycle concludes, and the tree prepares for the following cycle to begin in the spring.

    Temperatures and light levels gradually decrease over several weeks before a tree goes into dormancy, which is not the case when temperate trees are housed indoors.

    This rest period is not required for tropical and subtropical trees.

    Indoor bonsai tree maintenance

    Caring for a bonsai tree indoors is not the same as caring for regular potted houseplants.

    Because bonsai trees are frequently planted in miniature containers, they have limited space to store fertilisers and water.

    Furthermore, tropical plants are accustomed to high light and humidity, which can be difficult to replicate indoors.

    Indoor bonsai demand extra attention:

    light

    The biggest issue with indoor tropical bonsai care is insufficient lighting.

    If the trees do not receive enough light, they will not die immediately, but their growth will slow, and the plant will weaken over time.

    As a result, bonsai grown indoors should be placed in a bright spot, ideally in front of a south-facing window.

    Even if you have a south-facing window, the light intensity may need to be increased.

    You can help your tree by supplementing its lack of light with artificial lighting.

    For example, you can use fluorescent lights with a growth-friendly spectrum or light-emitting LEDs for about 10 hours daily. Learn more about placement.

    humidity relative

    Another issue with keeping a bonsai tree indoors is that the tree requires a very high humidity level, which you won’t be able to achieve in your own home, especially if you have heating or cooling.

    The best way to enhance the humidity around your bonsai tree is to place it in a humidity tray full of water and spritz it several times a day. During the day, you can also circulate outside air by opening a window.

    Watering and fertilisation

    The most important rule is to water only when necessary.

    Ignore the label that says you should water your bonsai tree every x day.

    Keep an eye on the soil around your tree and water only when necessary.

    organic fine cut catnip

    Bonsai Tree Watering

    Several factors, including tree species, size, container size, time of year, soil mix, and climate determine the frequency with which a tree should be watered.

    Is it necessary to water my bonsai tree regularly?

    As previously indicated, the frequency with which a bonsai should be watered depends on various factors, making specific suggestions unattainable.

    Instead, you’ll need to keep track of each tree separately.

    Water your trees when the ground is slightly dry.

    As a beginner, check the soil moisture with your fingers at a depth of around one centimetre (0.4″).

    As you gain experience, this will become evident.

    When your tree needs water, you can see it rather than feel it.

    Never water frequently.

    Keep a watch on your trees to see if they require watering.

    Use the appropriate soil mix.

    The soil composition significantly impacts how often trees need to be watered.

    Most bonsai trees grow on a 12 to 14 to 14 acadama, pumice, and lava rock ratio. If you cannot water regularly, employ a mixture that retains more water in your pots by incorporating extra akadama or compost.

    When.

    When you water a bonsai, it makes no difference.

    Some experts recommend against using cold water after the sun has warmed the soil since it will cool the tree down.

    Watering your tree as soon as the soil becomes slightly dry will help regardless of the time.

    What is the best way to water your bonsai trees?

    If the soil is slightly dry and the tree needs water, thoroughly soak the entire root system.

    Water until the water drains from the lower drainage holes, then repeat as needed.

    To avoid washing away the soil, water from the top with a watering can fit with a fine nozzle.

    Rainwater is the best to use because it is chemical-free, but regular tap water will suffice if it is not available.

    Some excellent automatic bonsai watering systems are available, but they are somewhat expensive.

    Fertilization of bonsai

    Fertilizer’s essential components

    Nitrogen, phosphorous, and potassium are three key ingredients in all fertilisers (NPK).

    Nitrogen promotes leaf and stem development, as well as aboveground growth. Phosphorus encourages healthy root growth as well as fruit and flower development.

    Potassium generally enhances plant health. Gardeners widely use different NPK ratios for different trees and times of the year.

    Conversely, experts are increasingly recommending that the same NPK ratio be utilised throughout the bonsai growth cycle.

    In addition to the three macronutrients (NPK), fertilisers may contain a range of micronutrients such as iron, manganese, boron, molybdenum, zinc, and copper.

    When should I fertilise?

    When actively growing, most bonsai trees require fertiliser from early spring until mid-fall.

    Older and more mature trees are often fed less frequently, depending on the species, season, stage of development, and tree health. Fertilizing indoor trees can be done at any time of year.

    Temperature

    Tropical tree species require rather high temperatures all year, similar to those in your living room.

    Subtropical bonsai trees may tolerate somewhat lower temperatures and survive in temperatures lower than the average room temperature throughout the winter.


    The post Bonsai Trees For The Home appeared first on https://gqcentral.co.uk

  • Catnip Plant Varieties: Cultivating Various Nepeta Species

    Catnip Plant Varieties: Cultivating Various Nepeta Species

    Catnip Plant Varieties: Cultivating Various Nepeta Species

    Catnip Plant Varieties: Cultivating Various Nepeta Species: Catnip is a member of the mint family and is beloved among feline companions. Catnip comes in various types that are easy to grow, vigorous, and appealing.

    In case you’re wondering, these plants will entice your feline companions. Crushing the leaves releases nepetalactone, a cat-loving chemical.

    Contact with the plant makes the cat happy and provides several photo opportunities as you watch “Fluffy” frolic.

    Varieties of Catnip, The most common type of catnip is Nepeta cataria, sometimes known as actual catnip.

    Other Nepeta species exist, each with its blossom colour and aroma.

    catnip species

    ahm articles

    Catnip plants are native to Europe and Asia, but they have become naturalised in various parts of North America.

    Catnip and its cousin, catmint, have interbred, resulting in several variants of the original species.

    The following are the five most prevalent species:

    True catmint (Nepeta cataria) reaches a height of one foot and bears white to purple flowers.

    The tall Greek catmint (Nepeta parnassica) is 112 feet tall with pale pink blooms (1.5 m).

    Camphor catmint (Nepeta camphorata) grows to 3 feet (1.5 m) in height and has white blooms with purple patterns.

    Lemon catmint (Nepeta citriodora)- A 1-metre-tall plant with white and purple flowers.

    Persian catmint (Nepeta mussinii) has lavender flowers and grows to 15 inches (38 cm).

    The majority of catnip cultivars have grey-green, heart-shaped leaves with fine hairs. All have the characteristic square stem of the mint family.

    Other Nepeta species are available for bold gardeners or cat lovers.

    Giant catmint can reach heights of over 3 feet.

    The flowers are purplish blue and come in several varieties, including ‘Blue Beauty.’ The blossoms of ‘Caucasian Nepeta’ are massive and magnificent, while Faassen’s Catmint forms a thick clump of massive, blue-green leaves.

    Catmint plants are grown in countries such as Japan, China, Pakistan, the Himalayas, Crete, Portugal, Spain, and others.

    Almost every country appears to have some variation of the herb growing.

    Most of them demand the same dry, hot circumstances as common catnip, but some, such as Kashmir Nepeta, Six Hills Giant, and Japanese catnip, prefer moist, well-drained soils and can bloom in partial shade.

    Learn more about the plants that grow in conjunction with catnip.

    Catnip resembles other mints in appearance, but it also contains the aromatic oils for which the mint family is famous.

    Catnip is, therefore, an ideal garden companion plant.

    According to several studies, putting these oils on your fruit and vegetable plants can help keep them healthy and pest-free. Using catnip as a pest control agent is a natural way to keep insects at bay while protecting your landscape.

    Catnip as an Insect and Plant Companion If you’ve ever seen a cat circle a catnip plant, you know how strong the allure is. Catnip is not only great for a kitty-friendly garden, but it also repels several common pests.

    Chard, for example, is one of catnip’s many friends. The plant’s herbal oils keep flea beetles away from the veggies, preventing harm caused by their feeding.

    Catnip can be grown alongside other plants that benefit from its strong aroma. Many insects are repulsed by catnip’s beneficial oils, including:

    Ants and Aphids Weevils that consume cabbage Aphids on potatoes Japanese beetles Flea-eating beetles Cockroaches Weevils Bugs should be eliminated.

    That’s a long list for a plant that’s easy to colonise. Catnip, a vegetable garden companion plant, can help protect crops from pest damage without the use of toxic chemicals.

    The following plants can be grown using catnip:

    Chard (Swiss) (Swiss) Squash, beets, broccoli, cauliflower, and potatoes are all root vegetables. The herb’s pungent perfume appears to prevent mice and voles, two common vegetable garden pests.

    As a Plant Companion, Catnip may quickly become invasive and spread throughout a bed.

    Plant the herb in a pot and bury it among catnip companion plants to avoid this.

    Of course, the herb attracts cats, but the blossoms attract honeybees. You can apply catnip as a border if you don’t want cats in your garden.

    Cats will be so distracted by the plant’s enticing aroma that they will avoid the soft soil near your plants and go elsewhere to relieve themselves.

    As a bonus, you may watch a cat frolic among the fragrant foliage and flowers.

    Leaf and bud catnip

    There will be numerous photo chances!

    Catnip can be grown from seeds, cuttings, or cuttings. It proliferates and has little disease and pest problems.

    Plant catnip in well-drained soil near plants that need protection for pest management.

    Catnip grows lanky, so prune young plants early to achieve a thicker, bushier shape.

    To use the plant at home, cut the stems and hang them upside down in a dry place.

    Once the herb leaves have dried, remove them from the stems.

    Crush the leaves and sprinkle them on doorways, windowsills, and anyplace else small bug invaders might enter the house.

    The odour can linger up to a week and keeps various pests away from your home.

    What else is catnip helpful for besides making cats happy?

    The name, or nearly so, says it all. Catnip is a common herb that can be grown in a garden or in the wild.

    You can profit from the catnip for yourself and your feline buddies if you know how to use it.

    Catnip for Cats, also known as Nepeta cataria, is a mint-family herb traditionally used to treat cats.

    One common misunderstanding is that all cats respond to catnip. Only about two-thirds of cats lick, rub catnip toys, roll in the herb, or drool in response to catnip.

    Even feral cats are affected by catnip. Catnip can be fed to cats as a fresh plant in a container or in a bed outside.

    If you put it in a container, make it big enough and heavy enough to keep a curious cat from knocking it over.

    To limit access, wrap toys in dried catnip leaves and store them covered and out of reach when not used.

    Other ways to use catnip Catnip isn’t just for cats.

    If you grow the herb, you have various options and may wonder what to do with the leftover catnip from making cat toys.

    Nepetalactone, a molecule found in catnip, is an insecticide.

    It can keep mosquitoes, spiders, ticks, cockroaches, and other bugs away from your home.

    You can deter certain pests by planting catnip between vegetable rows as a gardener.

    According to one study, growing catnip with cabbage vegetables reduced flea beetle infestations.

    Catnip can even keep rabbits and deer away from your vegetable garden. Catnip may have medicinal properties for humans, but before using it as a food supplement, see your doctor.

    Tea from dried catnip leaves and flowers has been used for centuries to cure stomach disorders, fever and flu symptoms, insomnia, and stress.

    It is perfect for ill children because it calms and helps with gastrointestinal issues.

    The post Catnip Plant Varieties: Cultivating Various Nepeta Species appeared first on https://gqcentral.co.uk

  • Venus Flytrap Cultivation and Care

    Venus Flytrap Cultivation and Care

    Venus Flytrap Cultivation and Care

    Venus Flytrap Cultivation and Care: A carnivore that thrives as a houseplant.

    The Venus flytrap (Dionaea muscipula) is one of the world’s strangest plants. People cultivate it for the impact rather than the appearance:

    It exists on flies.

    This makes it one of the most appealing plants to grow, particularly for children who can spend hours watching it “eat.”

    The “trap” of a Venus flytrap is a modified leaf. There can be up to eight of them on a plant, and they grow from flat stems (technically part of the leaf) that create a rosette at the base.

    The Venus flytrap isn’t the only plant with an altered leaf. Another example is the purple pitcher plant (Sarracenia purpurea subsp. purpurea).

    This leaf is composed of two lip-like lobes joined by a hinge. The nectar inside the trap acts as bait, drawing the beetle inside and killing it.

    When the bug inside hits one of the trigger hairs, the trap shuts and confines the prey inside.

    venus flytrap cultivation and care

    ahm articles

    Enzymes digest the bug between 4 to 10 days.

    The “jaws” reopen after digestion.

    Venus flytrap is the common name for the Venus flytrap.

    Dionaea muscipula is the botanical name.

    Droseraceae family

    Perennial plant species

    6-12 cm tall, 6-9 cm broad at maturity

    Full or partial sun exposure

    Sandy and damp soil

    Acidic soil pH

    Flowering season: spring and summer

    White flower colour

    Zones 5-8 for Winter Hardiness (USDA)

    North American native

    Upkeep of the Venus Flytrap

    Because Venus flytrap is bred to be watched up close, it is typically grown as a houseplant in a container, where its unique behaviour may be examined more easily.

    A Venus flytrap’s care is no more complex than many other houseplants, but it demands special surroundings.

    This carnivorous plant requires live flies, mosquitoes, and gnats to survive. Insert the bug into the trap with tweezers until it hits a trigger hair.

    Because a Venus fly trap can only open and close so many times during its lifetime, keeping track of when you feed it is critical.

    Remove the blossoms when the plant begins to flower in May or June. Flowering results in the development of seeds, which depletes the plant’s energy.

    The predatory effect of the Venus flytrap is more critical than its blossoming beauty.

    Light

    From spring to fall, you must ensure that your container plant receives at least 12 hours of sunlight daily. Four of those hours should be spent in direct sunlight.

    Soil

    Venus flytraps reside in bogs with damp, acidic, nutrient-depleted soil. Indoors, use peaty potting soil and adequate drainage to simulate this.

    Water

    The Venus flytrap thrives when watered with rainwater rather than conventional tap water.

    Install a rain barrel or leave a container outside to collect rainwater. Distilled water should be utilised if rainfall is not available.

    Fertilize

    Do not fertilise. The Venus flytrap thrives on nutrient-deficient soil. 3 It behaves exactly as it does in its natural bog habitat.

    Species of Venus flytrap

    Plant breeders have created numerous varieties of this unusual plant. Cultivars have vibrant names that emphasise the bizarre nature of the Venus flytrap.

    These cultivar names are often highly descriptive, highlighting a distinct quality that sets the cultivar apart from the many others. Here are a few examples:

    Dionaea ‘Petite Dragon’ is one of the smallest Venus flytraps, measuring only half an inch in diameter.

    Dionaea ‘Ginormous’ traps are at the opposite end of the spectrum, measuring 2.25 inches in diameter.

    ‘DC’ Dionaea Color is the most visible difference between the many species of Venus flytraps. Most traps have some green in them, while some are fully green.

    Others may combine red, yellow, green, and purple. The ‘DC All Red’ variant is entirely red.

    venus-fly-trap-

    Propagation

    The division is the simplest and most reliable method of propagating the Venus flytrap.

    Mature plants will develop offshoots in the early spring. Cut them off at the base with care to avoid injuring the roots.

    Fill pots 4 to 5 inches wide and at least 6 inches deep with new peat for growing media. Each pot must have a hole drilled through the centre.
    Fill up the holes with the trimmings. Maintain a steady moisture level in the soil and water it frequently.

    Protect the container from direct sunlight while allowing the plant to receive light.


    WARNING

    Because of over-collection and habitat degradation, wild populations of Venus flytrap, like those of other native species, have declined substantially.

    This plant should never be plucked in the wild; instead, it should only be obtained from nurseries that propagate their plants.

    The Venus flytrap is in the process of being potted and repotted.

    The Venus flytrap prefers a more acidic soil mix than most houseplants. Because peat moss acidifies the soil, a mixture of soil and peat moss or horticultural sand and an equal amount of peat moss is effective.

    Wood items with low pH, such as bark, sawdust, or wood fibres, are a feasible and ecological alternative to peat moss.

    Check to see if the timber has been chemically treated. Coconut fibre, a sustainable alternative to peat moss, is inappropriate since its pH is nearly neutral.

    Plant fertilisation is wasteful.

    Overwintering

    The plant stays dormant in the fall when daylight hours and sunshine decrease. It then loses its leaves and looks to die, even though it lives underground via rhizomes.

    This is normal, and you should not utilise artificial light to make up for the shorter daylight hours.
    Reduce the amount of water and place the plant in your home’s most beautiful space. Give it just enough water to keep the soil from drying up entirely.

    When the plant re-emerges in early spring, resume regular watering to keep it moist at all times.

    Plant pests and diseases that are common

    Although you might think that a bug-eating plant would be immune to pests, the Venus flytrap is occasionally attacked by aphids and fungus gnats.

    Because the bugs are so small, the plant cannot collect and consume them. Horticultural oil or insecticidal soap can aid with severe aphid infestations.

    Bacillus thuringiensis (BTI) can be used to naturally control fungus gnats.

    FAQ

    Is it possible for a Venus fly trap to injure humans?

    Even if you mistakenly insert your finger into one of the traps, the result will not be painful.

    Avoid poking your finger into the trap, as this will reduce the plant’s energy, which should be utilised to collect and eat insects.

    The herb is not poisonous to pets.

    What is the origin of the name “Venus flytrap”?

    The genus name (Dionaea) and the first half of the common name are associated with the Roman goddess of love because to the plant’s stunning white flowers.

    The species name muscipula (Latin for “mousetrap”) most likely refers to the closing “jaws,” which resemble a mousetrap when released.

    Where is the Venus flytrap native?

    They can only be found in the Carolinas.

    The post Venus Flytrap Cultivation and Care appeared first on https://gqcentral.co.uk

  • T5 Grow Lights – Giving Seedlings The Best Start Possible

    T5 Grow Lights – Giving Seedlings The Best Start Possible

    T5 grow lights are available in a variety of designs. T5 lights are typically two or four feet long, with one, two, four, six, eight, or twelve bulbs per fixture. These models work well for small plants, but larger varieties necessitate a larger model. Consider T5 fixtures with a plug-and-play style if you wish to save money. Some of the benefits and drawbacks of T5 lighting are listed below.

    Other LED or fluorescent bulbs have a shorter lifespan than T5 bulbs. T5 bulbs typically last six to seven years before needing to be replaced. T5s also have a much longer life span than LEDs, which can be quite costly. Consider T5s if you’re cultivating plants for medical or recreational purposes. They give off the most light and are the most cost-effective option. Grow lights can be either high-intensity discharge (HID) or low-intensity discharge (LID).

    Consider your personal preferences when selecting a grow light. Try a high-intensity discharge lamp if you need a lot of light for flowering. These lights are usually more expensive, but they can provide a wider range of light. They’re ideal for both vegetative and flowering growth because of this. They’re perfect for indoor grow rooms with a lot of space. It’s crucial to think about your specific needs when choosing T5 lights or high-intensity discharge lights.

    T5s have a higher brightness capacity, which is important for vegetative growth.

    t5 grow lights

    More light is required for optimal plant development during these times because photosynthesis increases. T8s, on the other hand, cannot be adjusted to boost the brightness of the vegetative or flowering stages. For indoor gardening, the T5s are a good choice. To get the most out of your grow space, it’s best to use high-output lights if you’re growing marijuana.

    When selecting T5 grow lights, keep in mind that the temperature and wavelengths of the light are important considerations. T5 bulbs should have a 6,500K colour temperature. Seedlings, microgreens, and fruits are all grown with T5s. The white T5s will be useful in propagation as well. Furthermore, they have a long lifespan. They can also be used to start new plants. This is an excellent option for both novice and experienced growers.

    For most people, a T5 grow light is the best option when growing indoors. T5 lights are less expensive to run than T5 lamps, but they are more powerful. In the same environment, a T5 grow light will not have the same effects on plants as a CMH, but it will produce more light intensity than a CMH or LED. Because the T5 tube is smaller, it can be placed closer to the plants. The intensity of light required by the plant is determined by the size of the T5 fixture.

    While LEDs are better for many growers, they can be costly, and many hobbyists may not be able to afford them. Because T5s do not generate heat, they are still a good choice for small plants and seedlings. They’re also less expensive than LEDs and use less energy than most incandescent bulbs. If you’re searching for a T5 fixture, you’ll want to make sure that it is matched to your developing style.

    T5 grow lights are available in a range of sizes. T5 bulbs are typically 5/8-inch in diameter, but different sizes are available. Plants that require blue or green light should be grown under a T5 light. A T5 grows kit with red or green bulbs in the bottom should be placed six to eight inches above the plant. This will aid in the absorption of light by the plants and will aid in their growth.

    Make sure to read the label and compare prices before purchasing T5 grow lights. T5 grow lights are often more powerful and have longer life spans than other types of lighting, despite their lower price. T5s may be used to cultivate a variety of plants, including herbs, and they can be grown both indoors and outdoors. A T5 is an excellent choice if you have limited space.

    Greenhouse Supplemental Lighting: Combining Sunlight and T5 Grow Lights

    What role does additional lighting play in greenhouse agriculture, and what are the main benefits?
    Outdoor gardening now necessitates the use of additional greenhouse lighting. It allows growers to continue crop production on short winter days and bad weather days by providing a constant light source in the greenhouse. When sunlight is combined with additional lighting, production costs are significantly reduced. During the day (when sunlight is at its strongest), each light is not on full power, and greenhouse lighting grids frequently spread lights out more than indoor cultivation. As a result, the lights consume less energy and cover a larger area, significantly lowering the cost per square foot of canopy.

    Light Transmission Through Greenhouse Glazing

    You may need to invest in a whole grow light system to get your grow room up and running. These systems are custom-built to fit your space and garden needs, and they provide the best artificial sunlight for your plants to thrive in. Our models provide long-term support for your garden, ranging from tried-and-true to cutting-edge. If you want to upgrade your system or replace existing lighting, we have a large selection of light bulbs and lamps. We provide the best options available because the bulbs you choose for your grow room are the source of your plants’ growth.

    When buying a T5 grow light, there are a few things to keep in mind.

    As a result of climate change, food production for our rapidly growing population has become a major issue. However, in order to increase food production, technology is attempting to alleviate the majority of the issues that the agricultural industry is facing. Sunlight has traditionally been the primary source of energy for photosynthesis, but it has proven unreliable in meeting rising food demand. People are now debating whether led grow lights or sunlight are preferable.

    When I first went online to look for grow light shelf units for indoor seed growing, I quickly discovered that they were way out of my price range. At the time, a three-shelf unit with lights cost well over $400 (and will cost around $600 in 2022!). This 3-tier garden grow light kit from gardener supply is a dream come true if you can afford to splurge on a grow light system.

    Explanation of the Flowering Far Red Light

    Throughout the growing process, high-pressure sodium grow lights are used, but they are especially popular during the blooming and fruiting stages. They produce a lot of red and orange light, which plants need in their later stages of life. hps bulbs explained and reviewed for more information.

    Any led light may theoretically be used as a grow light. However, depending on the stage of development reached by the cannabis plant, some work better than others. Any regular 150 watts led white light bulb, according to Zartarian, could adequately nurture a small cannabis plant in its early stages. As the cannabis plant matures, its demand for light will fluctuate. “As the plant matures and enters the flowering stage of its life, it requires much more light across a bigger area in order to grow effectively.” “This is where high-power, purpose-built grow lights come in handy,” Zartarian explained.

    During the Growing Season, Light and Plant Growth

    Raspberry Seedlings and Haskap SeedlingsLed lighting is absolutely adored by garden seedlings! Good seed germination necessitates a cold, full-spectrum light. This gives young plants an advantage before they have to contend with the elements outside during the growing season. As a result, healthier seedlings result in faster plant growth and higher yields in the future. Additionally, because led lights are flush with the shelf, you’ll have a lot more room for multiple seed trays, even if you’re growing in a small space!

    In a greenhouse, a fast-growing plant and a healthy crop require more than simply water and soil. It’s also important to have the right amount of lighting. Growers frequently make the mistake of installing a large number of hps lights and placing them too close to the plants. Heat is generated by HPS lights. Furthermore, the lamp near the plant may cause the leaves to burn. Led grow lighting is one of the most promising forms of supplemental lighting for greenhouses, so let’s take a closer look at it because these lamps offer many advantages over other types of lamps and also because it is a new stage in the development of horticulture lighting.

    The post T5 Grow Lights – Giving Seedlings The Best Start Possible appeared first on https://riskinabox.org

    The post T5 Grow Lights – Giving Seedlings The Best Start Possible appeared first on https://wookicentral.com

    The post T5 Grow Lights – Giving Seedlings The Best Start Possible appeared first on https://gqcentral.co.uk